- Created by Andy R. Andersen, last modified by Jie Weng on May 02, 2023
You are viewing an old version of this page. View the current version.
Compare with Current View Page History
« Previous Version 36 Next »
The instructions below provides guidance for contractors with enrollment acceptance.
Access the To Do List from the Main Menu. The To Do list will automatically search for and show any EmPower+ Enrollments assigned to them by CLEAResult based on the customer's preference in the EmPower+ Application.
The To Do list should also be used when continuing an REA or EmPower+ Appliance Enrollment initiated by the same user.

Locate your enrollment and click on the Enrollment # to access the Enrollment Profile page.

Within the Enrollment Profile page, review the enrollment history and click on the Enrollment Acceptance hyperlink under open status. The page will redirect to the Enrollment Acceptance workflow step.

Contractors begin by determining if they should accept the enrollment. Review the Application Priority Reasons and the Details Provided by Customer in the Applicant Information section of the Workflow Step Detail tab to determine if this is an enrollment that should be accepted or rejected.
If the contractor selects Rejected from the Outcome, they will be required to select a reason and add a note to the Notes tab explaining in as much relevant detail as needed to help CLEAResult know what to do with the enrollment when it is pushed back to them to select an alternate contractor.
If contractor select On Hold from the Outcome, they will be required to select a reason. Once Save is clicked, two new fields will appear in the On Hold Information section to document the reason for the hold and include a reminder date that will allow the system to send an email notification on that date to the contractor who placed the enrollment on hold. Enrollments on hold cannot be processed until the hold is removed.

If Contractors cannot process the enrollment acceptance step by the due date, they can extend the due date by 5 business days after clicking on the Extend Due Date button.
Contractors may only extend the due date once, if pass due, the system will automatically process the step as rejected because of due date expired.
Extending the due date will force a New Note window that must be completed before the enrollment due date can be extended.

Notes and Documents are optional for this step. See the NY Home Energy Portal Overview for more guidance on how to add or upload notes and documents.
When all the required fields are completed, the contractor may Process the step by clicking Process. The Work Scope Submission is going to change the assignment status to New and It will be assigned to the Contractor.
Once a step in any enrollment is processed, contractors will always be returned to the Enrollment Profile - Workflow page to access or review the next step.

The instructions below provides guidance for contractors with the Workscope Submission step.
The Workscope Submission will be assigned to the Contractor who accepted the Enrollment Acceptance step.
When the Workscope Submission is in the New status, complete the following on the Applicant Information tab.
The fields will be prepopulated by the Salesforce API call when the enrollment is created. If the contractors leave outcome as Accepted, they should review this page, including the Project Type.
If the contractor selects Rejected from the Outcome, they will be required to select a reason and add a note to the Notes tab explaining in as much relevant detail as needed to help CLEAResult know what to do with the enrollment when it is pushed back to them to select an alternate contractor.
If contractor select On Hold from the Outcome, they will be required to select a reason. Once Save is clicked, two new fields will appear in the On Hold Information section to document the reason for the hold and include a reminder date that will allow the system to send an email notification on that date to the contractor who placed the enrollment on hold. Enrollments on hold cannot be processed until the hold is removed.
Proceed if the Project Type is set as Full Comprehensive or Muni Install. Audit Install is for non invasive measures, unless you are able to obtain the landload approval, in which case the Project Type can be changed to Full Comprehensive.
No project should be changed to a Muni Install unless directed by NYSERDA or CLEAResult.
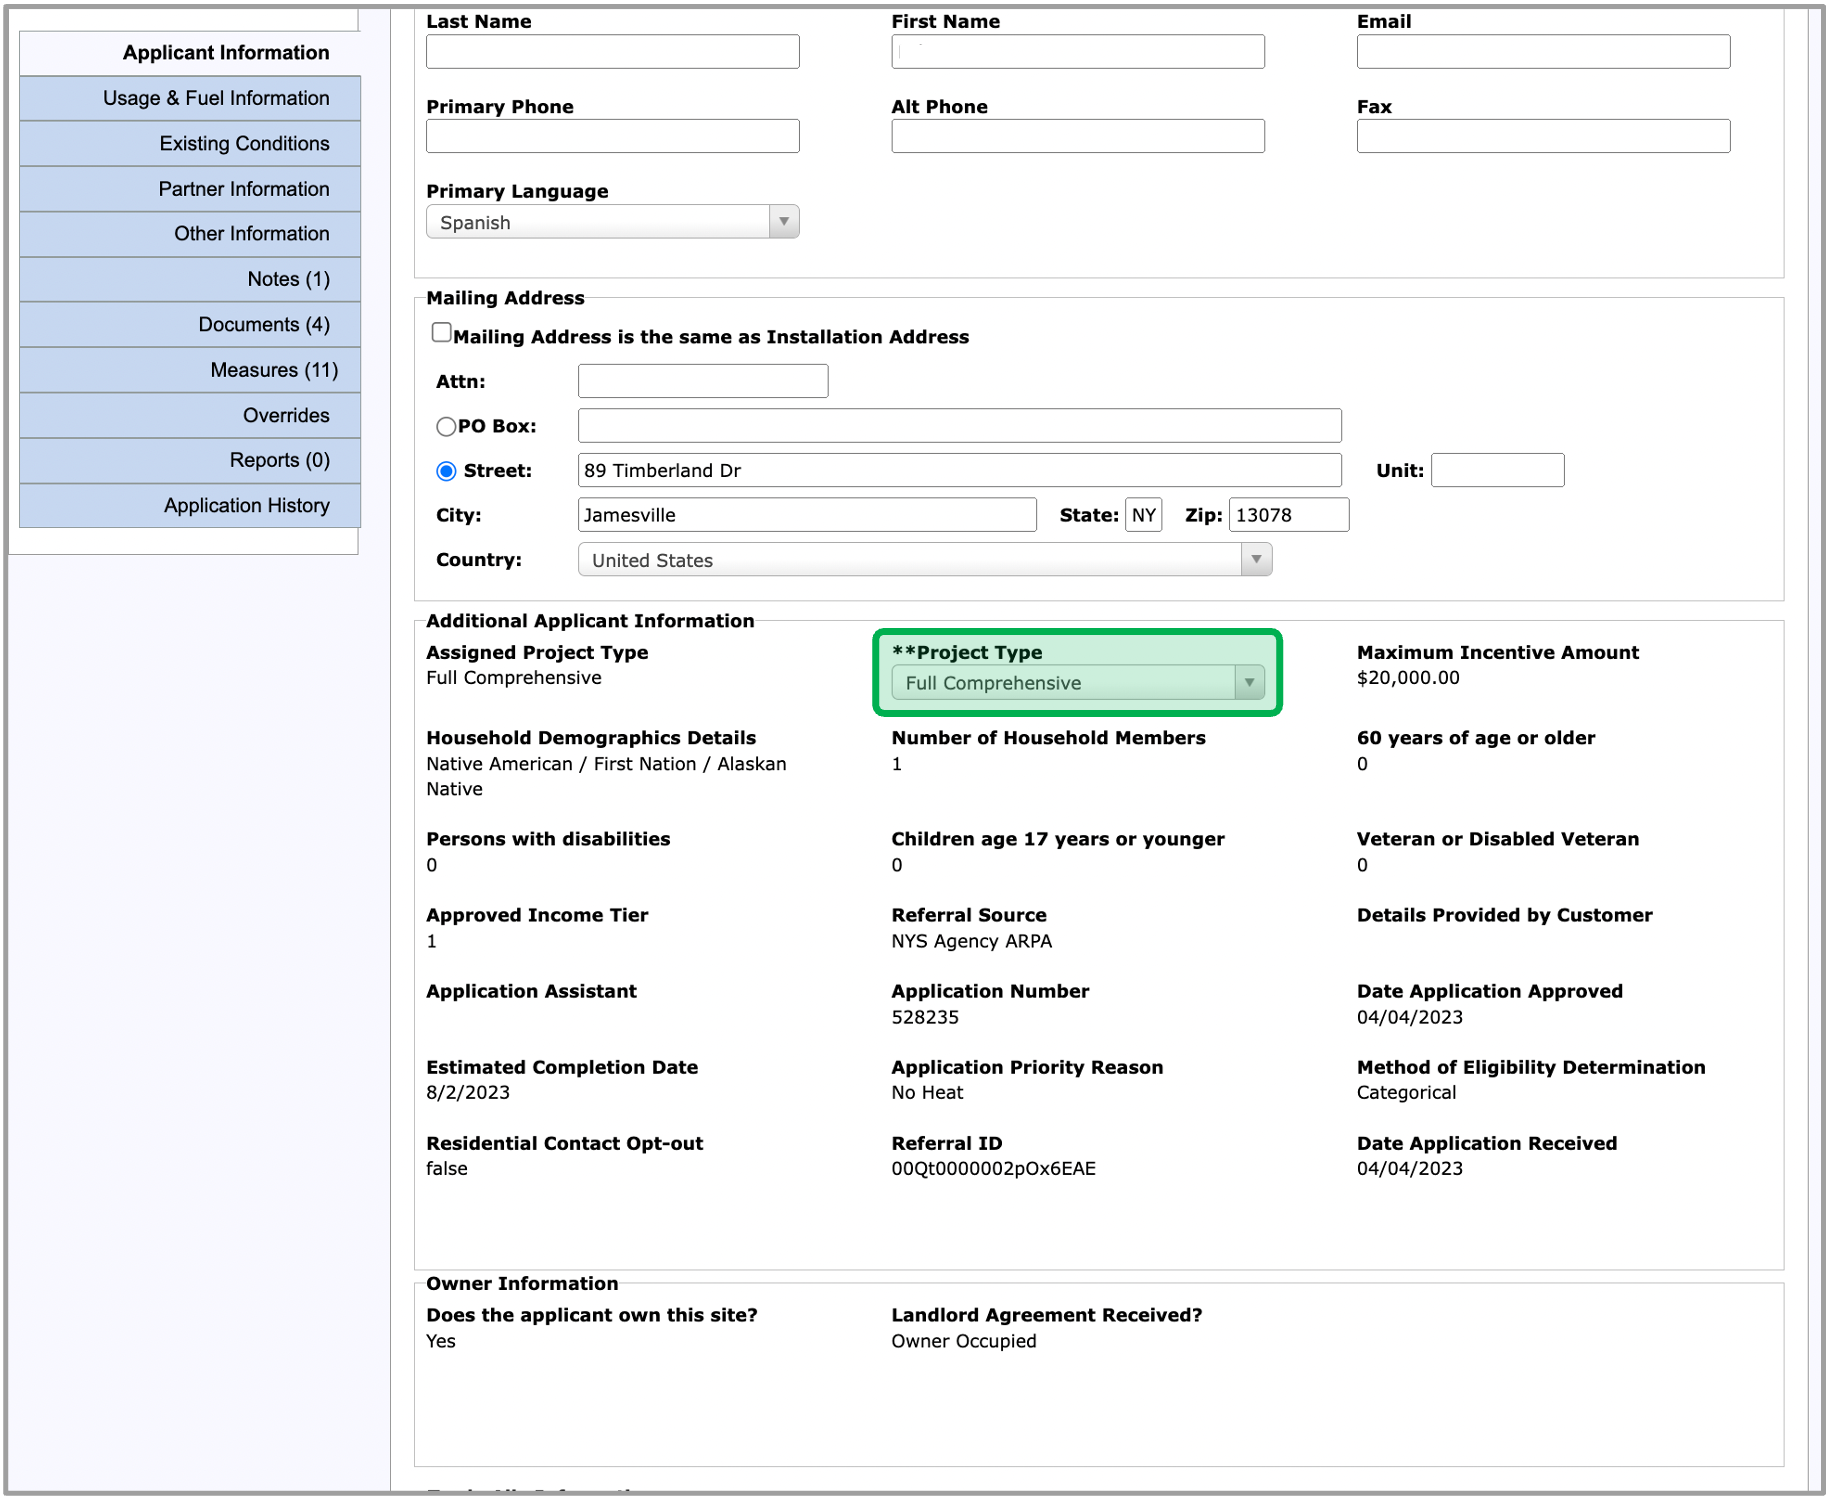
Once all of the required tabs are filled out, click the Save button and move on to the Usage & Fuel Information tab.
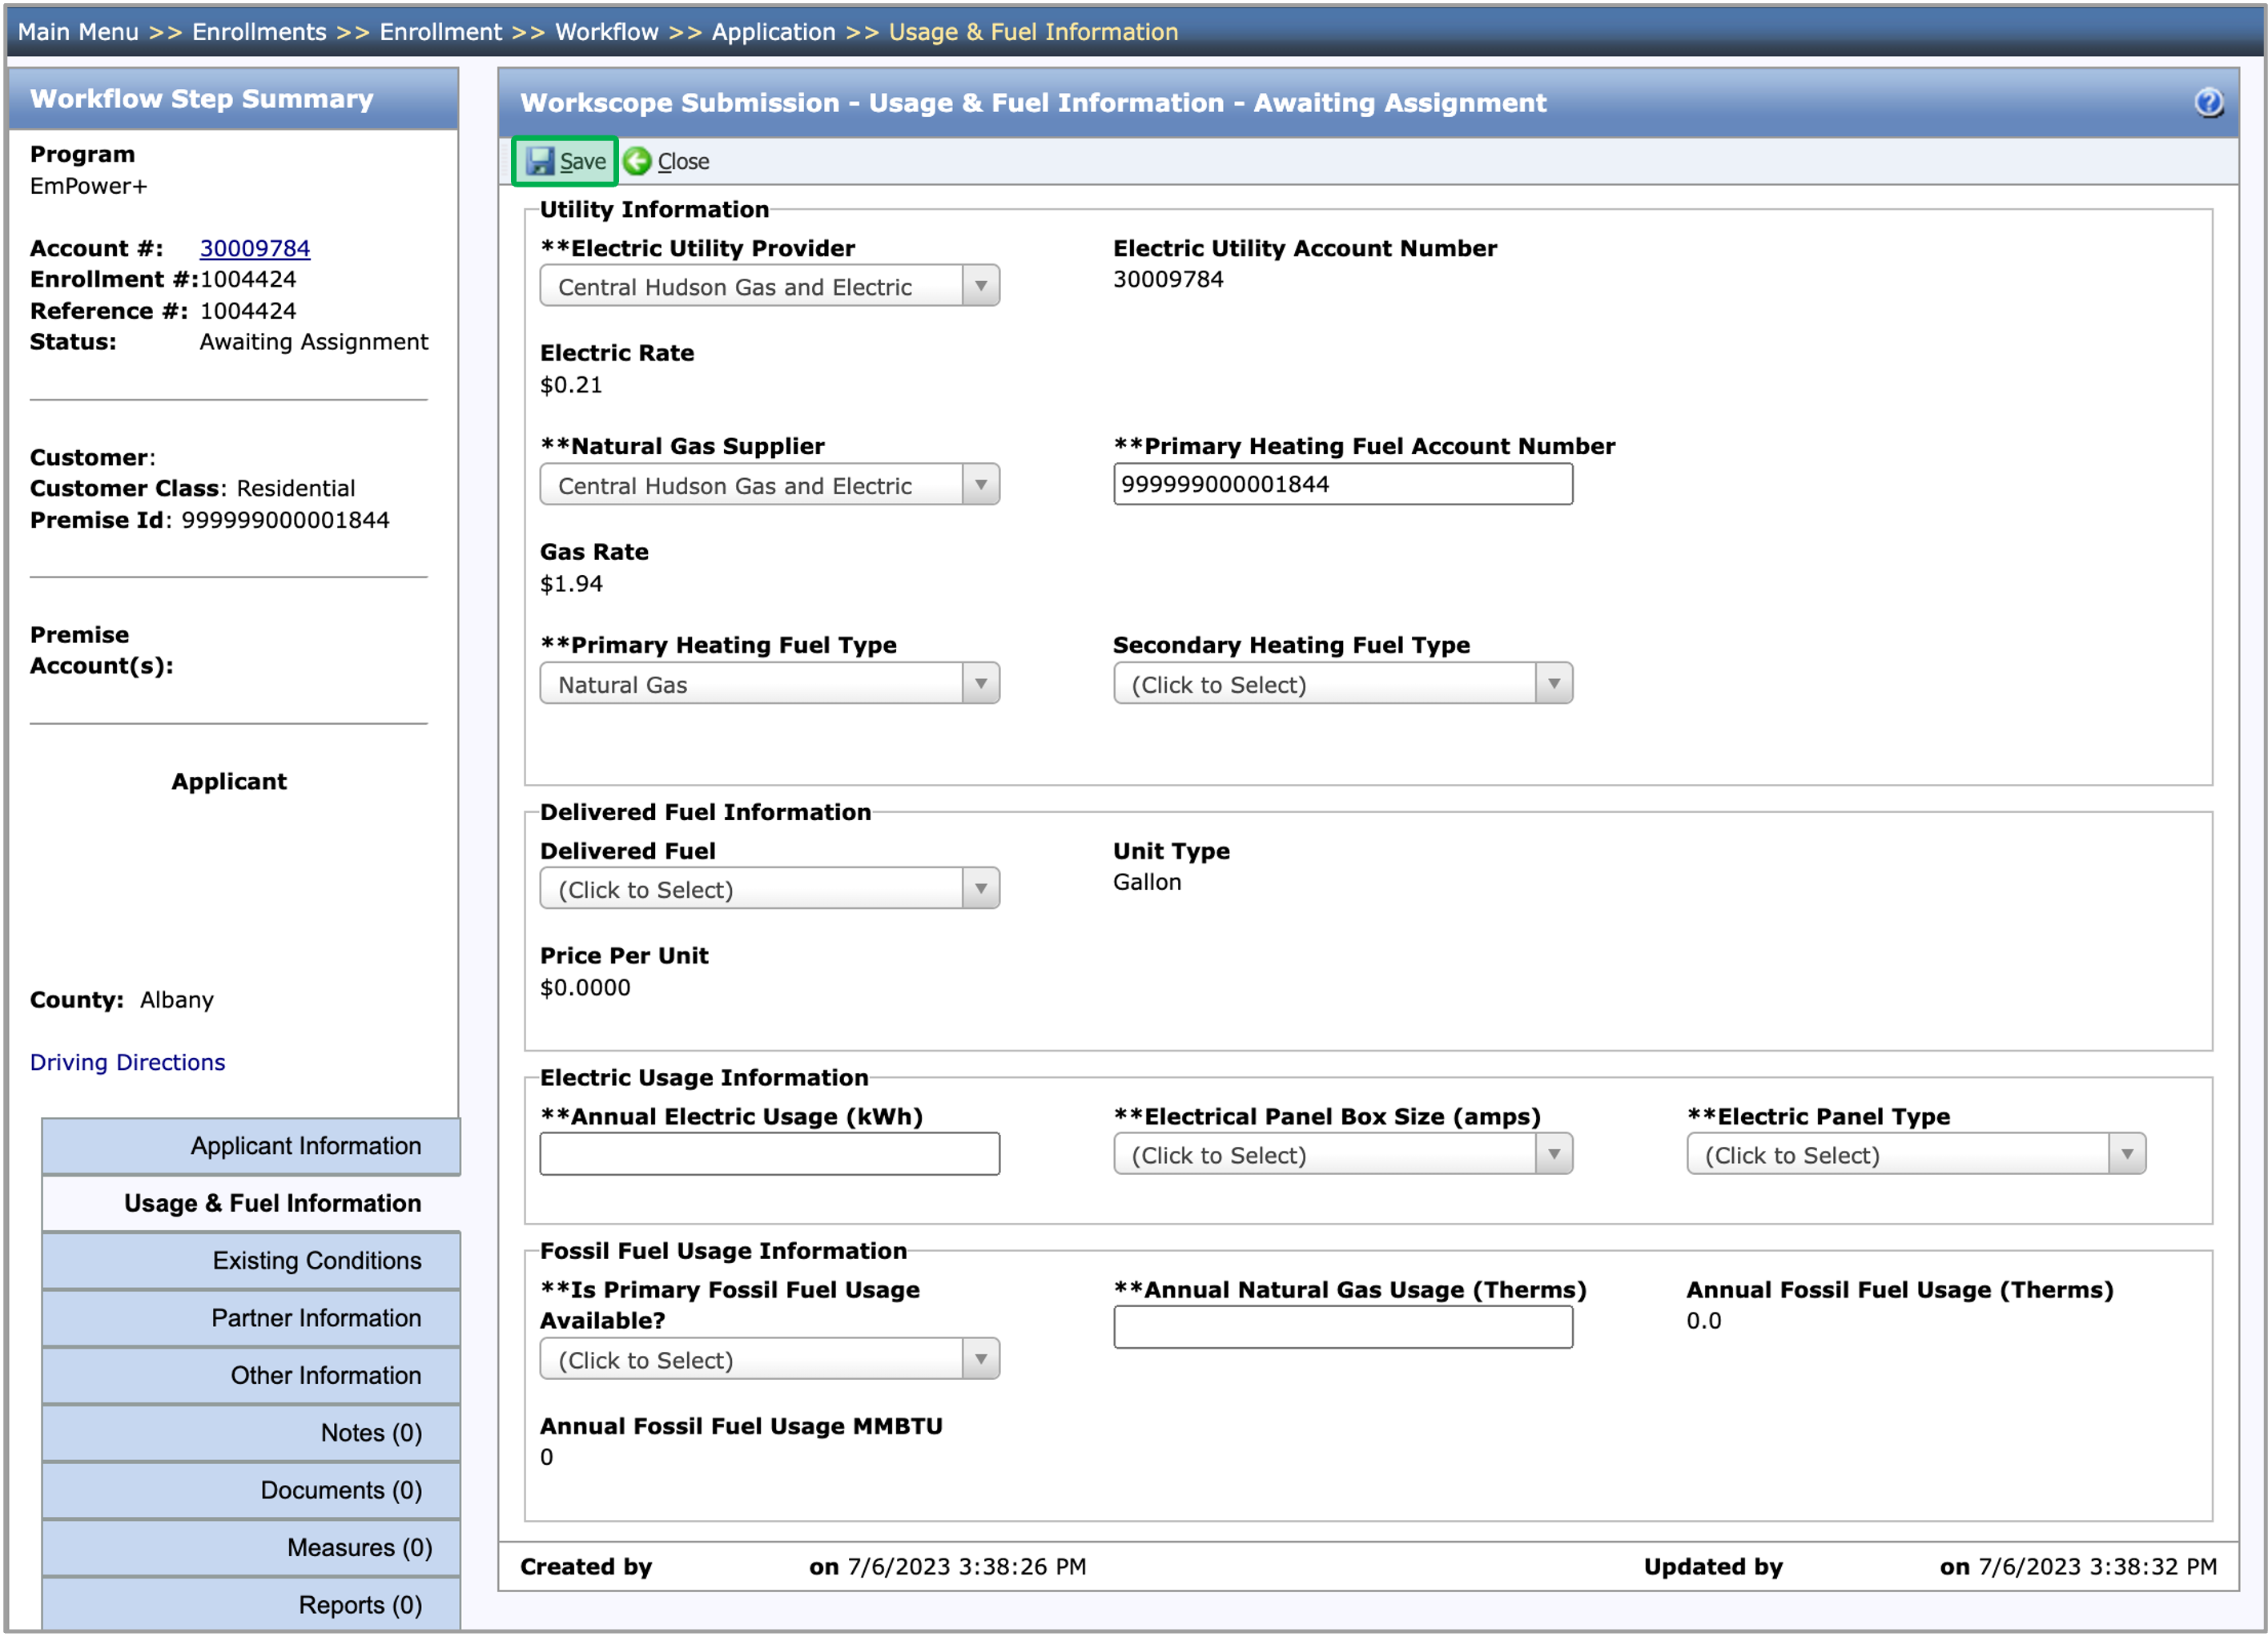
The instruction below provides guidance for contractors to complete the Usage & Fuel tab.
Information in the Utility Information section on this tab will come from the Combined Residential Application for EmPower+ Enrollments but can be updated or changed if needed.
On the Usage & Fuel tab, fill in all of the required fields that contains two ** (asterisk).
Some of the non-editable fields on this tab are calculated based on information added to editable fields.
Once all of the required fields are complete, click the Save button to save the Usage & Fuel information.
The instruction below provides guidance for contractors to complete the Existing Conditions tab. Benefit to completing this information upfront will provide us pre-filled information in the Measures tab.
Any insulation areas that will be proposed for improvement must have the corresponding Existing Condition filled out (ie. If they are proposing garage ceiling insulation, they must fill in the garage ceiling fields in existing conditions).
On the Existing Conditions tab, fill in all of the required fields that contains two ** (asterisk).
The first two fields are preset and not editable for EmPower+ Enrollments.
If the Needs Improvment option is selected under the Summary Section, you would be required to add at lease 1 associated Measure on the Measures tab to address the condition.
Once all of the required fields are complete, click the Save button and move on the Parner Information tab.
Some fields on this screen become Conditionally Required based on responses to previous fields. Those Conditionally Required fields will not include a **.
Conditionally Required fields are often fields that will appear based on responses to previous fields. If you try to process the step without completing those Conditionally Required fields, the system will prevent you from processing the step until you complete those fields.

The instruction below provides guidance for contractors to complete the Partner Information tab.
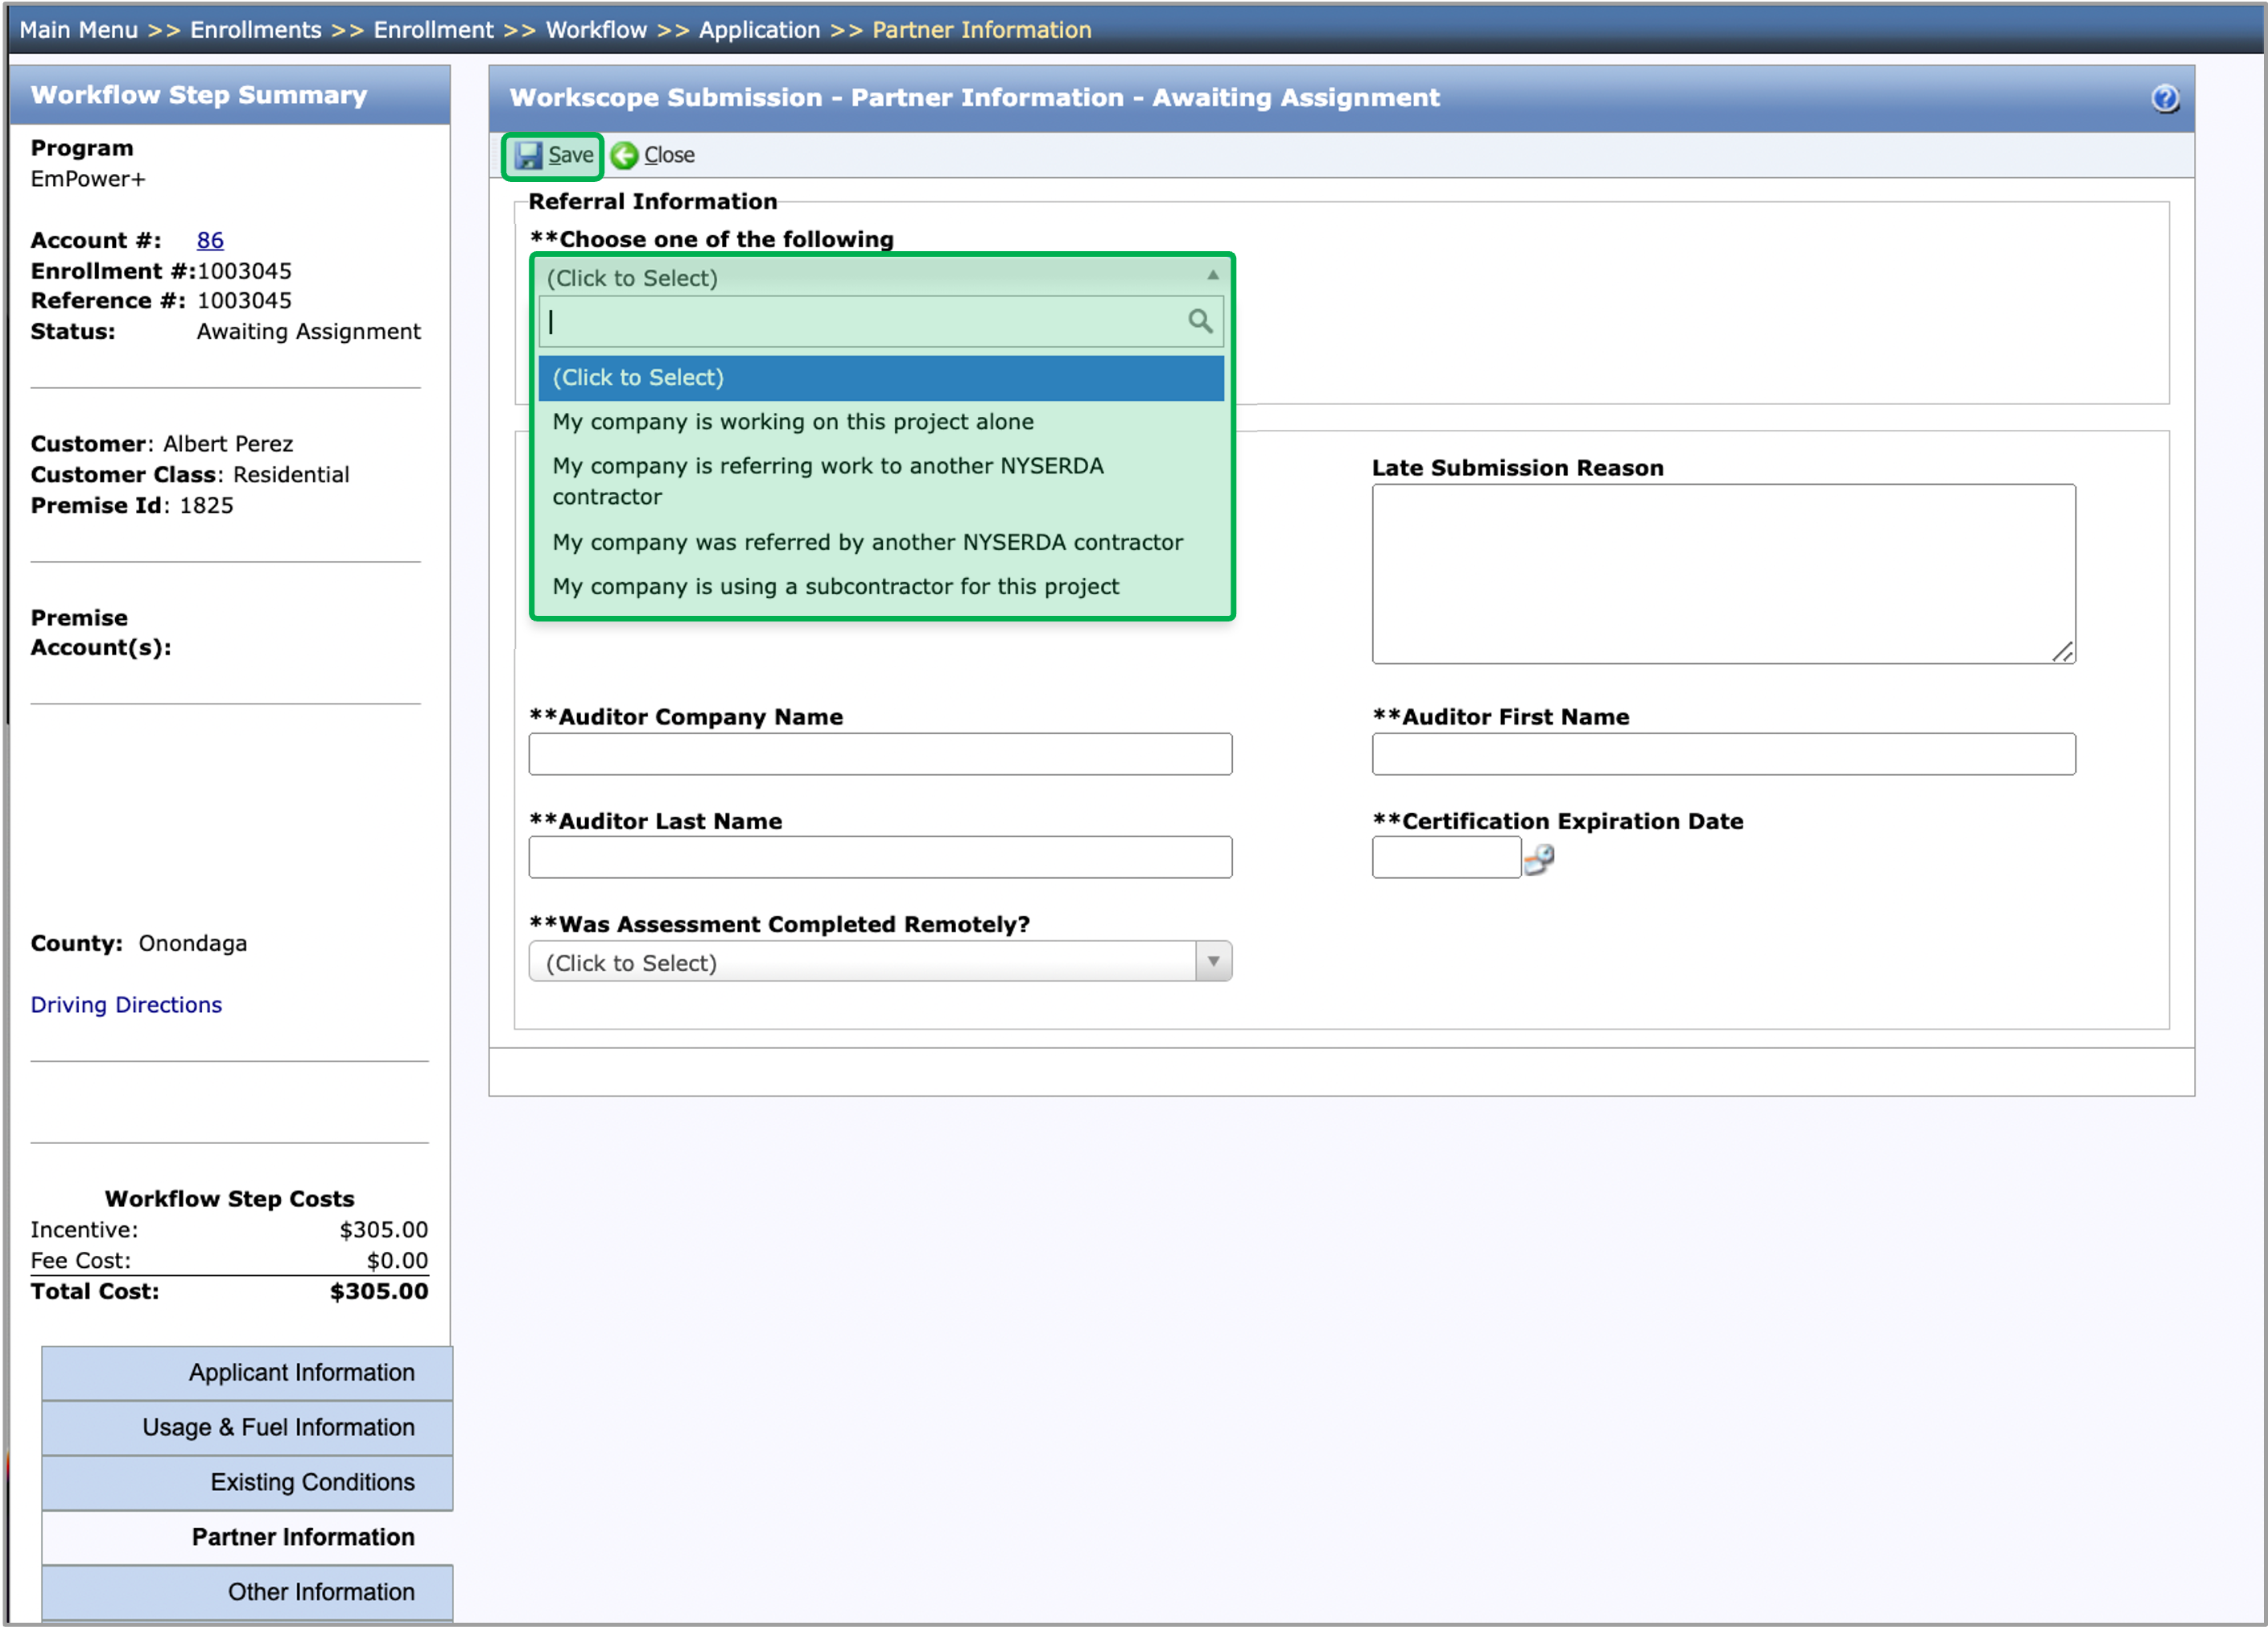
On the Partner Information tab, choose an option under the Choose one of the following drop-down list.
Depending on the option selected, additional required fields will become visible.
Fill in all of the required fields that contains two ** (asterisk).
Depending on the option you select, you may have to respond to additional questions.
Once all of the required fields are complete, click the Save button and move on the to Other Information tab.
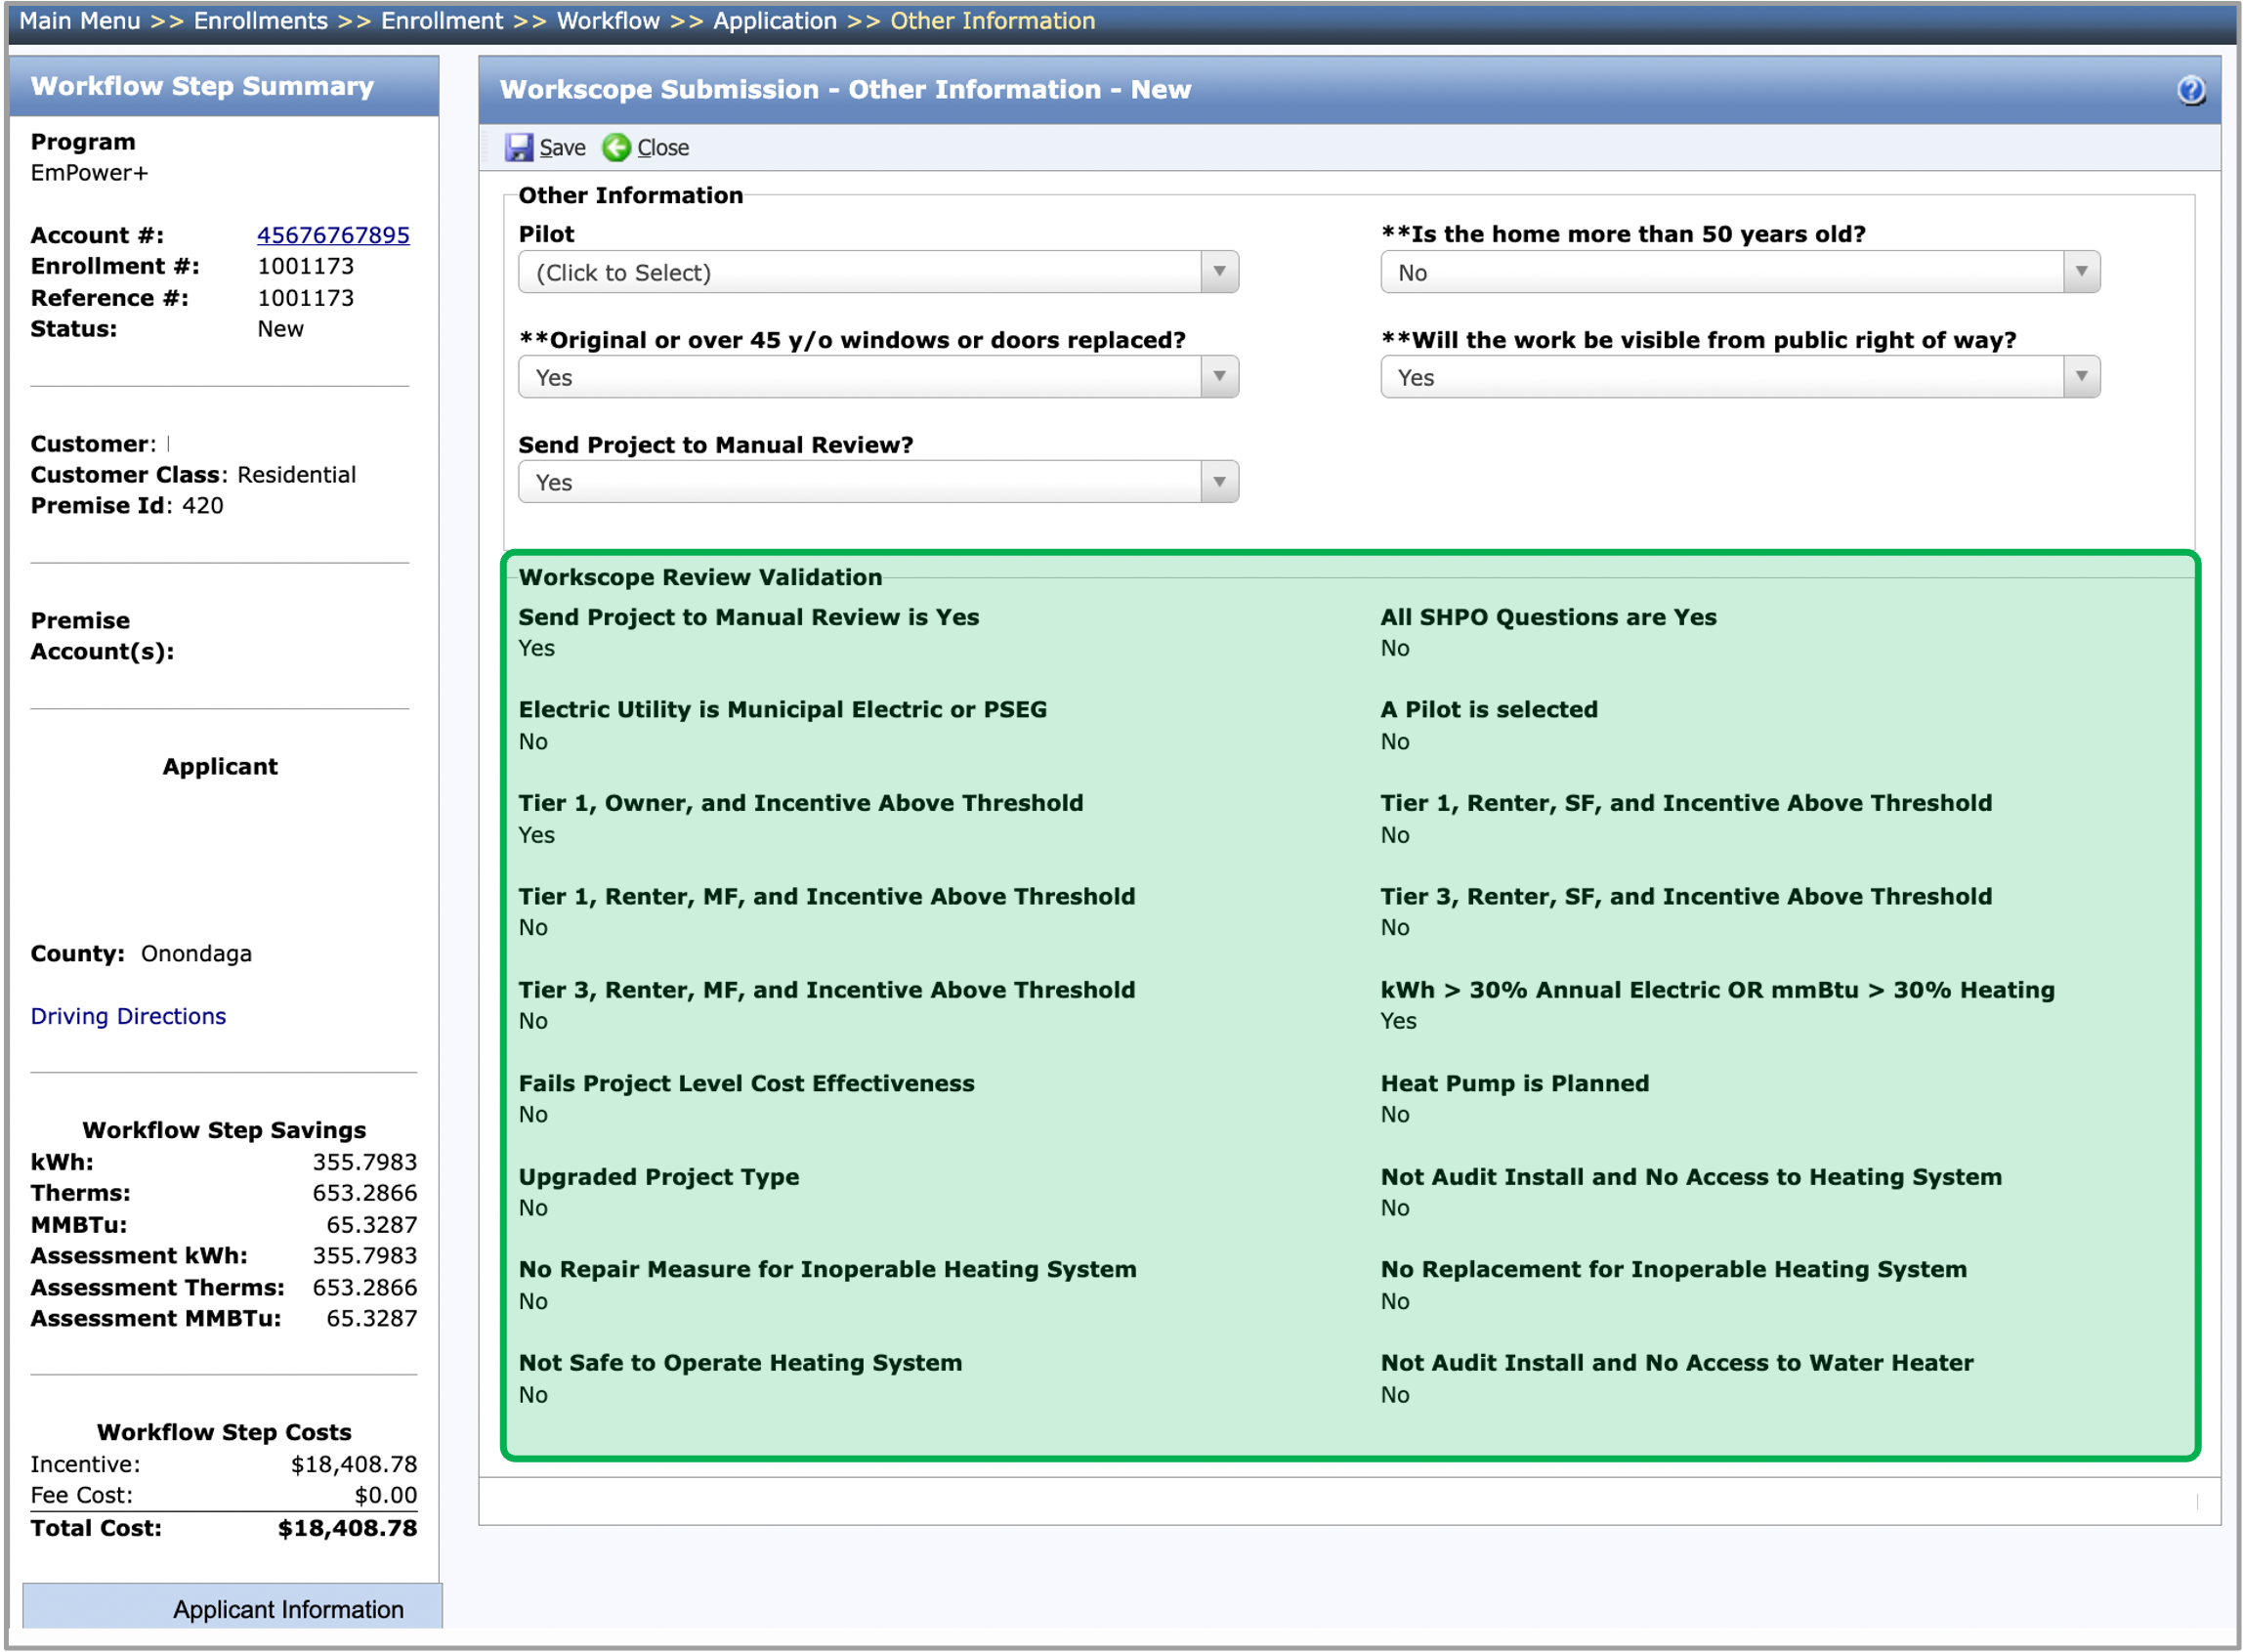
The instruction below provides guidance for contractors with the Workscope Review Validation field group in the Other Information tab.
Workscope Review Validation is to help the Contractor understand if the enrollment will be required to undergo a Manual Review by CLEAResult. It is suggested to return back to this tab before processing to confirm if changes made to other tabs will effect the Manual Review requirement.
On the Other Information tab, locate the Workscope Review Validation field group.
The 2nd, 3rd, and 4th drop downs all deal with the State Historical Preservation Office. If Yes is selected for those drop-downs, the All SHPO Questions are Yes validation will turn into a yes. In this case, a manual review by CLEAResult will be required and the contractor will be required to upload the SHPO form as well.
If any of the Workscope Review Validations indicate Yes, it signifies that this enrollment will be required to undergo a Manual Review by CLEAResult before you can begin the Final Project Submission.
If all of the Workscope Review Validations indicate No, the workscope will be auto-approved and work may proceed. The NYHEP will move the project to Final Project Submission.
If you would still like ClearResults to provide a manual review, select the Yes option under the Send Project to Manual Review? drop-down.
If the Project Type is Audit Install, the Final Project Review step will be generated next.
Once all of the required fields are filled out, click the Save button and move on to the Notes or Documents tab.
The instruction below provides guidance on how to add notes within Enrollments and Customer Records.
Notes added to an enrollment can be accessed during any other workflow step for the same enrollment and are accessible to anyone with access to the specific enrollment.
To see these instructions in action, watch the training video below:
To add a new note, access the Note tab and click the New Note button. A new Note dialog will open.
Notes can be added to any Record or Enrollment in the NY HEP where a Note tab is present.

Fill in the Notes field.
The Note Date and Note Time fields will automatically populate with the current date and time. Users can change these fields if needed. The system will still document the actual date and time the note was created as well.

The Who can view this note? field will default to Users with access to this enrollment.
For Contractors, it does not matter what option is selected for this field as anyone with access to the enrollment will also have access to the workflow step. It is best to leave this field alone.
If the This is an Interaction checkbox is checked, a drop-down will appear allowing Contractors to add this note to one of the available reports.

Click Save to save the new Note.
Once a note is saved, Contractors cannot edit or delete it. Be sure to review the note carefully before clicking save.

The instruction below provides guidances on how to upload document(s) within an enrollment. A red exclamation mark will be displayed under the Required column indicating the document type being a Required Document.
Multiple documents can be uploaded at the same time:
PC Users: CTRL + Click
Mac Users: Command + Click
To upload a Document, access the enrollment's Documents tab during any step.
Click the New button for the Document dialog will open.

Click Browse to select a file to upload.
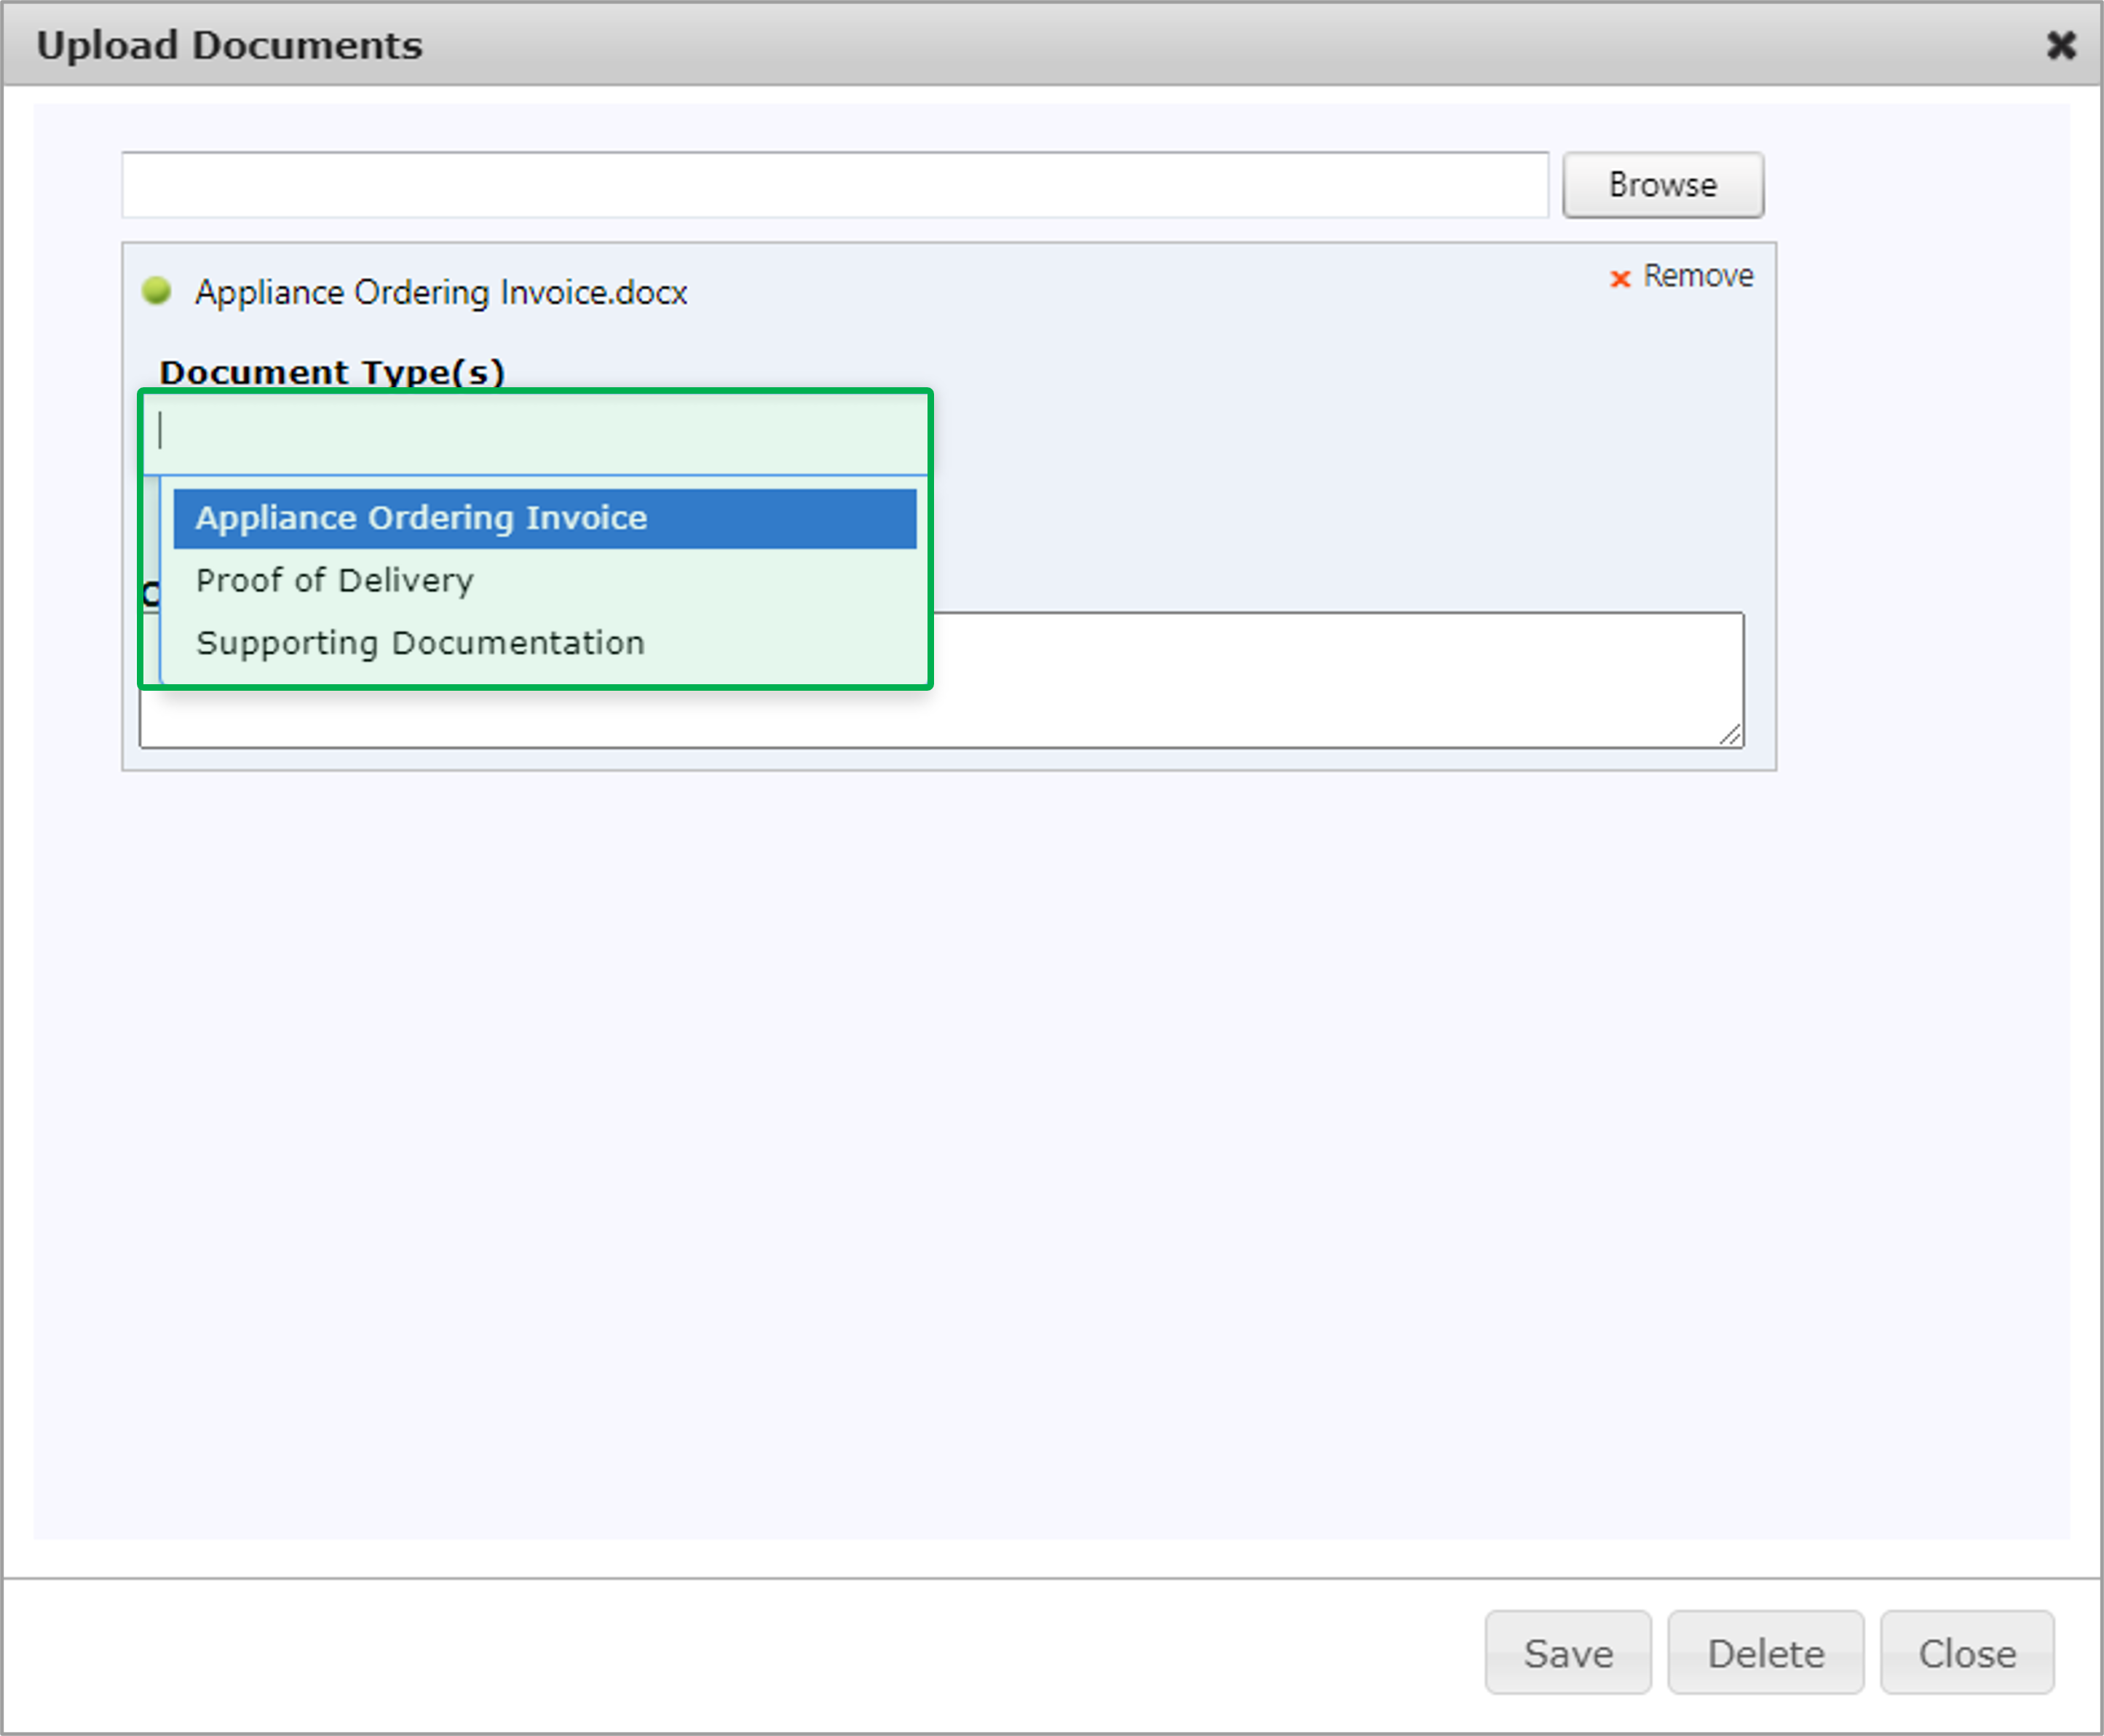
Multiple documents can be uploaded at the same time.
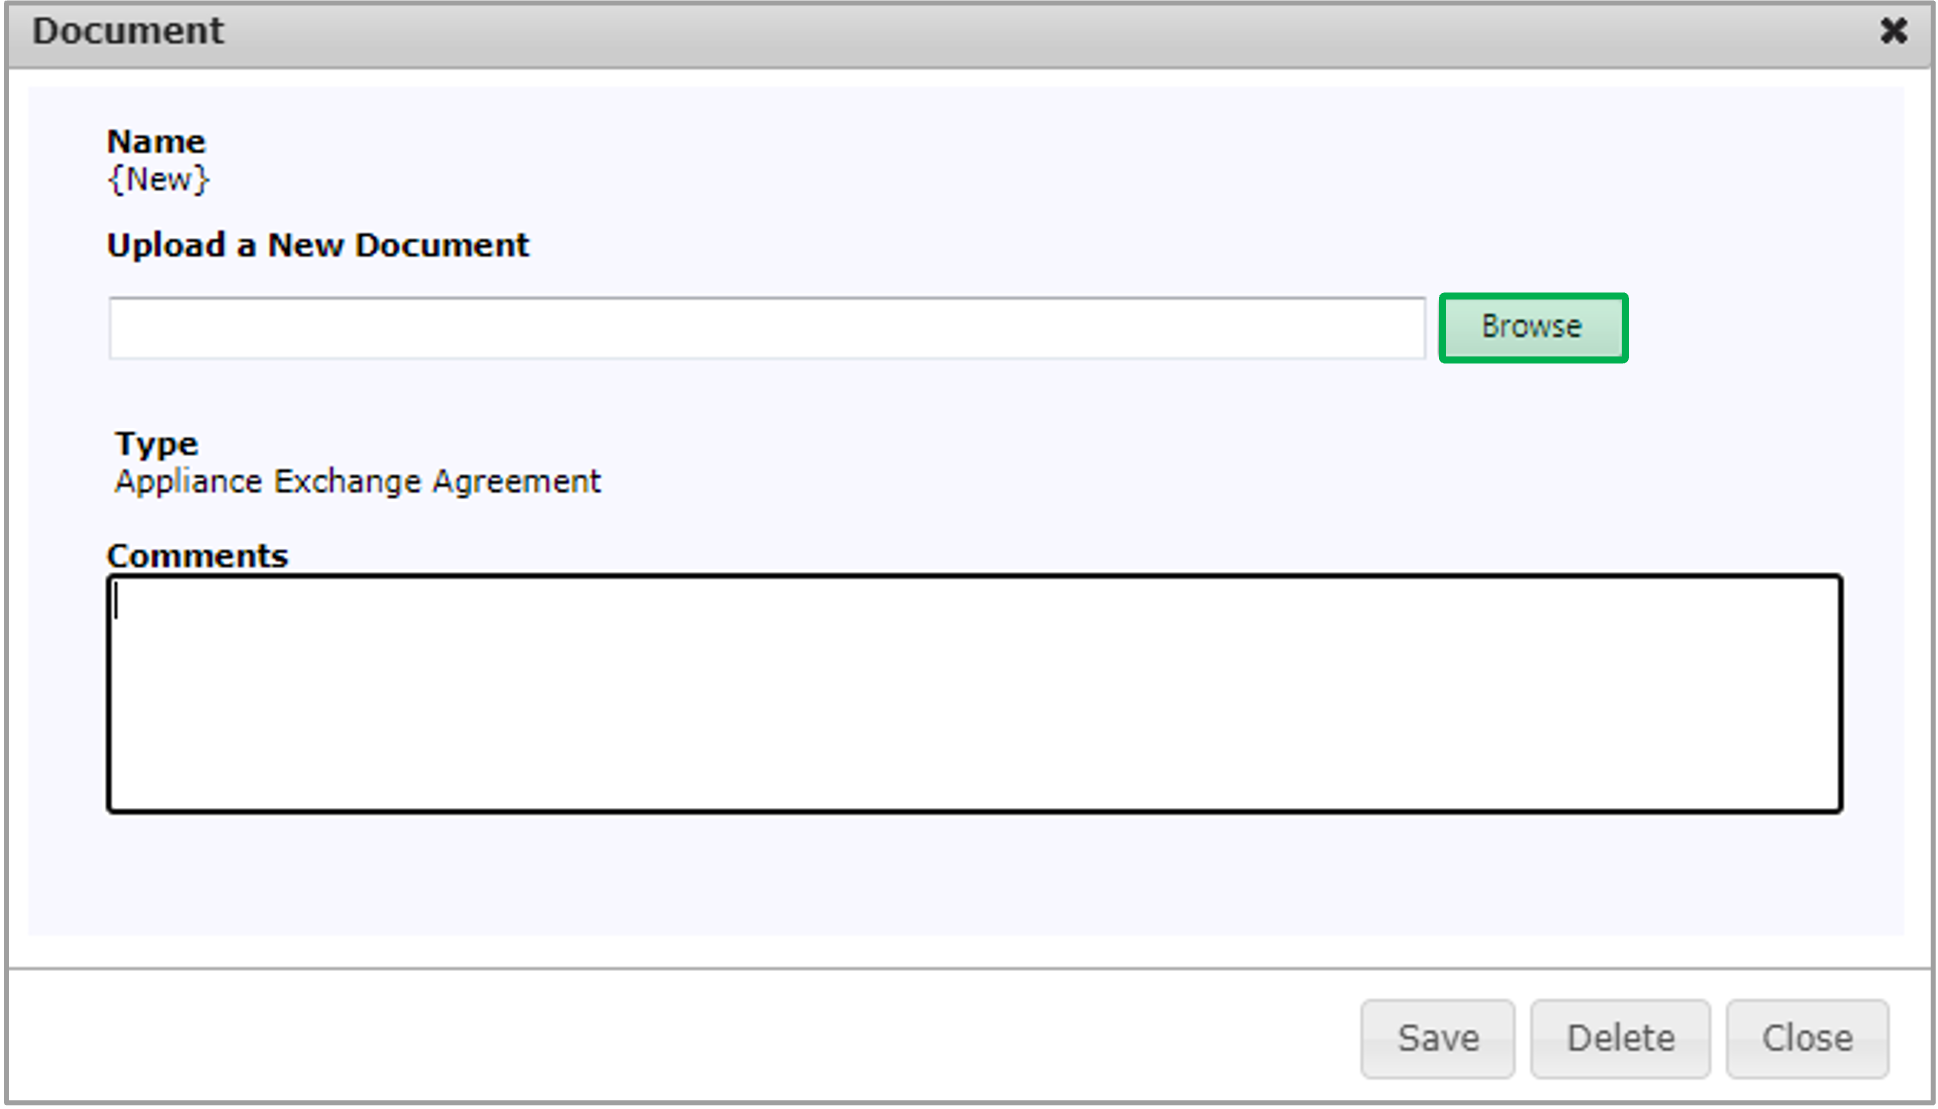
After the file is uploaded for the Document Type, click Save and then click Close to upload the file and close the dialog.
After you’ve selected a file, you can remove it by clicking the x Remove button.
This is the Contractors last opportunity to click Remove to not upload a specific document. Once Save is clicked, the document becomes a public record and it cannot be edited, deleted, or otherwise overwritten. If the wrong document is uploaded, Contractors will need to upload the correct document and use the Comments fields to let both CLEAResult and NYSERDA know which is the correct document to review.
To download and view an uploaded document, click the Document Name Hyperlink.

The instruction below provides guidance for contractors to complete the required data entry fields when adding measures to the Workscope Submission step.
Some measures will automatically be added to the Measures tab. For measures that are automatically added, they should NOT be deleted. If any of those are deleted, Contractors will have to manually add them back otherwise the system will not allow the Contractor to process the step.
As Measures are configured, calculations for Measure Cost, Incentives, and Savings will begin to populate. Contractors may need to click the Save button a few times to have calculations show correctly. Newly added measures will always appear at the top of the list to make them easier to find and configure. Clicking save will alphabetize all measures but the Funding Information measure. That will always be at the bottom and sums up the calculations for all other measures. Once a new measure is accessed to configure, the previous measure will become read only until it is clicked in again. Be sure to save before leaving this tab otherwise the added and configured measures will be lost.
For a full list of all program measures that may help with this tab, please access the NY HEP Measures List.
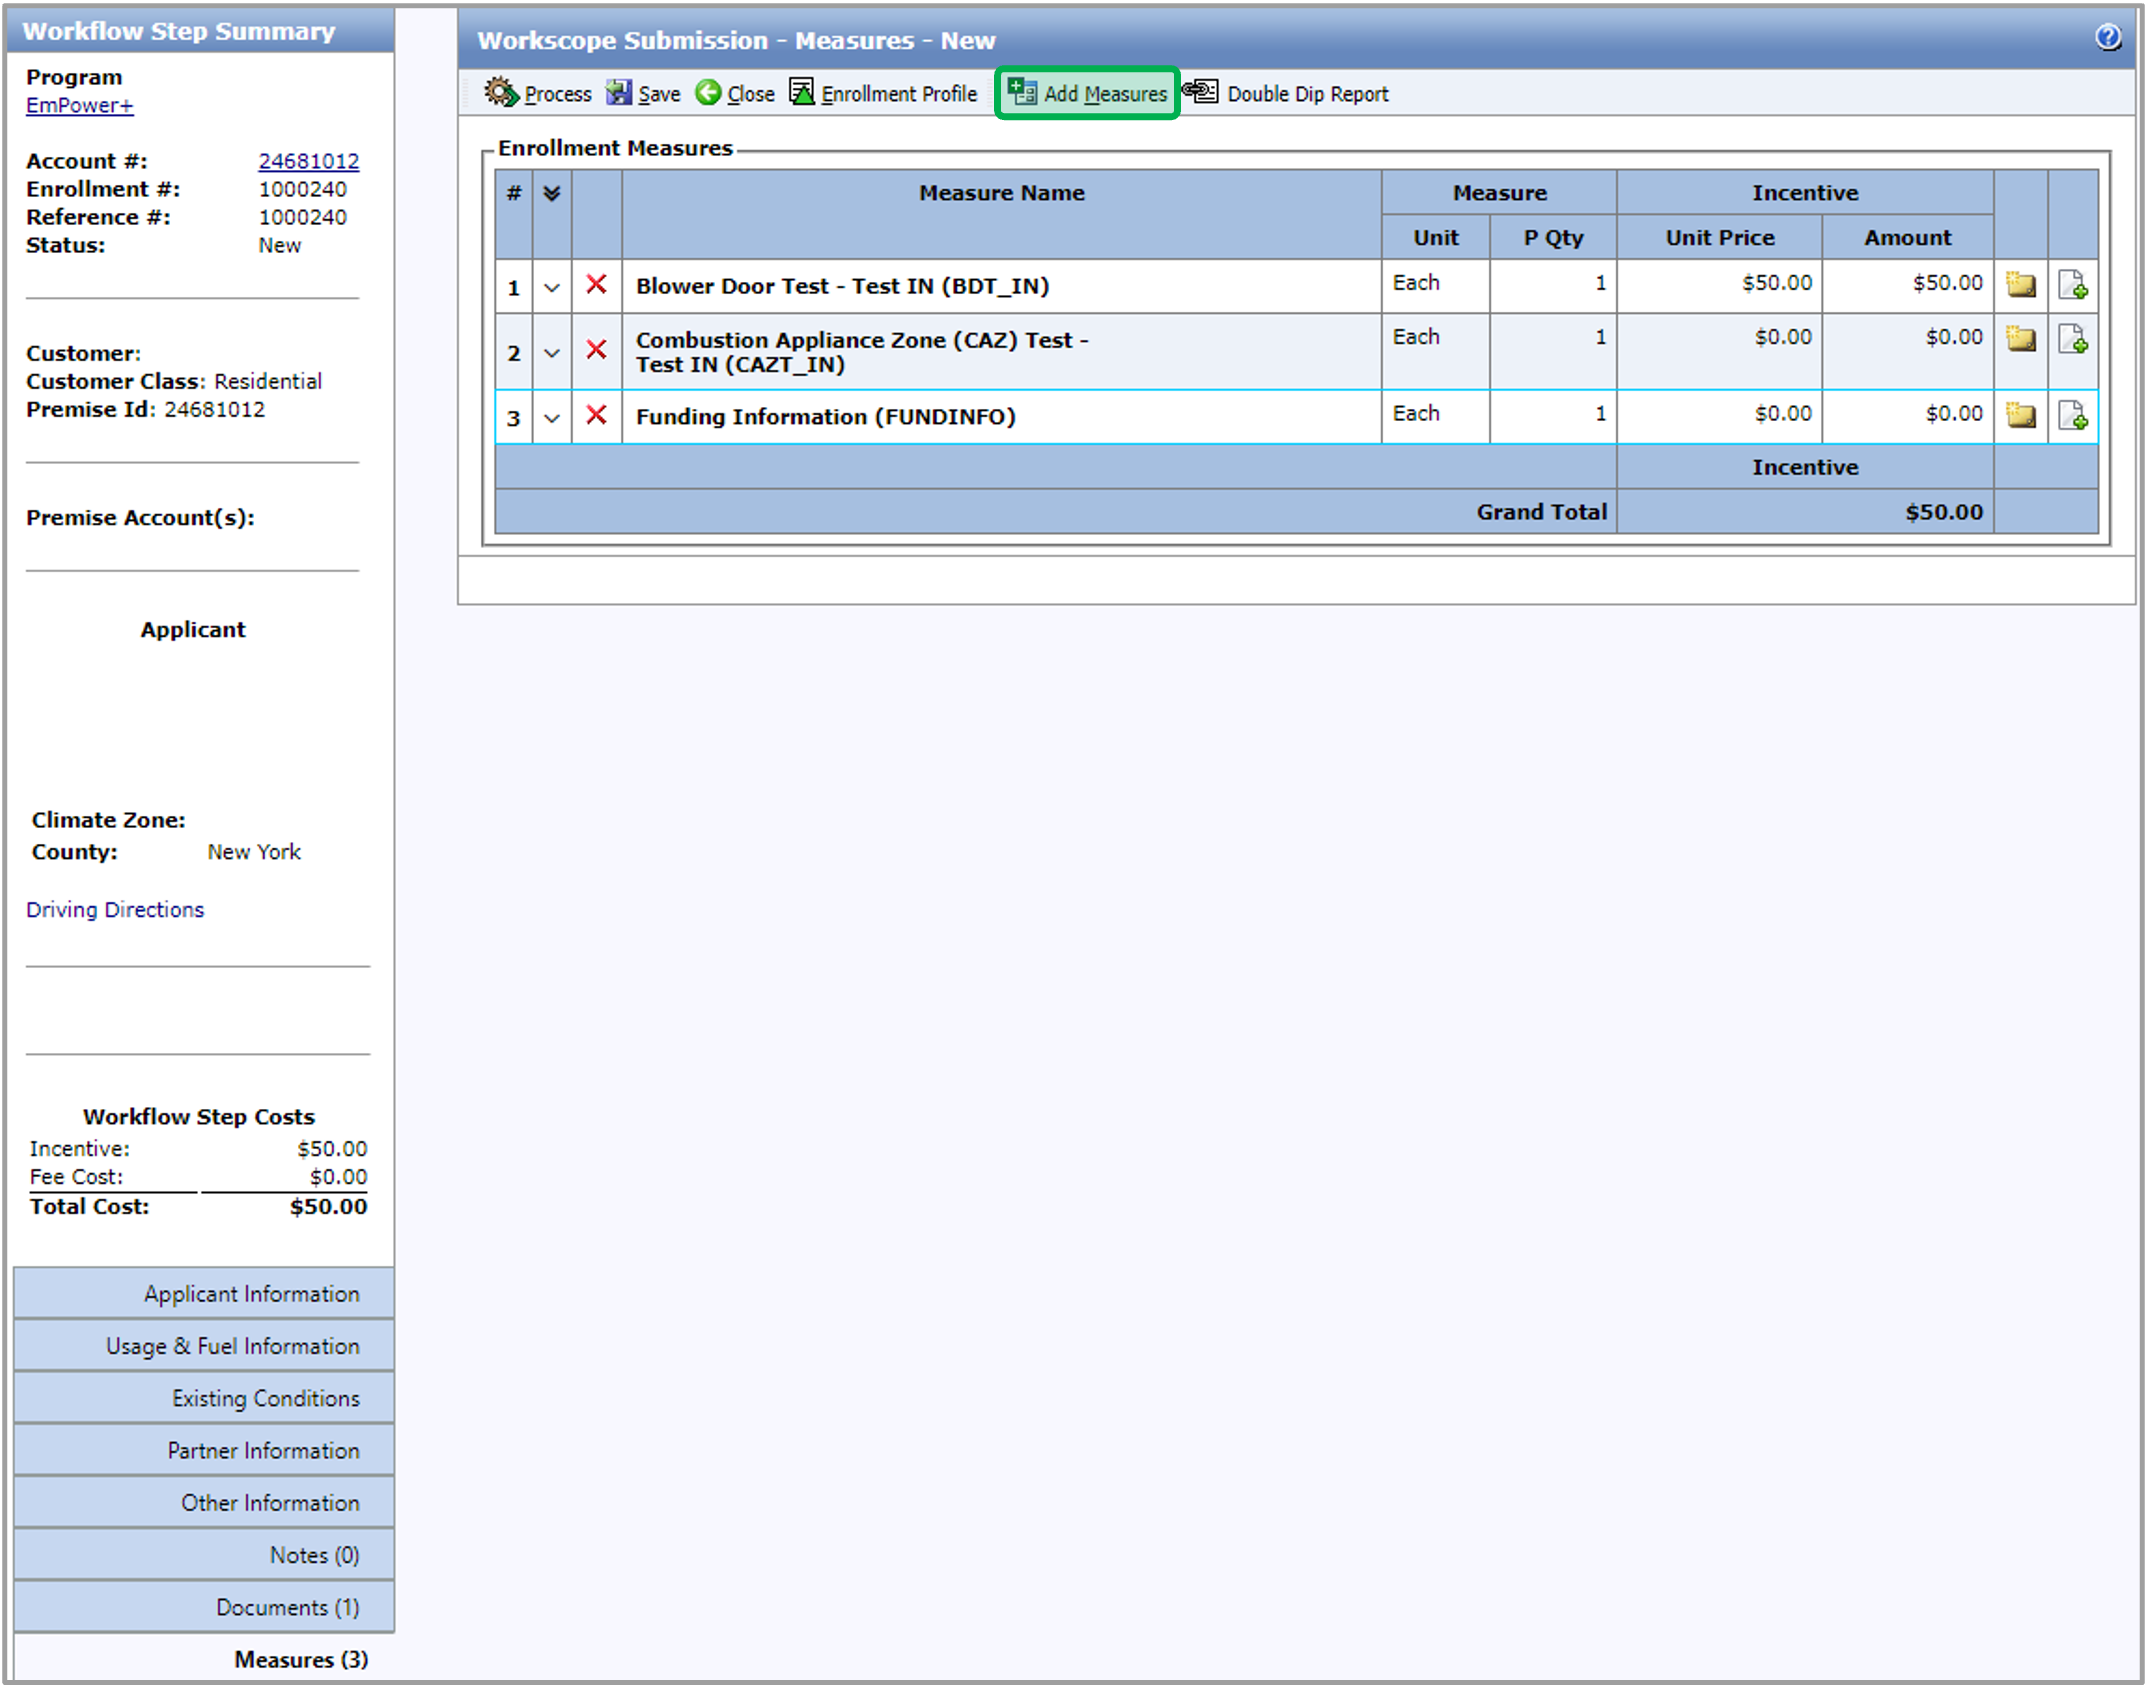
On the Measures tab, click the Add Measures button. The Add Measures dialog will open.
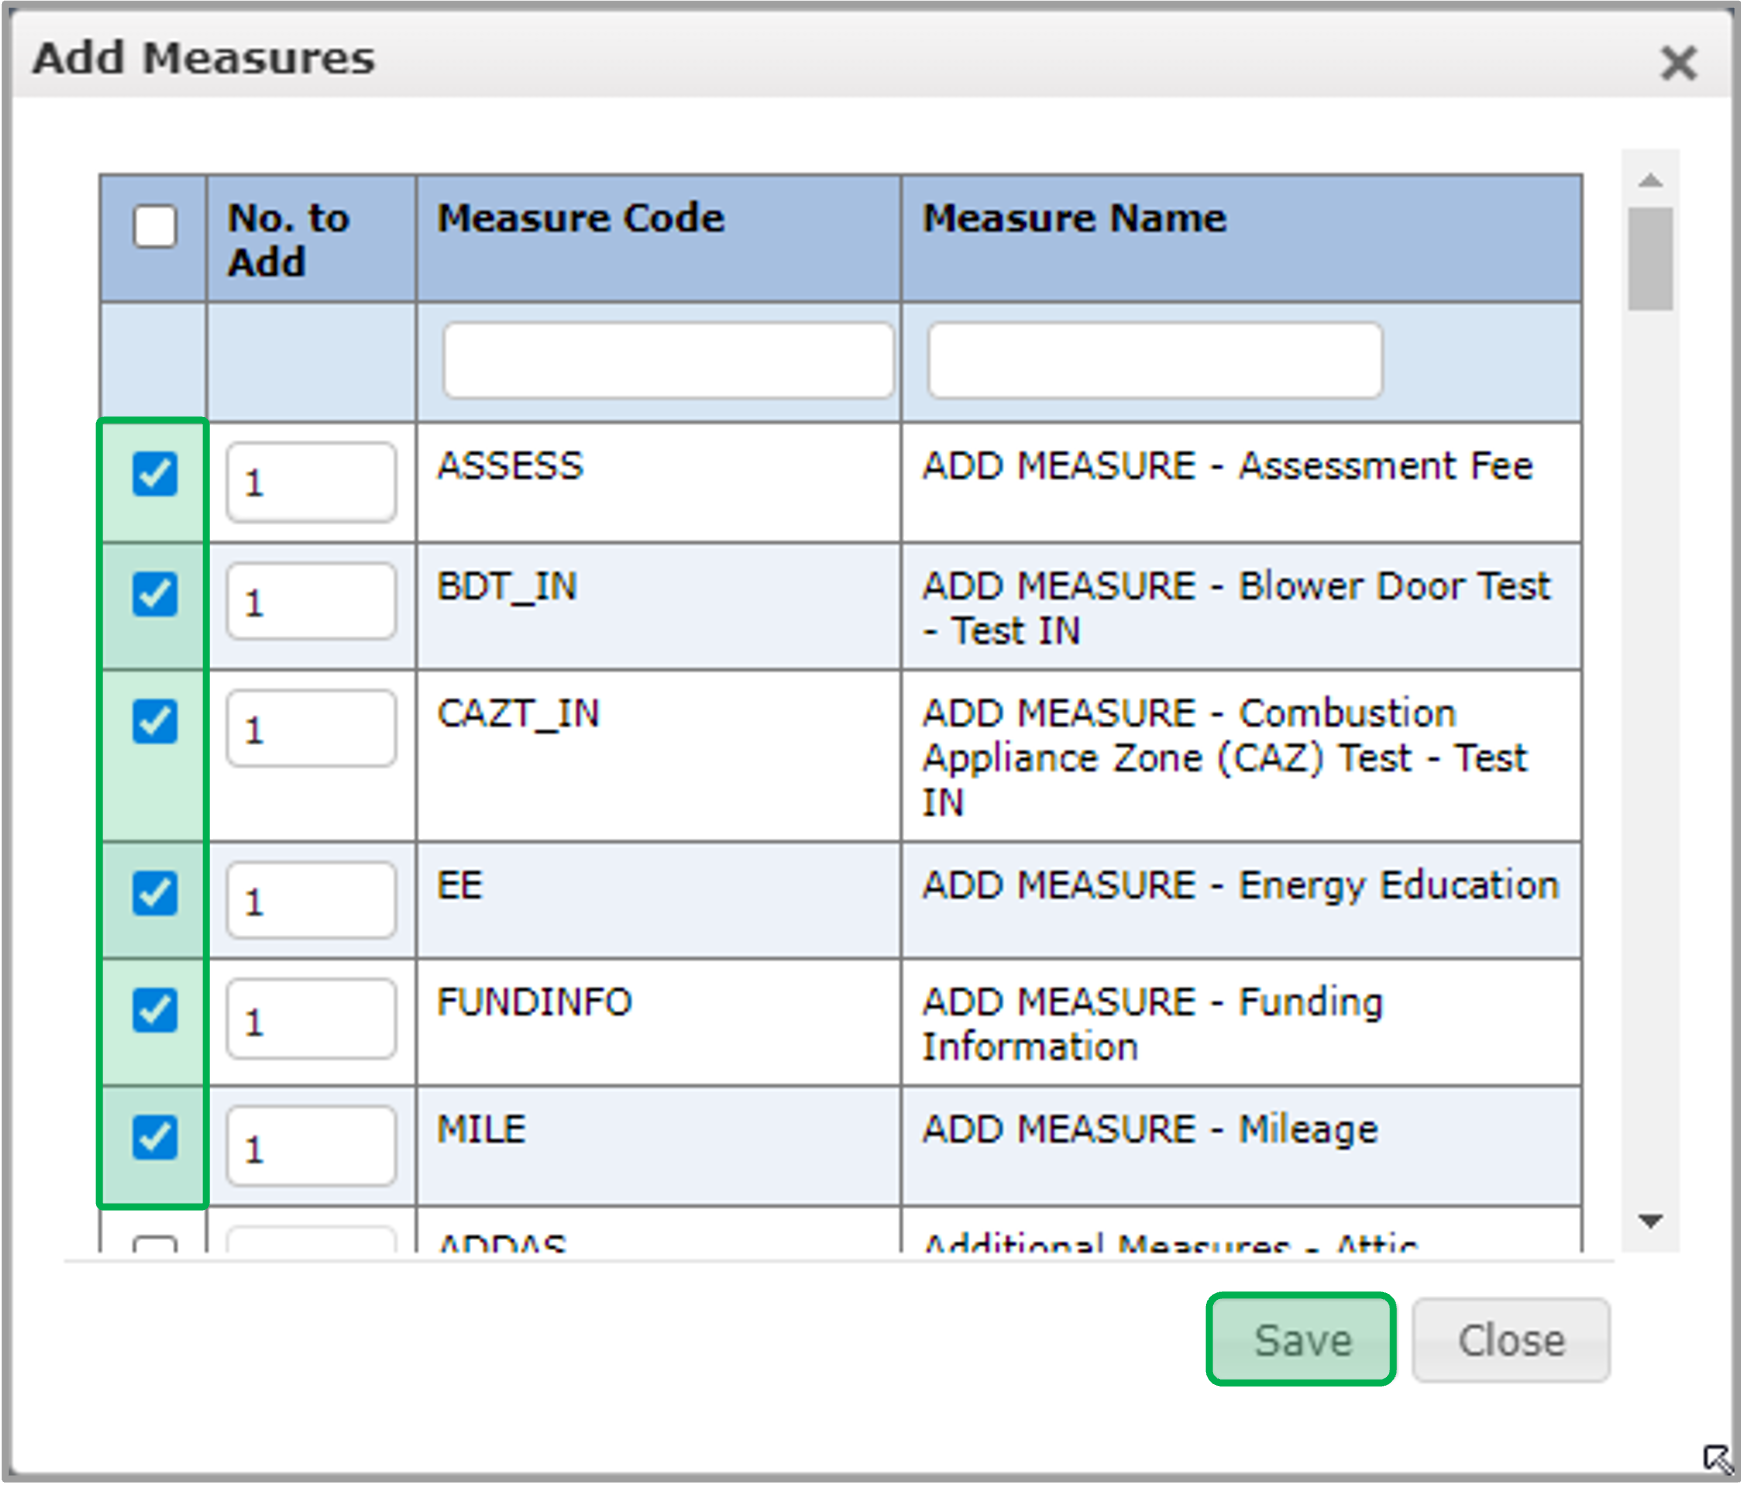
To select one or more measures to add to the step, check the box in the left-hand column. To add the selected measures to the step, click the Save button in the dialog.
If you increase the No. to Add value after selecting the measure, the system will add that many unique instances of the measure to the Add Measure step.
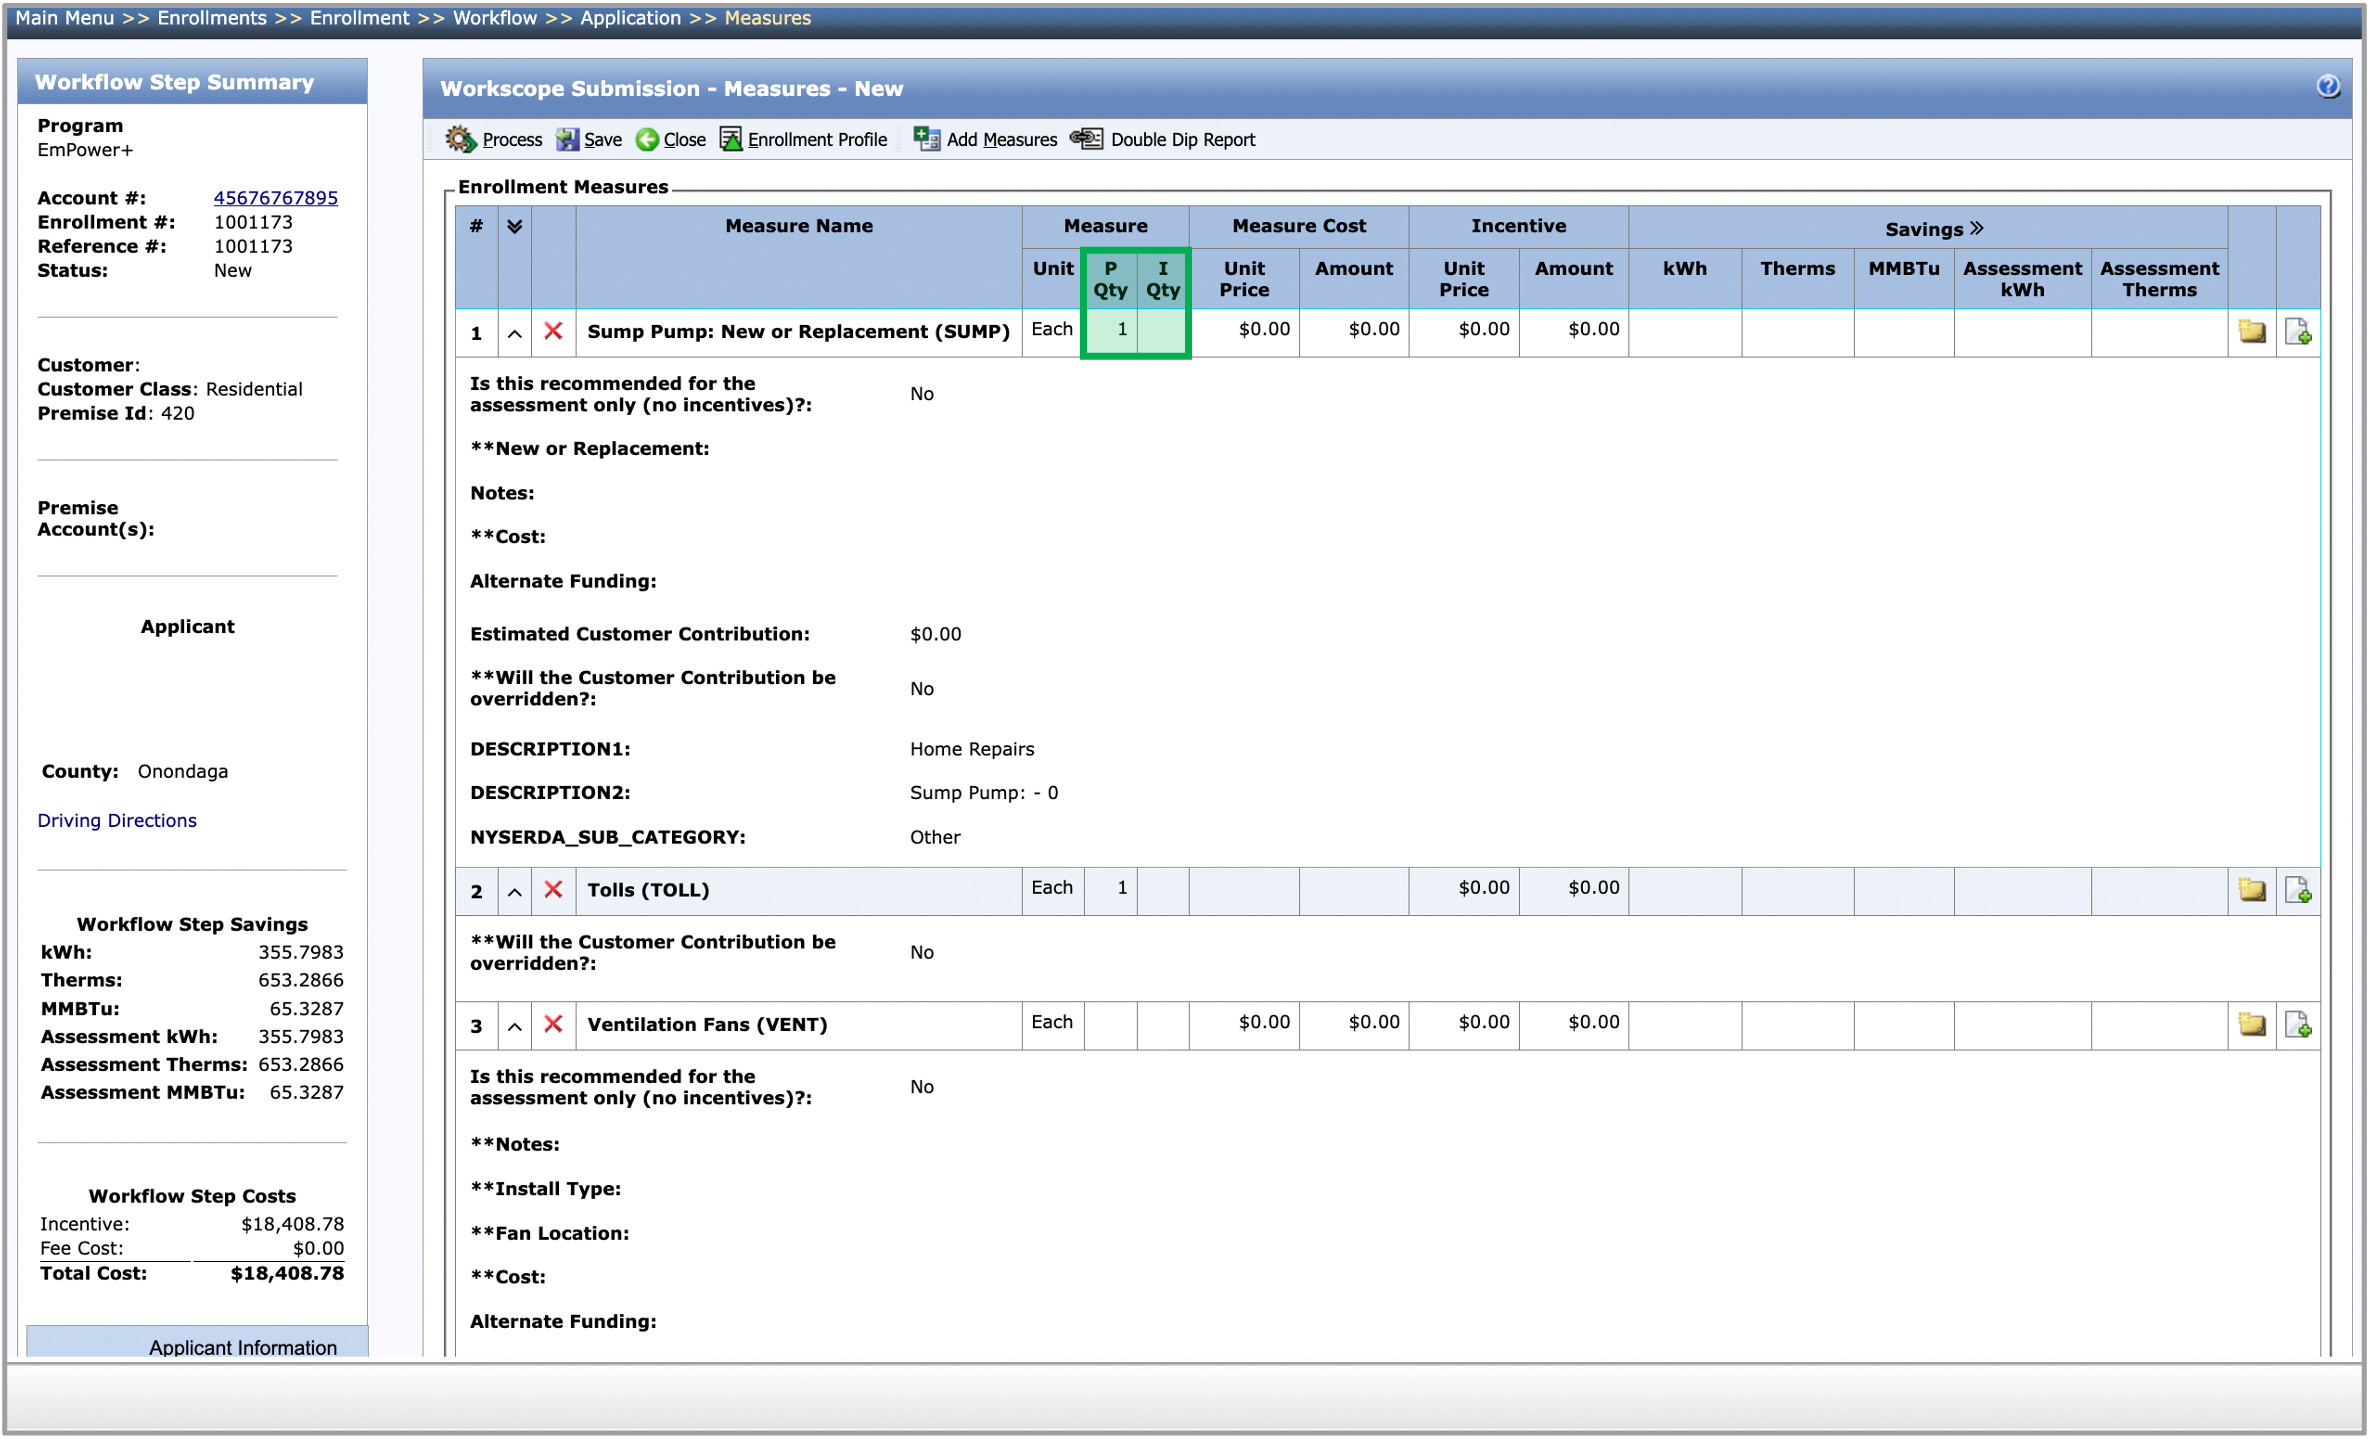
After you add one or more measures to the step, enter each measure’s P Qty (planned quantity) or I Qty (installed quantity) if it is not prepopulated. Then, click anywhere on the section to complete the data entry fields for each measure.
The P or I quantity is hard coded to the measure so Contractors will not have to figure out which one to populate. Only the P or I quantity will be editable based on the specific measure. This is where contractors add the quantity of the work being proposed or recommended.
Required fields are denoted with **. After all the measures are added and all the data entry fields are filled out, the Appliance Request step can be processed.
If the Contractor leaves the Is this recommended for assessment only question on No, then this is a proposed measure, meaning that the contractor is saying they will do this work.
If contractors changes the answer to yes, this work is Recommended and will not be performed by the contractor as part of this project. Recommended measures do no effect Incentive amounts
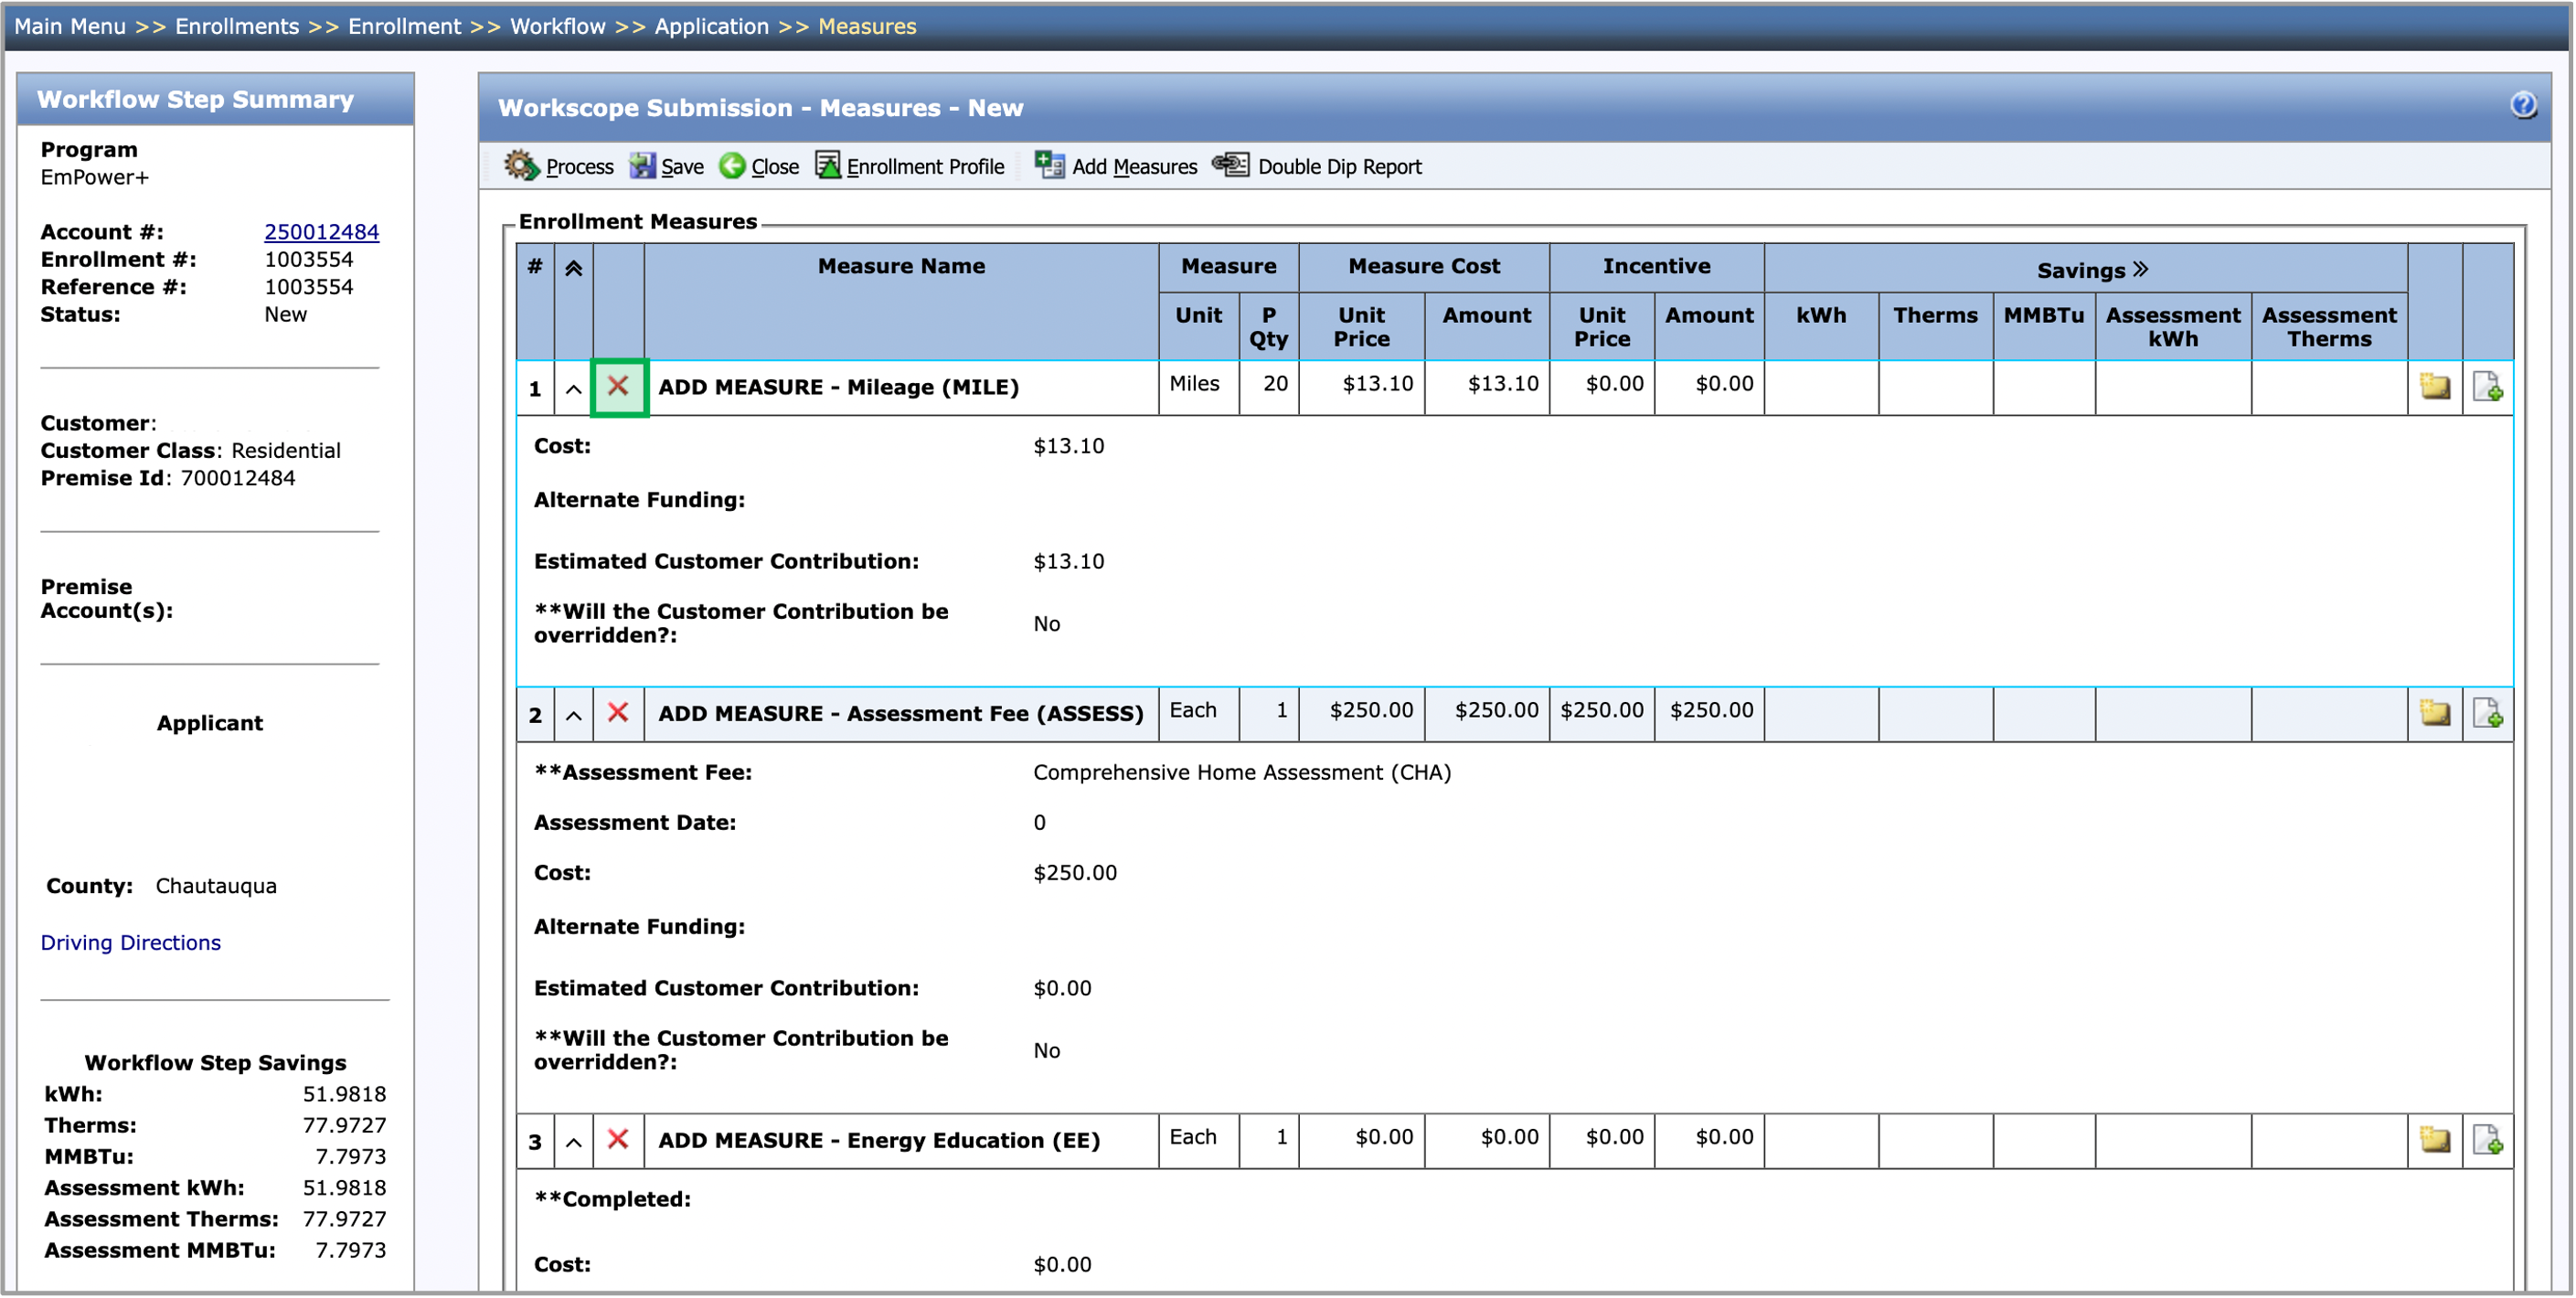
Contractors can delete a Measure by clicking on the Red X icon.
The folder icon at the fart right of each measure will allow Contractors to add 1 comment per measure per step. These comments are visible during Final Project submission for Measures that come through to the Final Project Submission.
I QTY measures will not show on the Final Project Submission. These are measures that are typically installed during the audit (done before workscope submission and what helps contractors complete the Existing Conditions tab.) Only measures at this step that are P QTY will migrate to Final Project Submission.
![]()
The paper icon at the far right of each measure will allows Contractors to associated previously uploaded documents to specific measures, such as the Workscope Submission Photos (required document).
![]()
After all the measures are added and all the data entry fields are filled out, the Assessment Submission step can be processed. Click the Process button at the top of the Measures tab or the Applicant Information tab.
If there are any missing fields, a popup will appear notifying you of what is missing.
Once all of the required fields are completed, click the Save button and move on the to the Reports tab.
The instructions below provides guidance for contractors to generate reports.
The reports tab is used to generate either the Customer Audit Report (required to give to customers to show the work recommend or proposed) and the Pre Install Audit report (which the customer will need to sign so the Contractor can upload during Final Project Submission.
On the Reports tab, click the Generate Reports button, a new Report dialog will open.

Select either the Customer Audit Report or Pre Install Audit report and click the OK button.
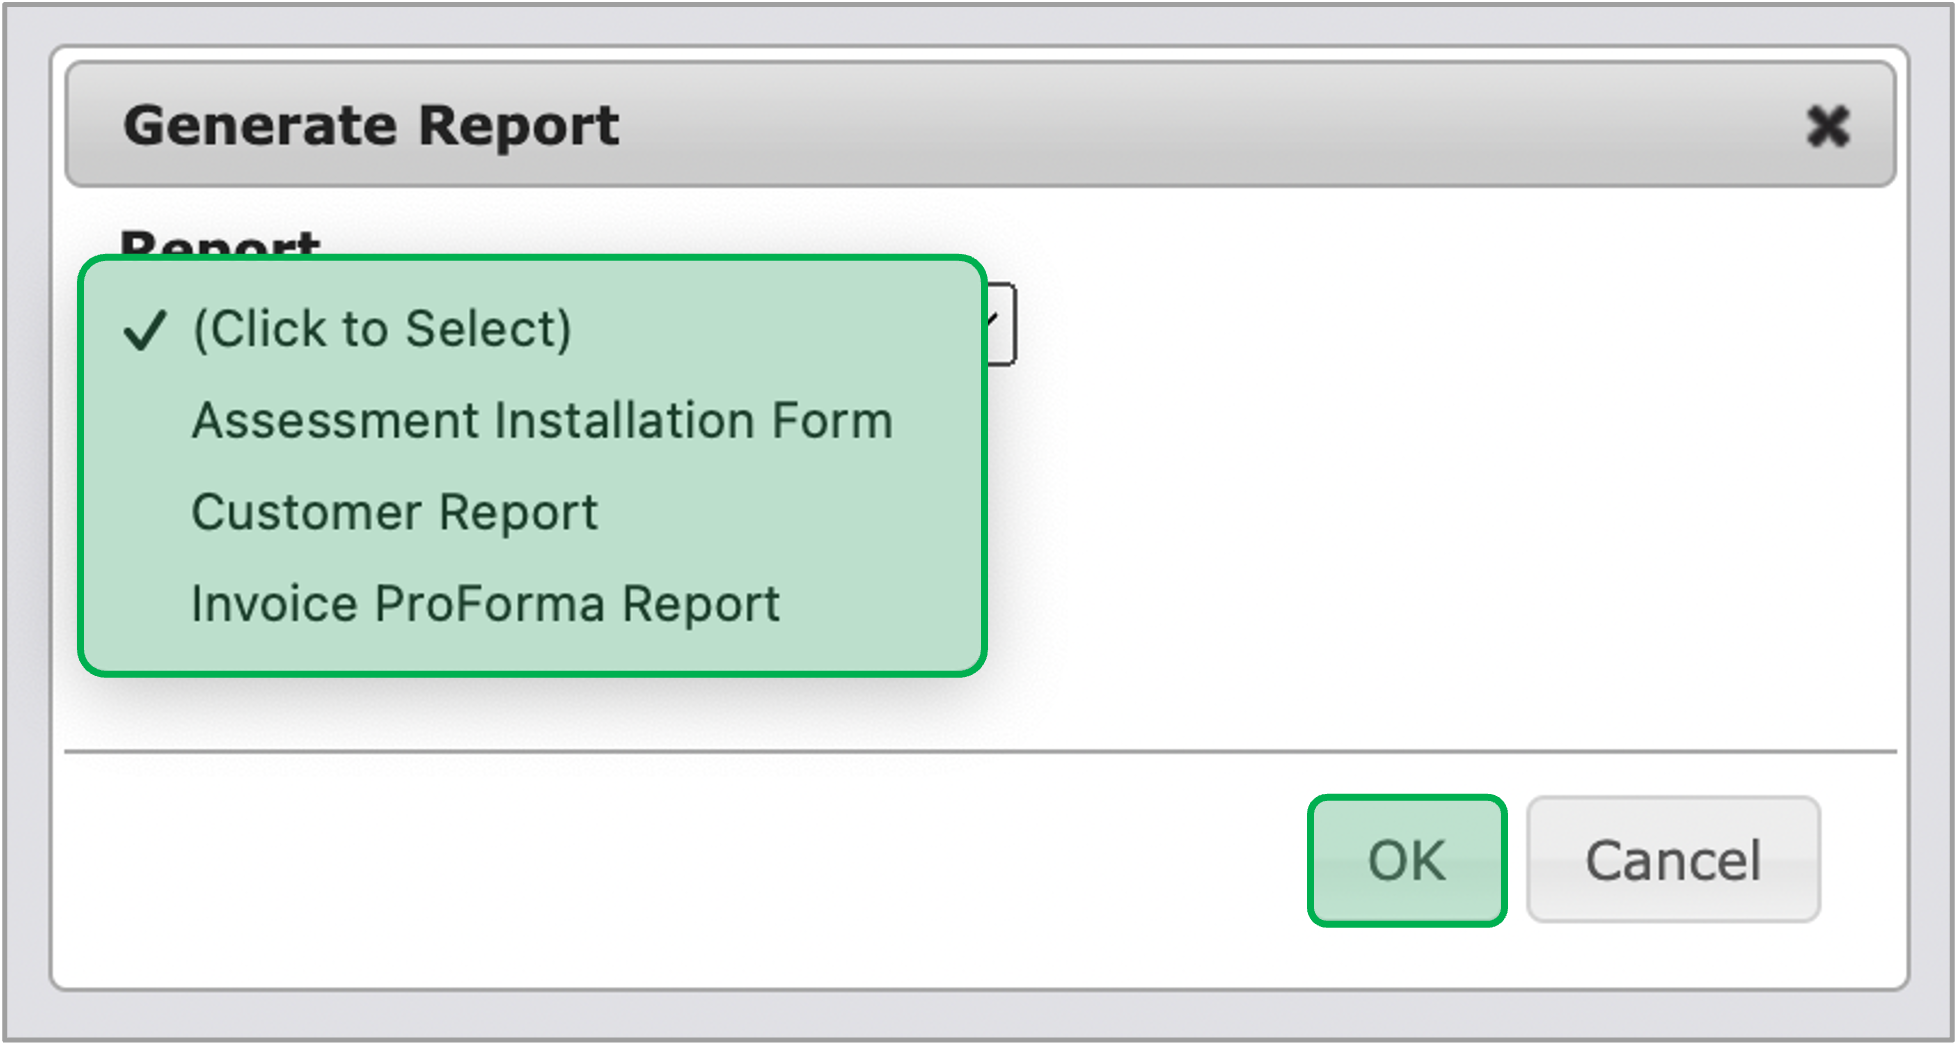
The reports will automatically download once they are generated. Reports can also be downloaded manually by clicking on the hyperlink under the Name column.

The instruction below provides guidance for contractors with Final Project Submission.
The Final Project Submission will be assigned to the Contractor that was assigned to the Workscope Submission step. To open the Final Project Submission step, click on the Final Project Submission hyperlink in the Enrollment profile.
The Final Project Submission step will include the following:
Workflow Step Detail - Incentive Information
This field group will display the Workscope Review Incentive Amount, the Final Project Submission Incentive Amount (the current incentive value), and whether the difference between these two values exceeds the Change Allowance Threshold (+$500 or -$1000). If so, the Final Project Reviewer will initiate a Final Technical Review.
Tier 1 Projects: If the change allowance exceeds the thresholds or a customer contribution is required, a change order approval is required.
Tier 3 Projects: any deviation from the approved workscope requires a change order to be submitted.
Measures Tab
All the measures that were planned on the Workscope Submission step and then approved on the Workscope Review (if applicable) will be displayed on the Final Project Submission step. The user can click on a measure to edit the installed measure information.
For a full list of all program measures that may help with this step, please access the NY HEP Measures List.
Documents Tab
The contractor will be required to upload the following documents on the Final Project Submission step:
- Change Order (Conditional)
- Final Project Submission Photos
- Post Installation Measure Report
- Pre-Installation Agreement Form
Follow the instructions on the Documents tab above for more guidance.
Processing
When the contractor is ready to process the Final Project Submission step, they can select one of the following Outcomes:
- Work Complete: The system will generate the Final Project Review step next.
- Cancel: The system will reopen the Workscope Submission step next.
- On Hold: follow the step below for more guidance
If you change the Outcome / Reason, click Save before you process the step. If the Cancel Outcome is selected, all Cancel Outcome Reasons will require a note, follow the instructions on the Notes tab above for more guidance.
On Hold Outcome
If the contractor selects the On Hold Outcome, they will need to select one of the following Reasons:
- Contractor Issue
- Customer Request
- Premise Issue
If you change the Outcome / Reason, click Save before you process the step.
- No labels