| Aura - Tab |
|---|
| | Panel |
|---|
| borderColor | #002D72 |
|---|
| bgColor | #F3F4F9 |
|---|
| titleColor | #ffffff |
|---|
| borderWidth | 1 |
|---|
| titleBGColor | #002D72 |
|---|
| borderStyle | none |
|---|
| title | Portal Access |
|---|
|
|
| UI Steps |
|---|
| | UI Step |
|---|
Once you are in the Salesforce Portal, click on the Submit a New Application tab on the home page. | Expand |
|---|
| 
|
|
| UI Step |
|---|
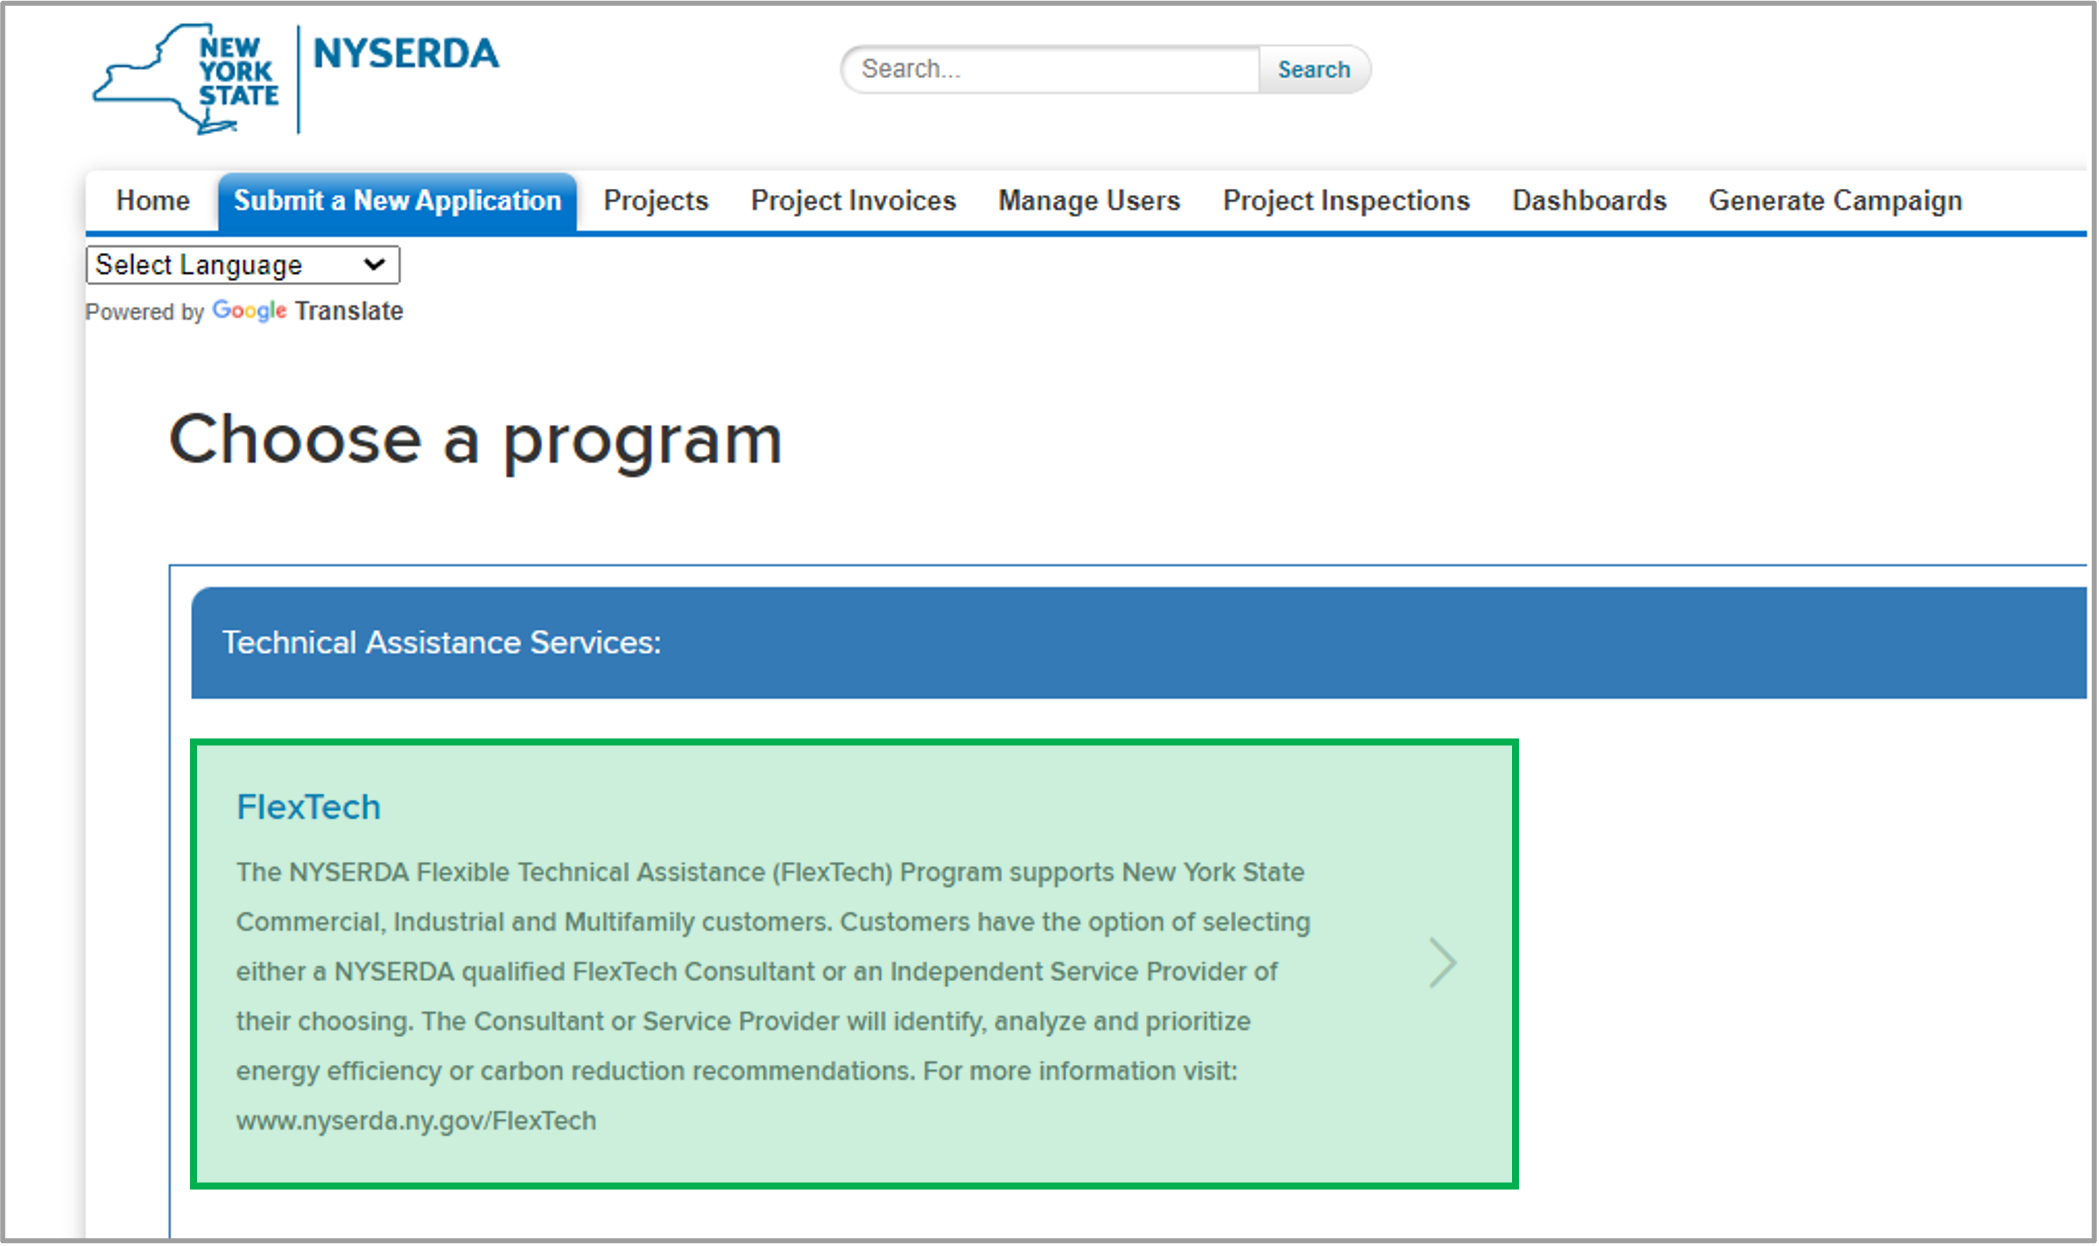
From the Choose a Program page page, click on the Technical Assistance-FlexTech tab. | Tip |
|---|
| Customers must have a Consultant for the project to be able to complete the application. If you do notA third-party technical assistance service provider is required for all projects. If you're a customer who does not have a service provider, please email FlexTech@nyserda.ny.gov and a member of the FlexTech will help you acquire one. for assistance. |
| Expand |
|---|
| 
|
|
|
|
| Aura - Tab |
|---|
| | Panel |
|---|
| borderColor | #002D72 |
|---|
| bgColor | #F3F4F9 |
|---|
| titleColor | #ffffff |
|---|
| borderWidth | 1 |
|---|
| titleBGColor | #002D72 |
|---|
| borderStyle | none |
|---|
| title | Page 1 |
|---|
|
|
| Section |
|---|
| Column |
|---|
| | UI Steps |
|---|
| | UI Step |
|---|
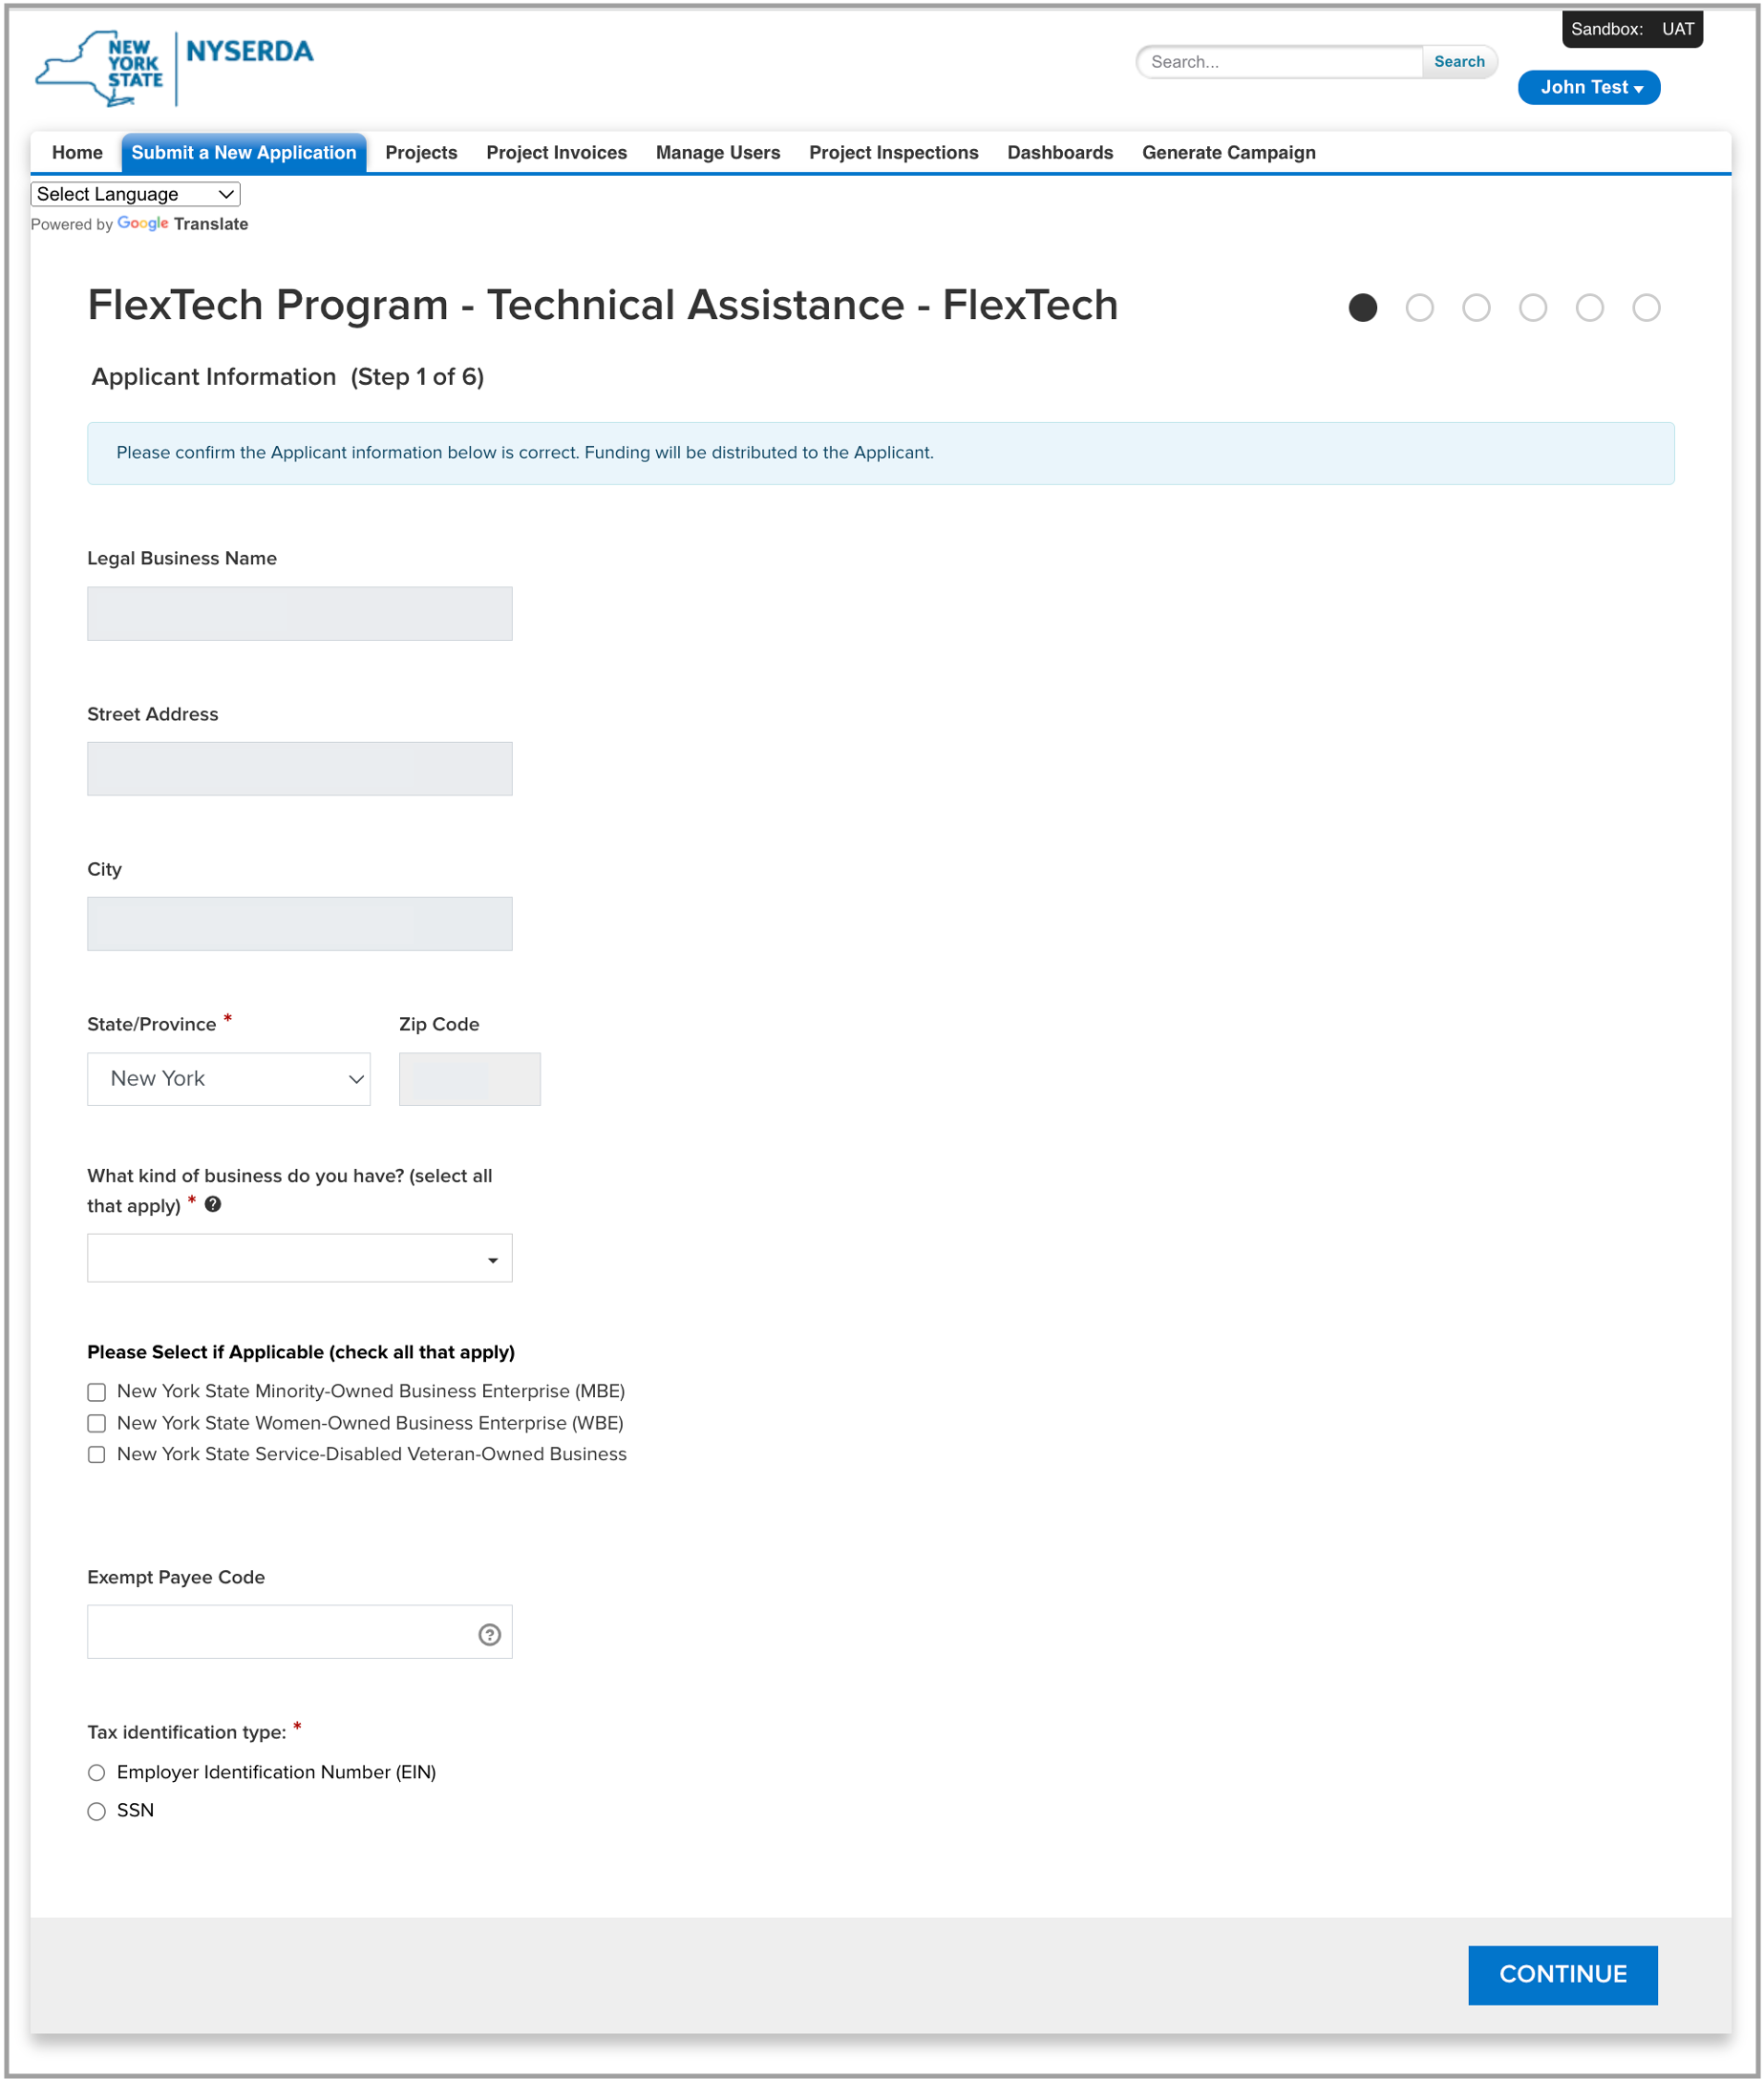
Fill out the required fields under the Applicant Information section and click Continue. | Tip |
|---|
| Some information on this page will be pre-populated based on your registration. |
|
|
|
| Column |
|---|
|  |
|
|
| Aura - Tab |
|---|
| | Panel |
|---|
| borderColor | #002D72 |
|---|
| bgColor | #F3F4F9 |
|---|
| titleColor | #ffffff |
|---|
| borderWidth | 1 |
|---|
| titleBGColor | #002D72 |
|---|
| borderStyle | none |
|---|
| title | Page 2 |
|---|
|
|
| UI Steps |
|---|
| | UI Step |
|---|
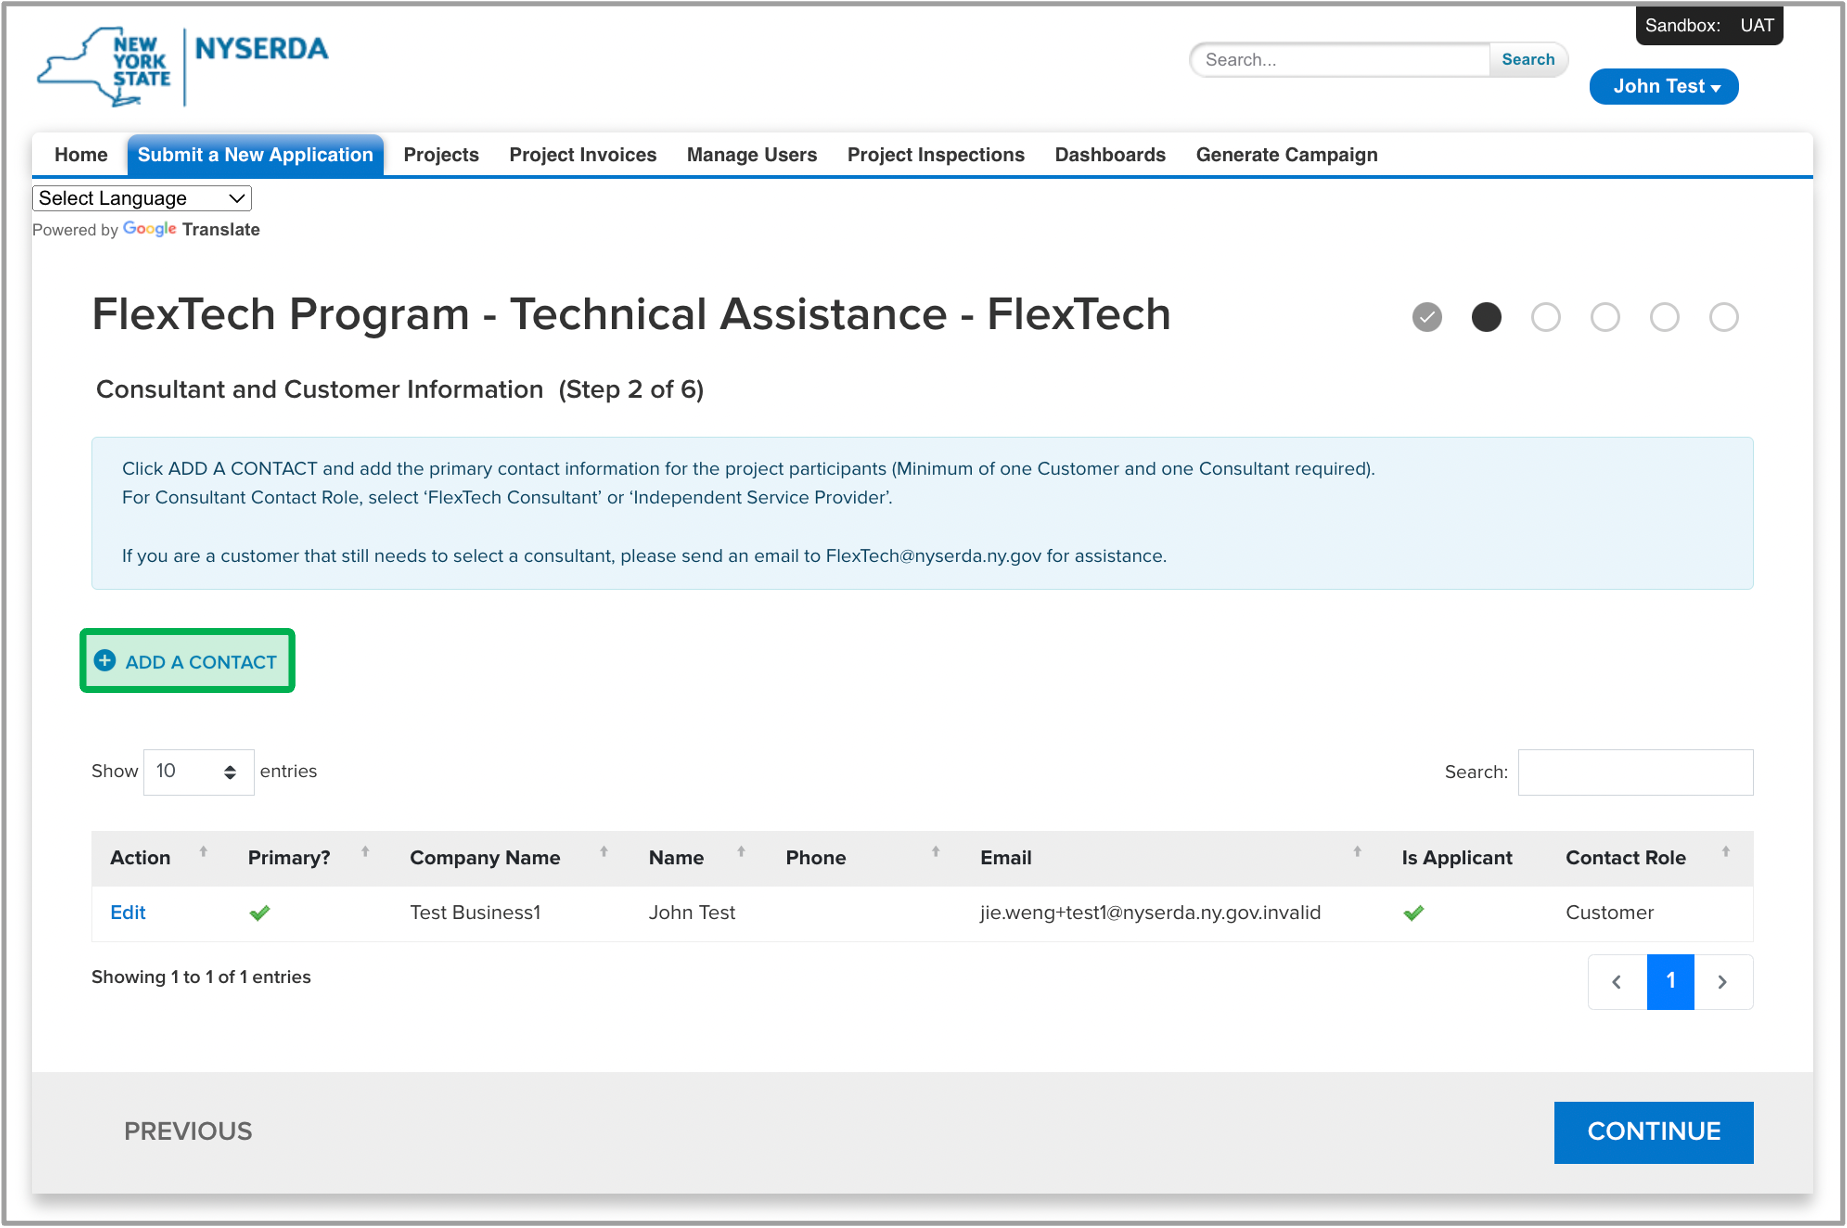
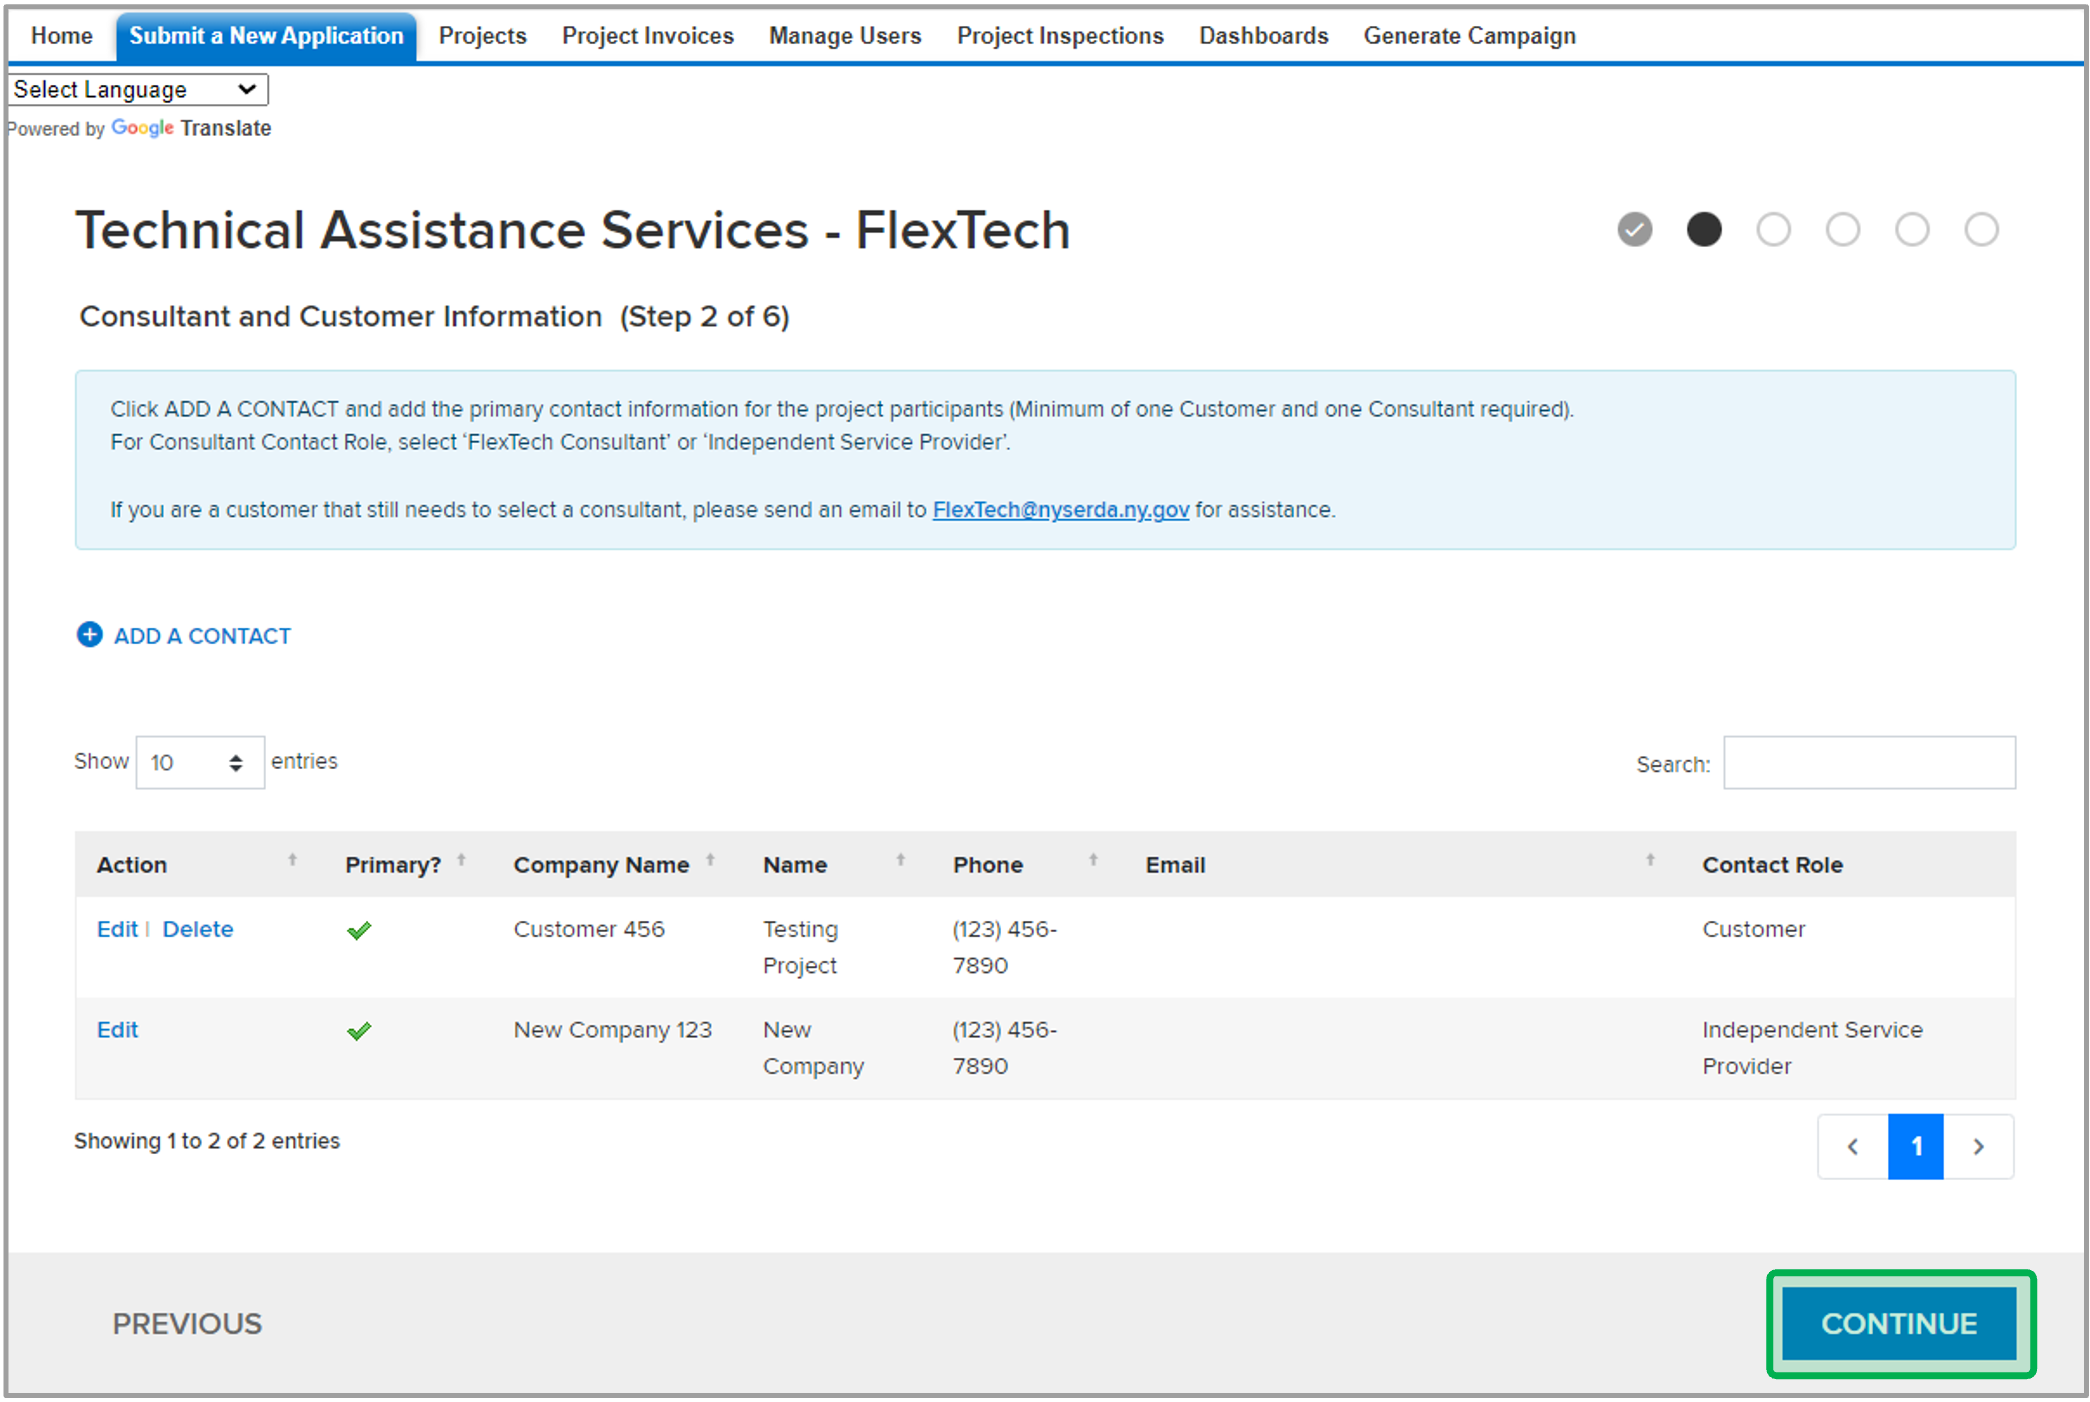
The Consultant and Customer Information step must contain at least two contacts (FlexTech Consultant and Customer) before you can proceed to the next page. To add a Customer and/or a FlexTech consultant, click on Add a Contact.step. There must be a FlexTech Consultant or Independent Service Provider contact, and a Customer contact listed below. Click on Add a Contact to include another contact. | Tip |
|---|
| | The Clone option means you have more than one of that role in the project. You will still need to enter the contact information for that If you wish to add additional individuals from your company to view the project, enter those on Step 2. Please make sure the Role is consistent with your company’s role. |
| Expand |
|---|
| 
|
|
| UI Step |
|---|
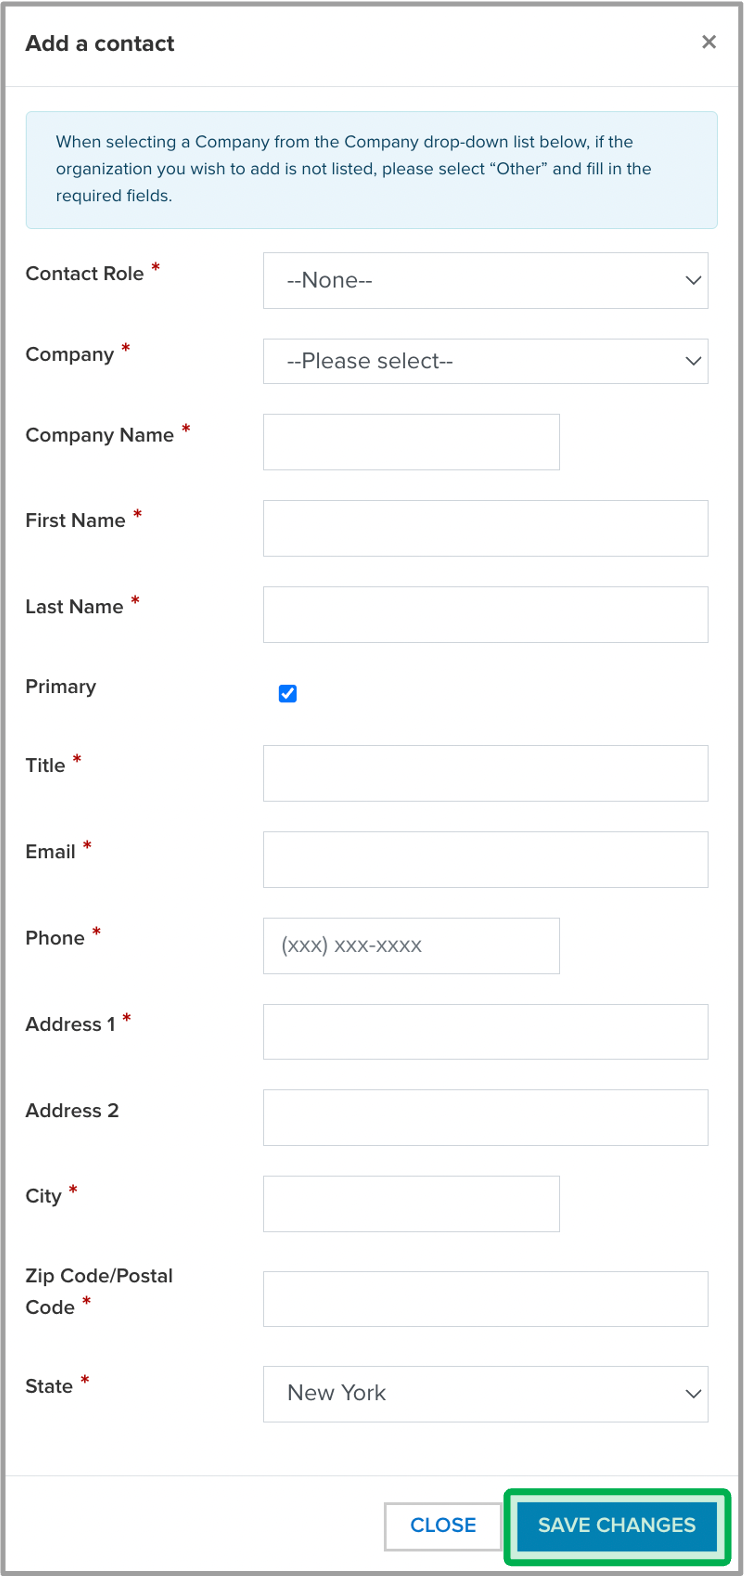
Select your After clicking Add a Contact, select the Role and fill out all of the required fields, then click Save Changes. | Expand |
|---|
| 
|
|
| UI Step |
|---|
Once all contact roles are added, click the Continue button to move to the next page. | Expand |
|---|
| 
|
|
|
|
| Aura - Tab |
|---|
| | Panel |
|---|
| borderColor | #002D72 |
|---|
| bgColor | #F3F4F9 |
|---|
| titleColor | #ffffff |
|---|
| borderWidth | 1 |
|---|
| titleBGColor | #002D72 |
|---|
| borderStyle | none |
|---|
| title | Page 3 |
|---|
|
|
| Info |
|---|
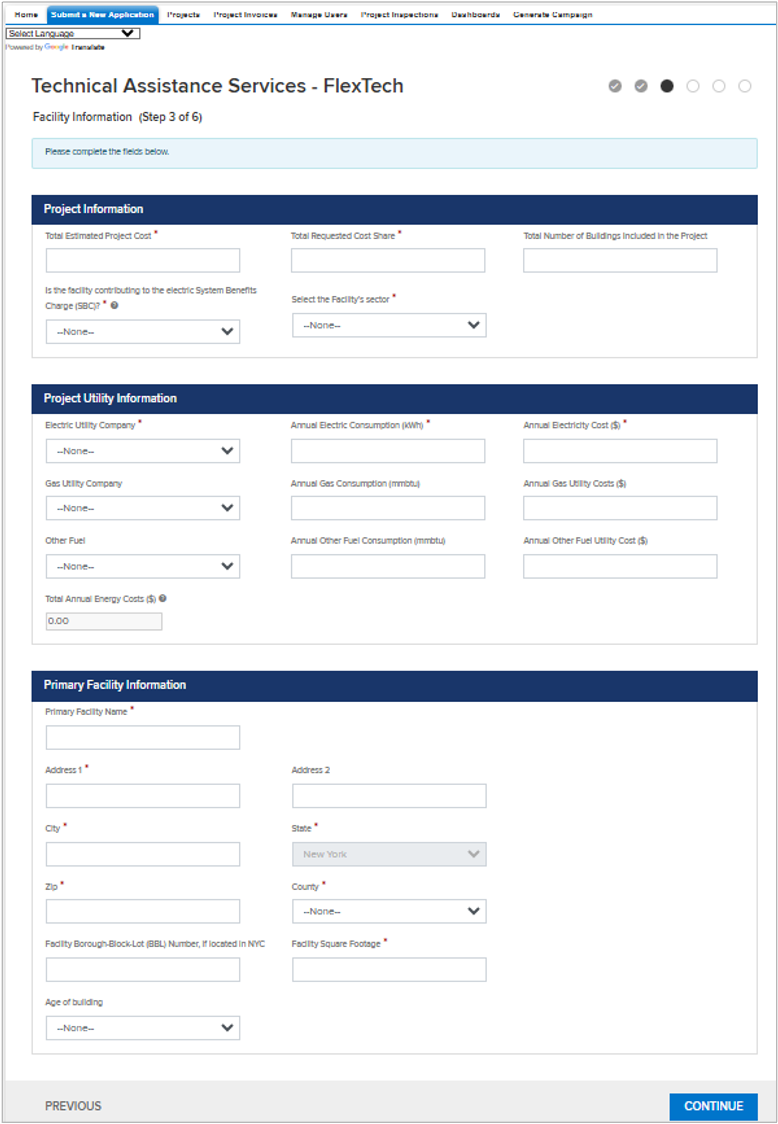
| If the Facility's Sector selected is: Multifamily, P-12 School, Industrial, College/University, or Healthcare, you will have additional required fields to complete on the page. |
| Section |
|---|
| Column |
|---|
| | UI Steps |
|---|
| | UI Step |
|---|
Fill out all the required Project and Facility information and click Continue. |
|
|
| Column |
|---|
|  |
|
|
| Aura - Tab |
|---|
| | Panel |
|---|
| borderColor | #002D72 |
|---|
| bgColor | #F3F4F9 |
|---|
| titleColor | #ffffff |
|---|
| borderWidth | 1 |
|---|
| titleBGColor | #002D72 |
|---|
| borderStyle | none |
|---|
| title | Page 4 |
|---|
|
|
| UI Steps |
|---|
| | UI Step |
|---|
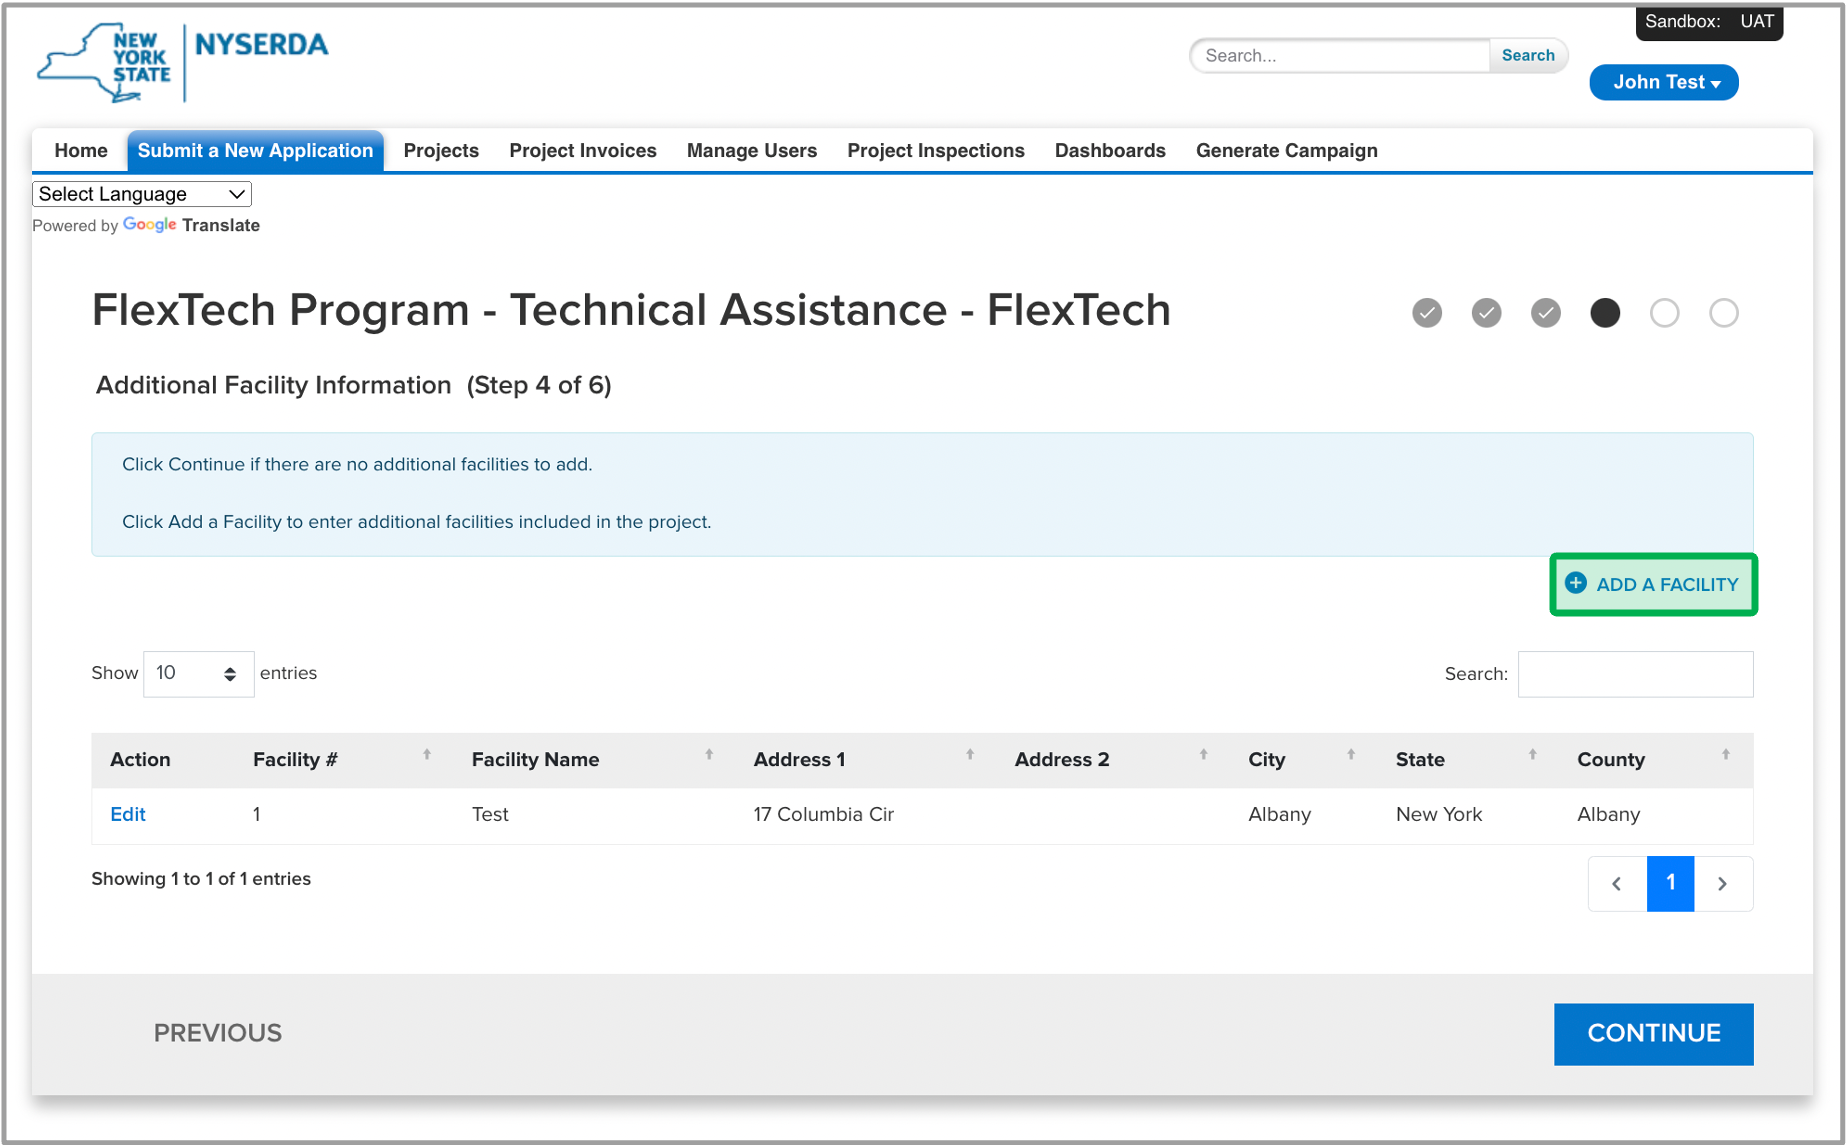
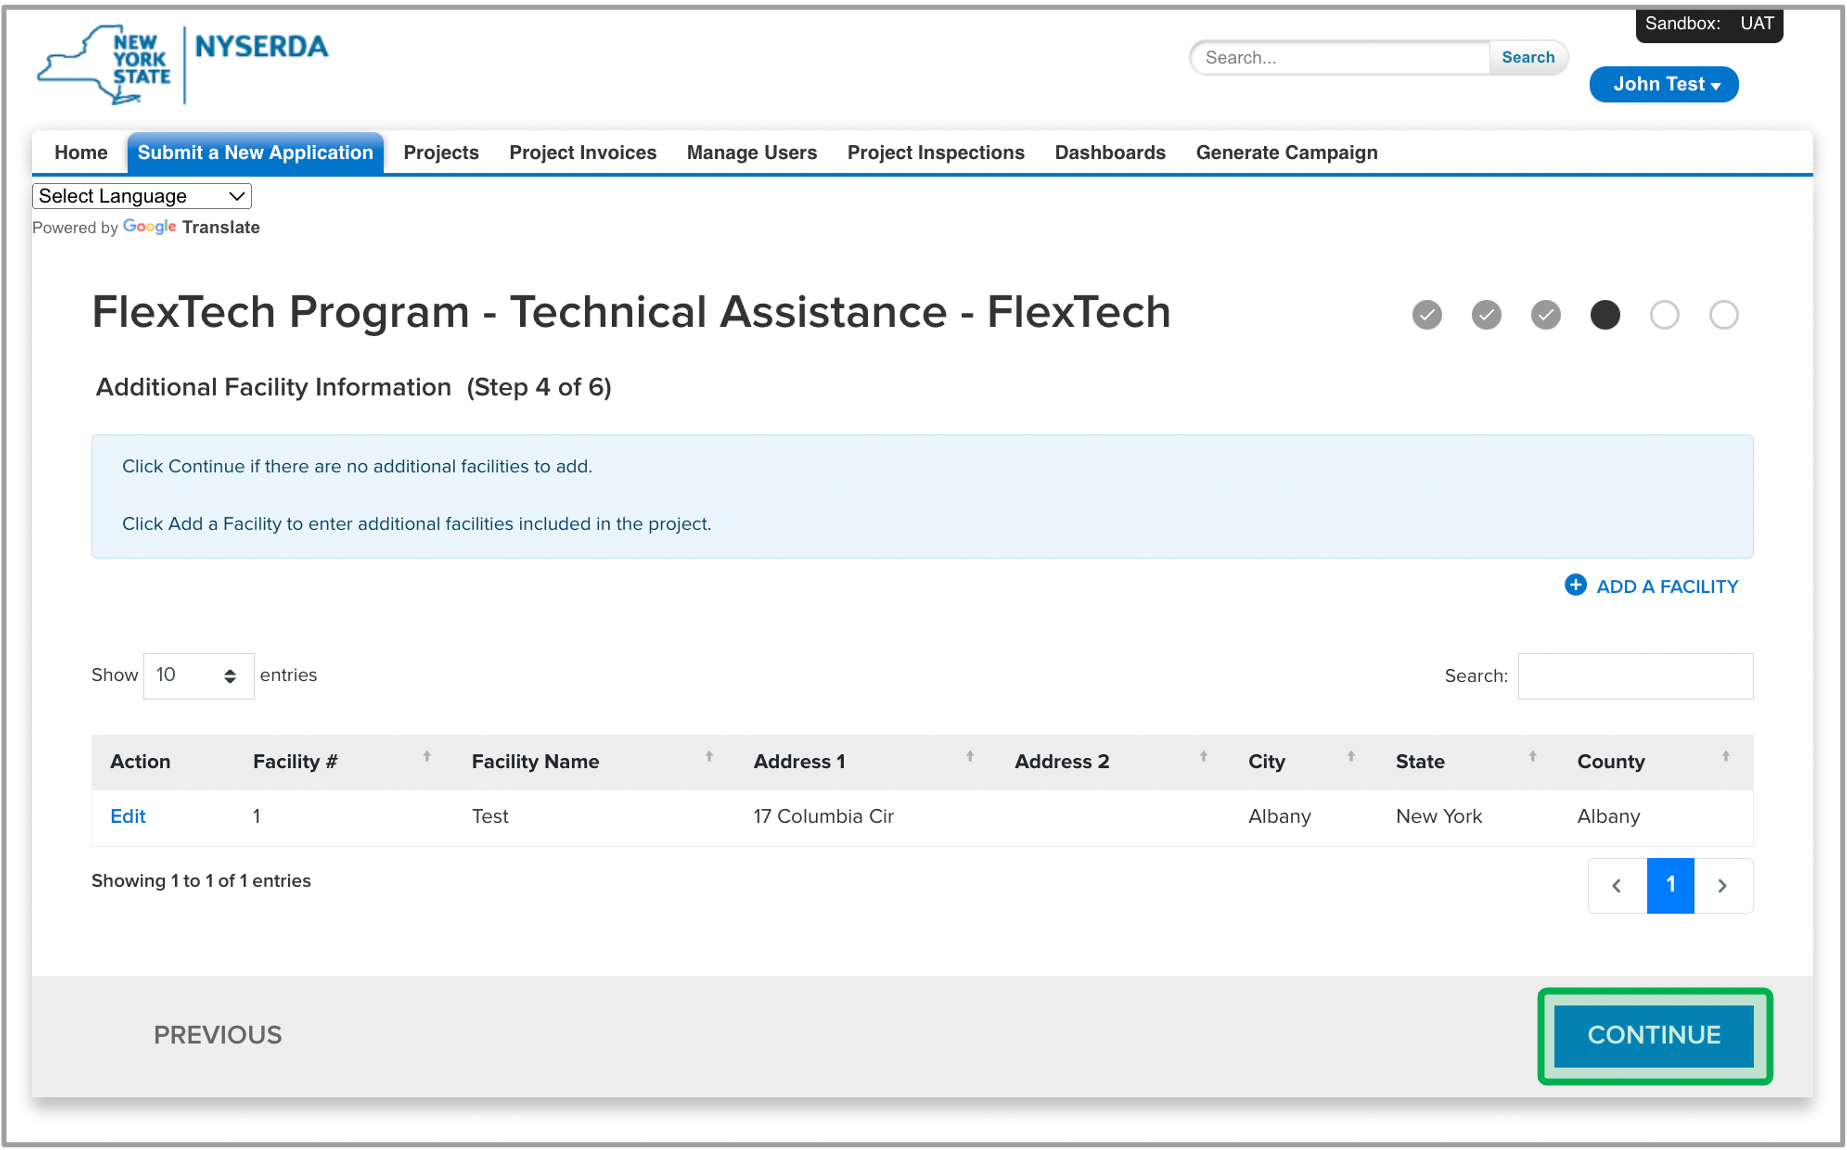
The Facility Information will populate automatically. If applicable, click on Add a Contact Facility and enter any additional Facility Information facilities information. | Tip |
|---|
| If you do not yet have the information for the additional facilities, you can enter it Additional facilities may also be added to your project record after NYSERDA has approved your application. Multifamily applicants are split between market rate and affordable housing. If affordable housing is selected as the sector, then the applicant will need to also upload affordability verification documentation. |
| Expand |
|---|
| 
|
|
| UI Step |
|---|
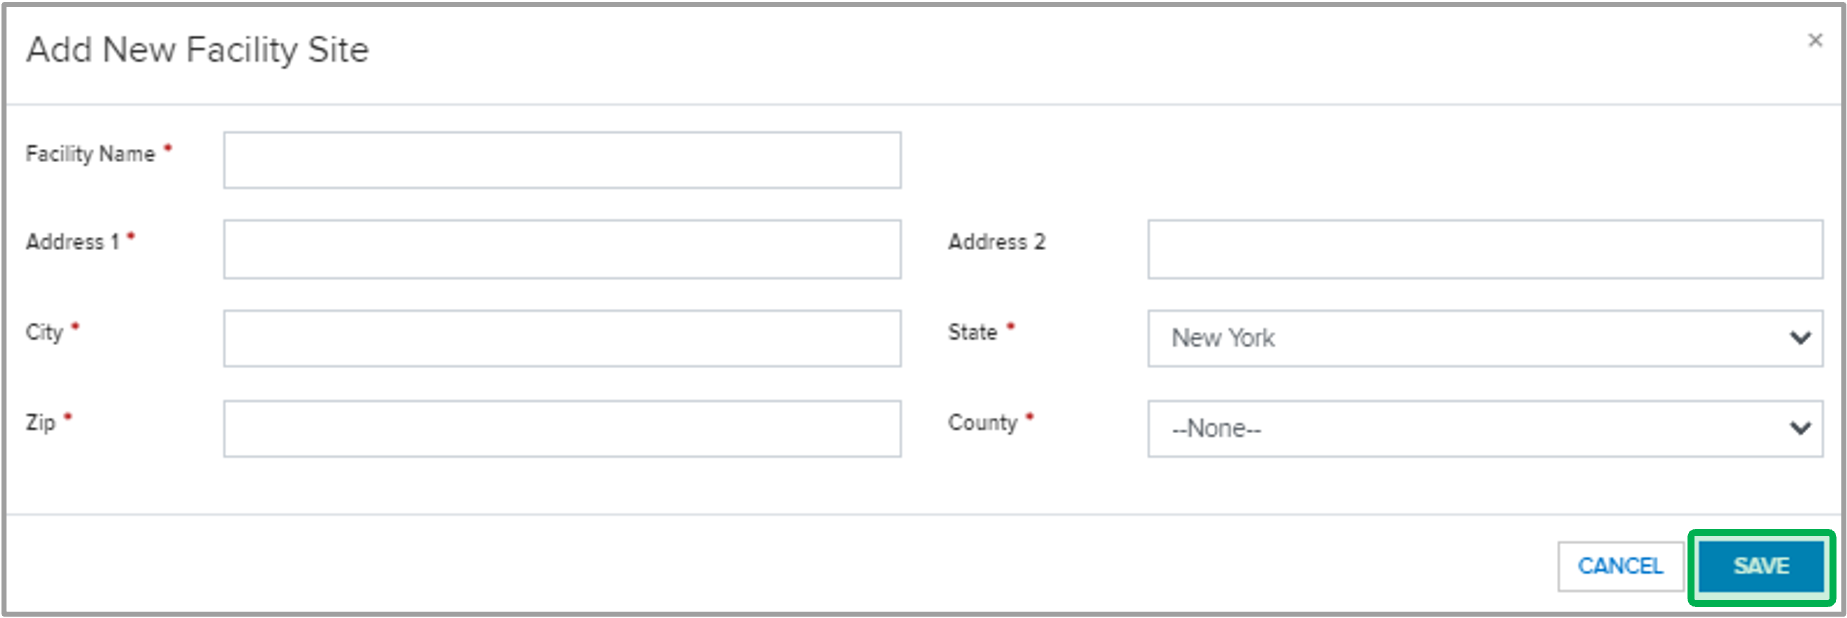
Enter in the additional Facility Information in the modal window and click click Save. | Expand |
|---|
|  |
|
| UI Step |
|---|
Once all Facility(sies) are added, review the information in the table and, if correct, click Continue. | Expand |
|---|
| 
|
|
|
|
| Aura - Tab |
|---|
| | Panel |
|---|
| borderColor | #002D72 |
|---|
| bgColor | #F3F4F9 |
|---|
| titleColor | #ffffff |
|---|
| borderWidth | 1 |
|---|
| titleBGColor | #002D72 |
|---|
| borderStyle | none |
|---|
| title | Page 5 |
|---|
|
|
| Section |
|---|
| Column |
|---|
| | UI Steps |
|---|
| | UI Step |
|---|
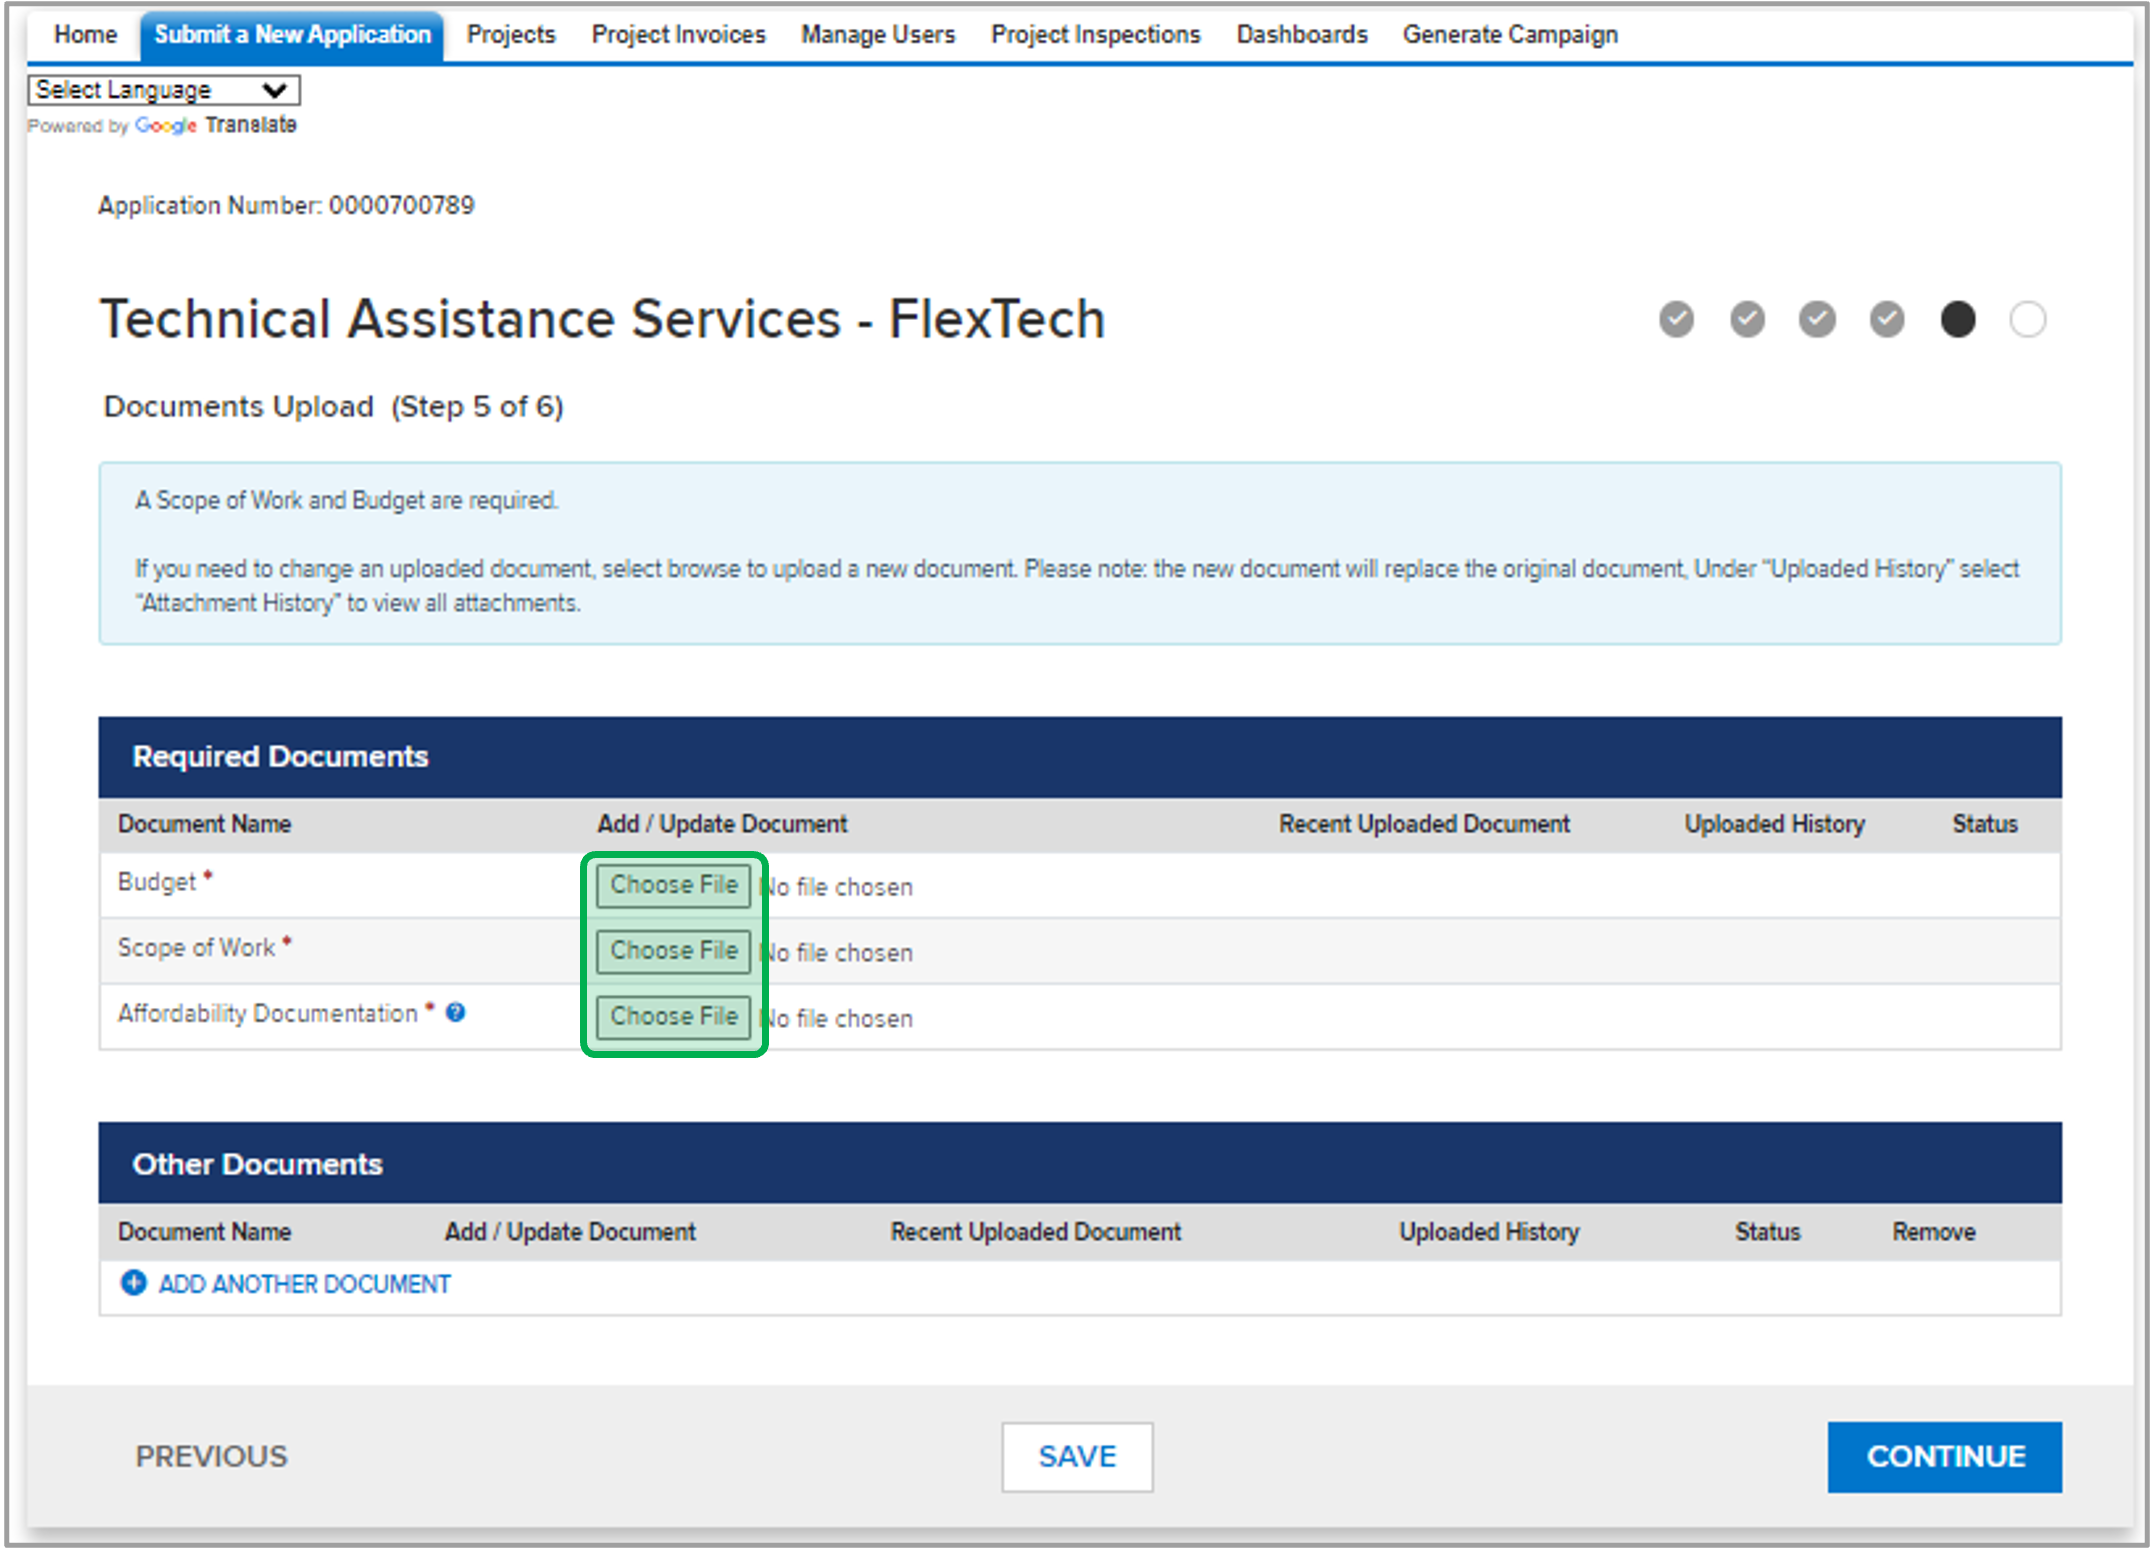
On the Documents page, click on the Choose File button under the Required Documents section to upload the appropriate files in the Budget and Scope of Work fields. Click Continue. | Tip |
|---|
| If the sector selected in Step 3 is Multifamily Affordable Housing, Affordability documentation must also be uploaded. Please click the Blue ? Icon for acceptable forms of affordability documentation. |
| Warning |
|---|
| File name or uploads can not exceed 40 characters your project is in the Afforadability Housing Sector, an additional affordability documentation must be uploaded. |
|
|
|
| Column |
|---|
|  |
|
|
| Aura - Tab |
|---|
| | Panel |
|---|
| borderColor | #002D72 |
|---|
| bgColor | #F3F4F9 |
|---|
| titleColor | #ffffff |
|---|
| borderWidth | 1 |
|---|
| titleBGColor | #002D72 |
|---|
| borderStyle | none |
|---|
| title | Page 6 |
|---|
|
|
| Info |
|---|
| The customerCustomer's signature is required for the application. If the applicant is not the customer, you can forward the DocuSign request via email to the customer for electronic signature. all applications. The Customer signature may be obtained either through DocuSign via the send for Electronic Signature button, or you may select the Print button to obtain an electronic version of the application for Customer signature and upload to the Signed Application section. You can also print the application to acquire the customer signature to later upload a scan of the application with their signature for review. See the instructions below depending on your role: |
| Warning |
|---|
| If you upload an old pdf application from a previous version of PON4192, the application will be rejected and you will be required to submit a new application. |
| UI Expand |
|---|
| title | Customer as the Applicant |
|---|
| | UI Steps |
|---|
| | UI Step |
|---|
Review the summary of your application, then at the bottom of the Certification page, check the Checkbox and then click the Electronic Signature button. | Expand |
|---|
| 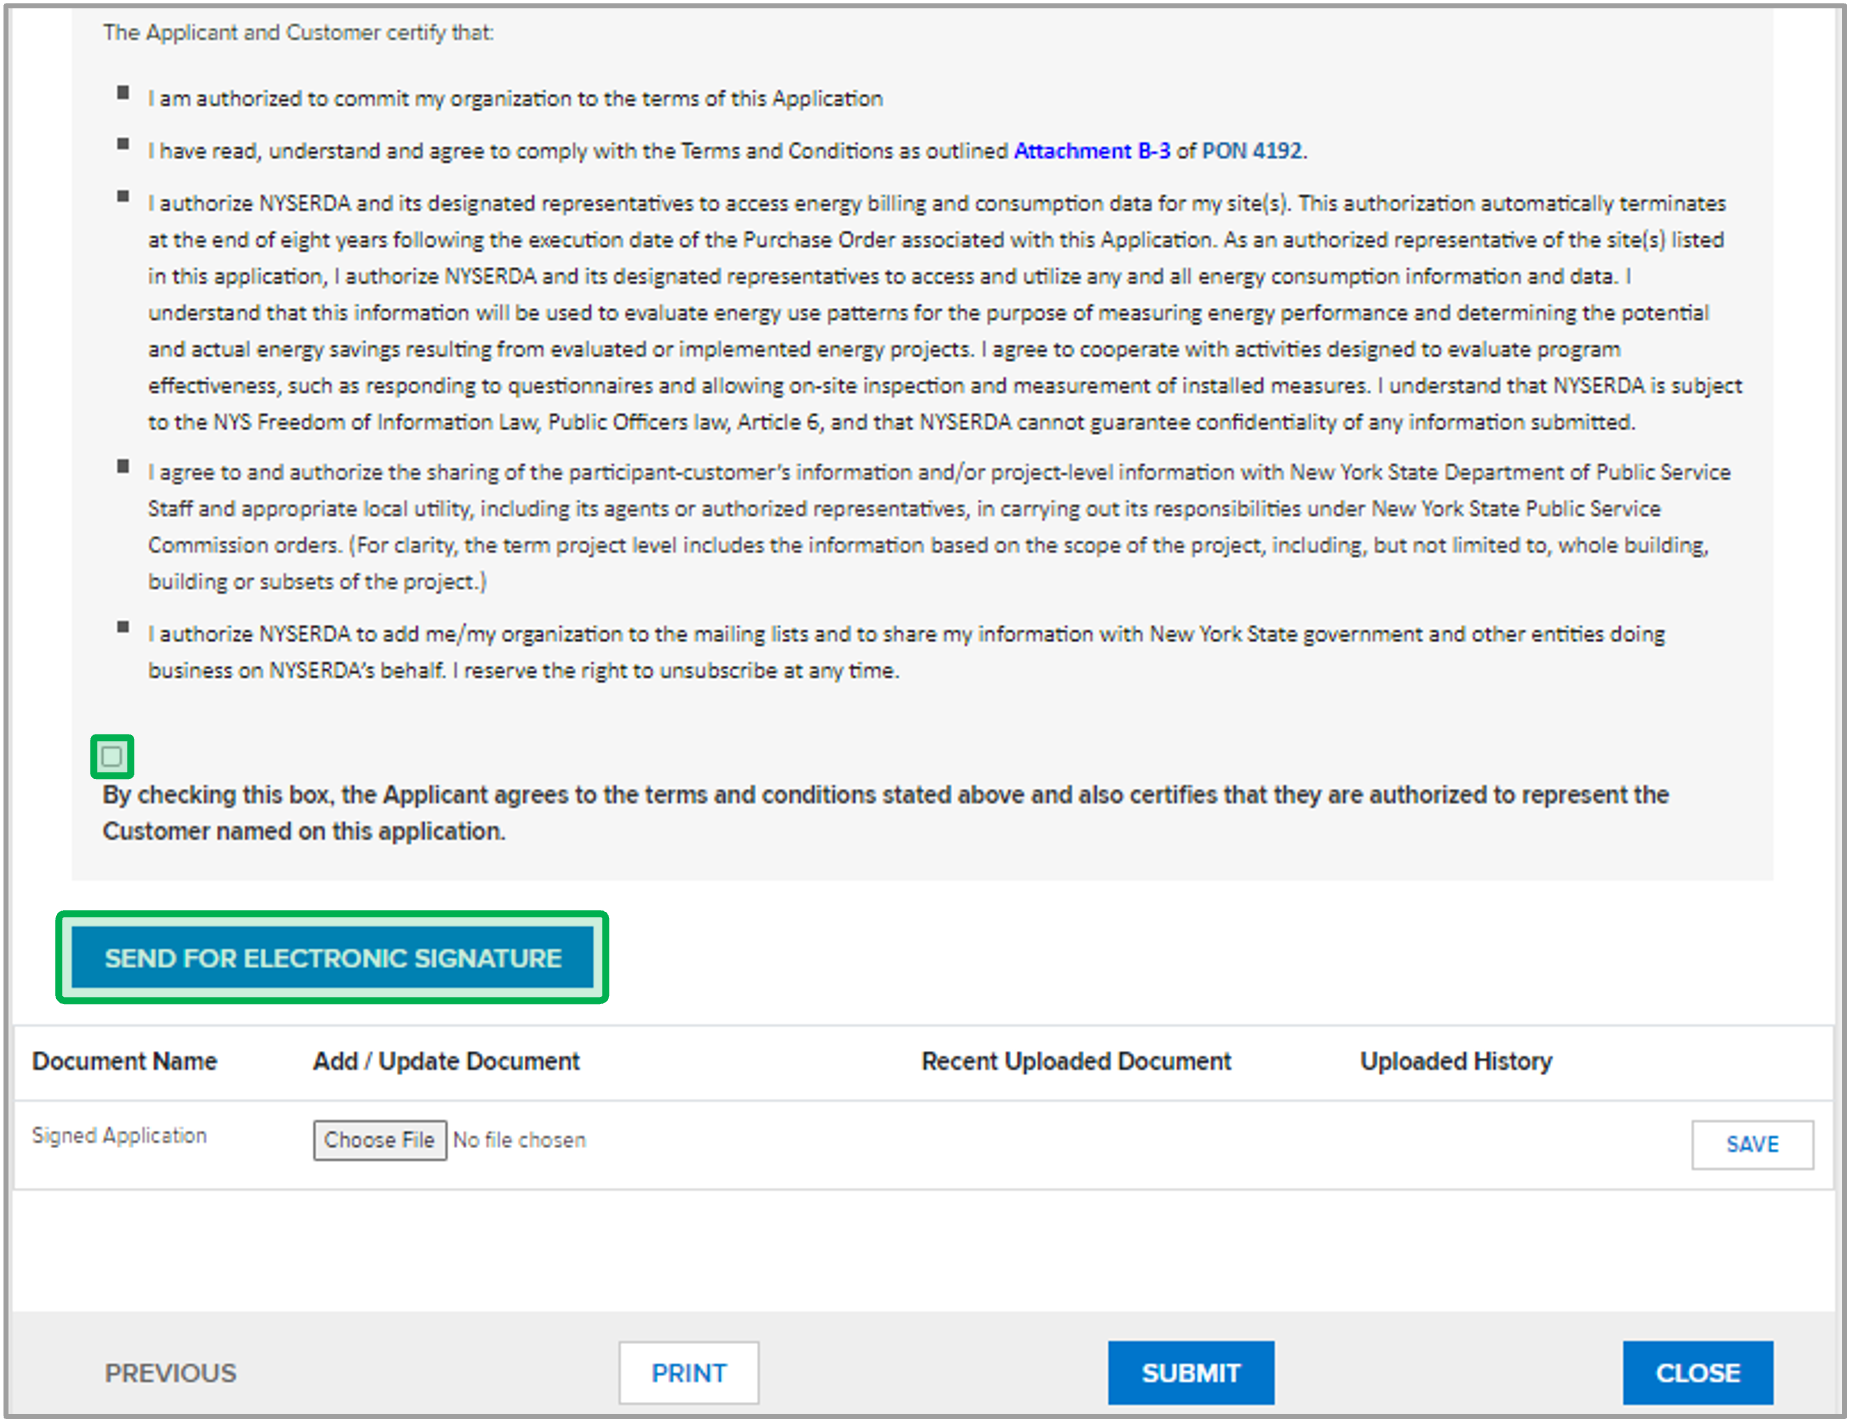 Image Removed Image Removed Image Added Image Added
|
|
| UI Step |
|---|
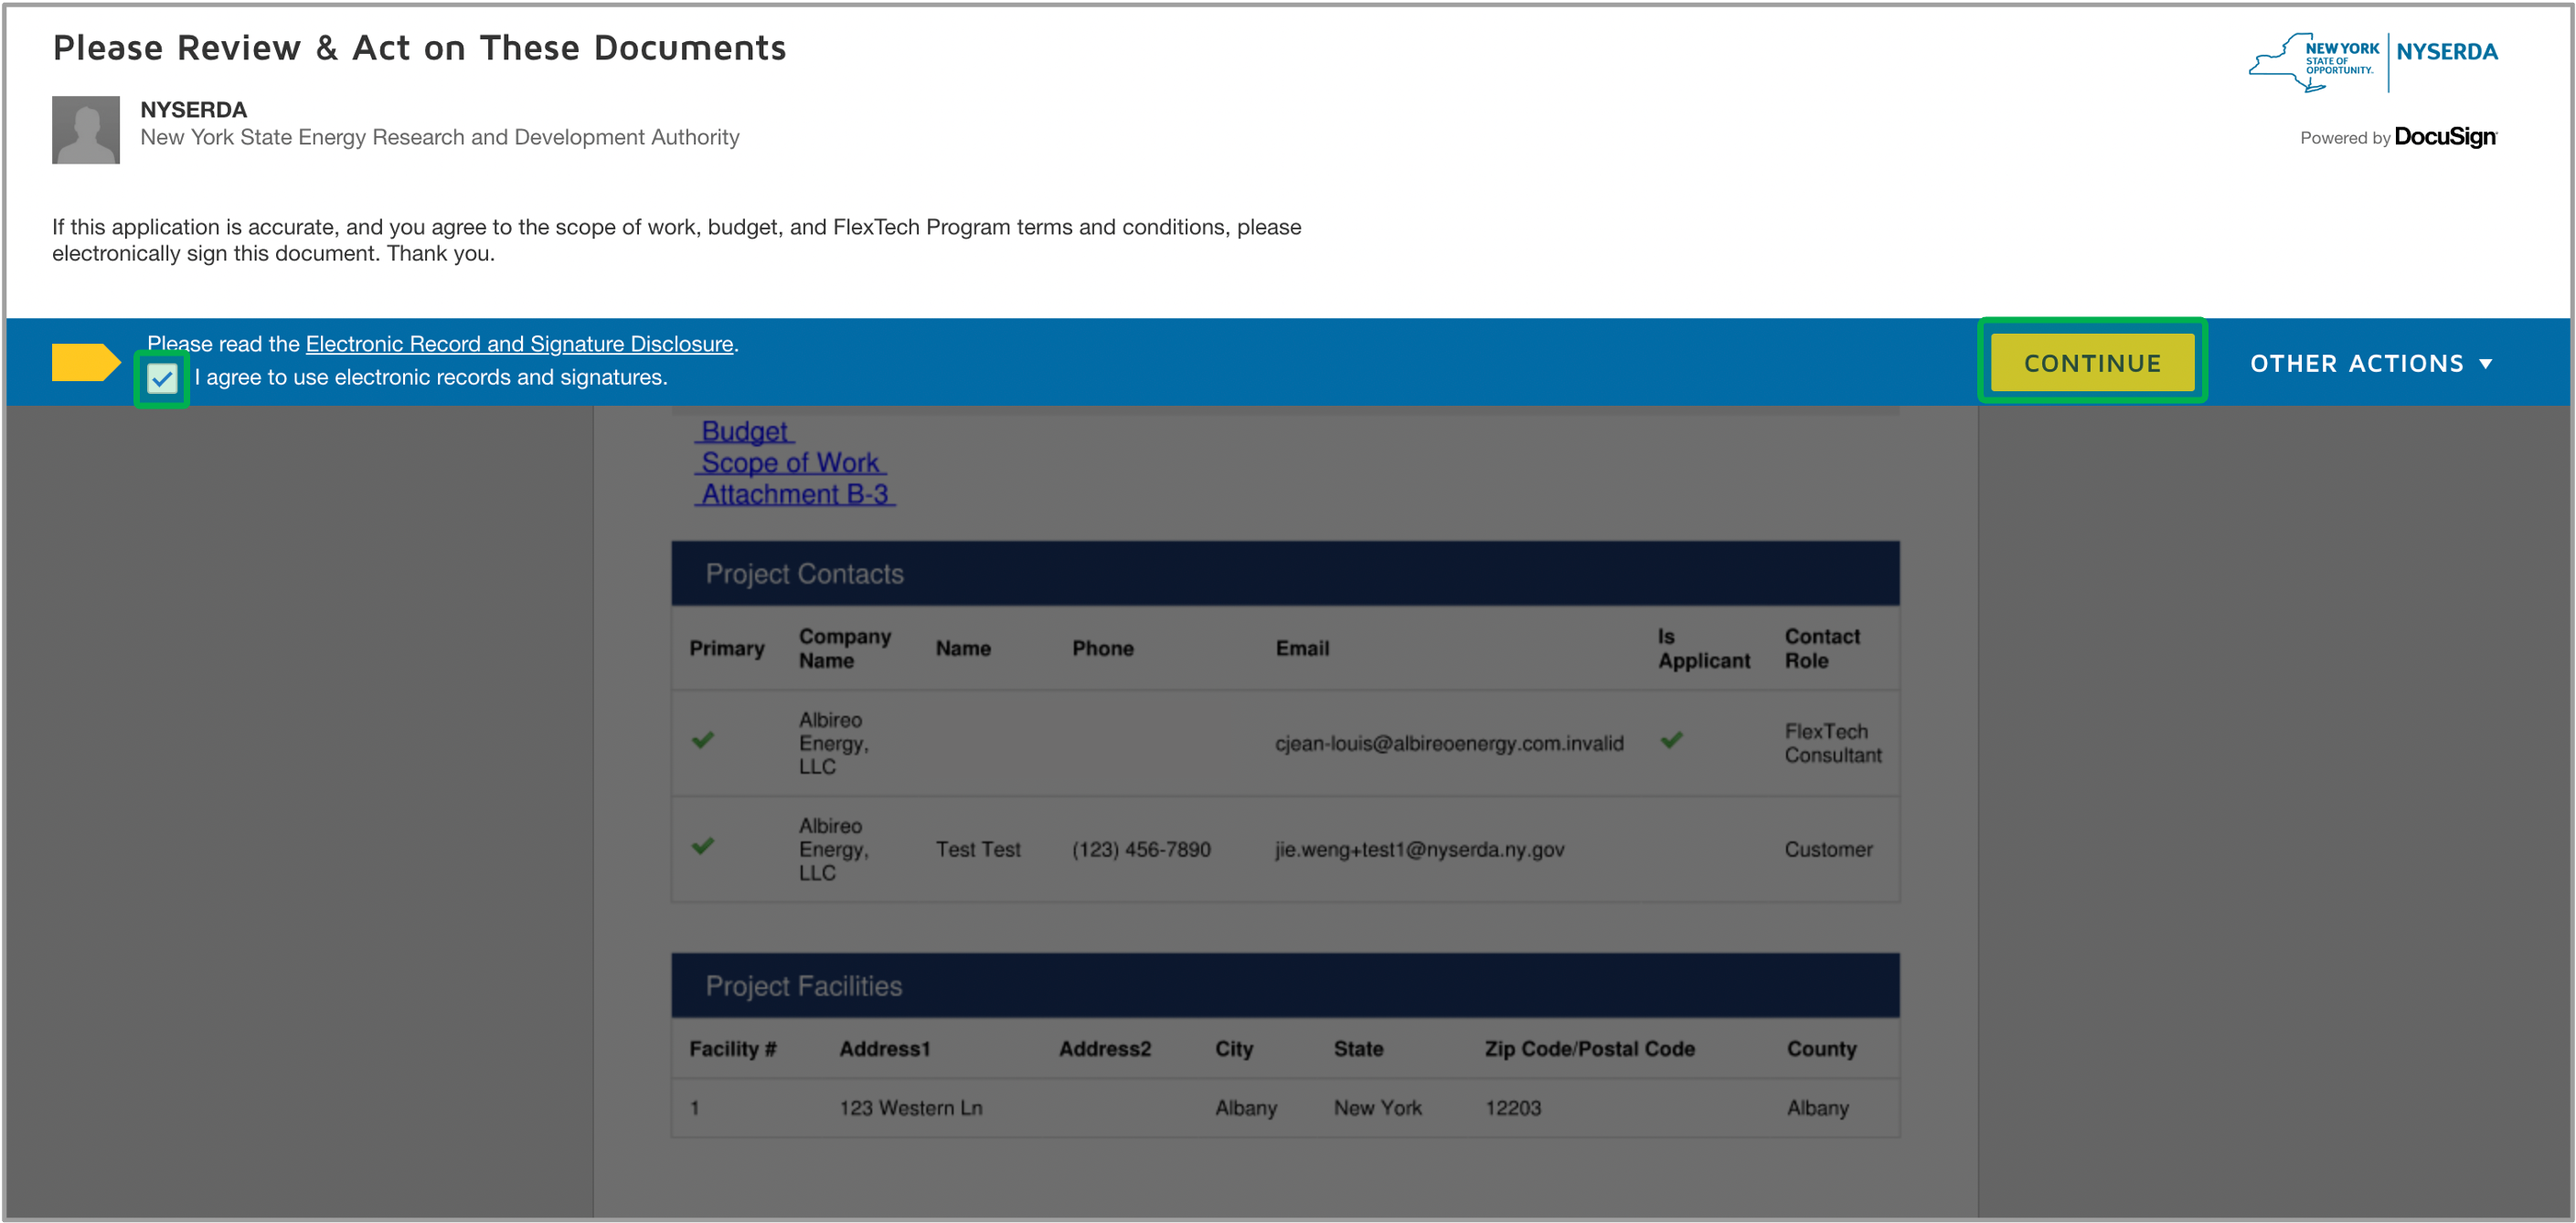
The page will redirect for you to DocuSign to review and sign the document. Read the Electronic Record and Signature Discloser Disclosure and check the Checkbox, then click Continue.
| Expand |
|---|
| 
|
|
| UI Step |
|---|
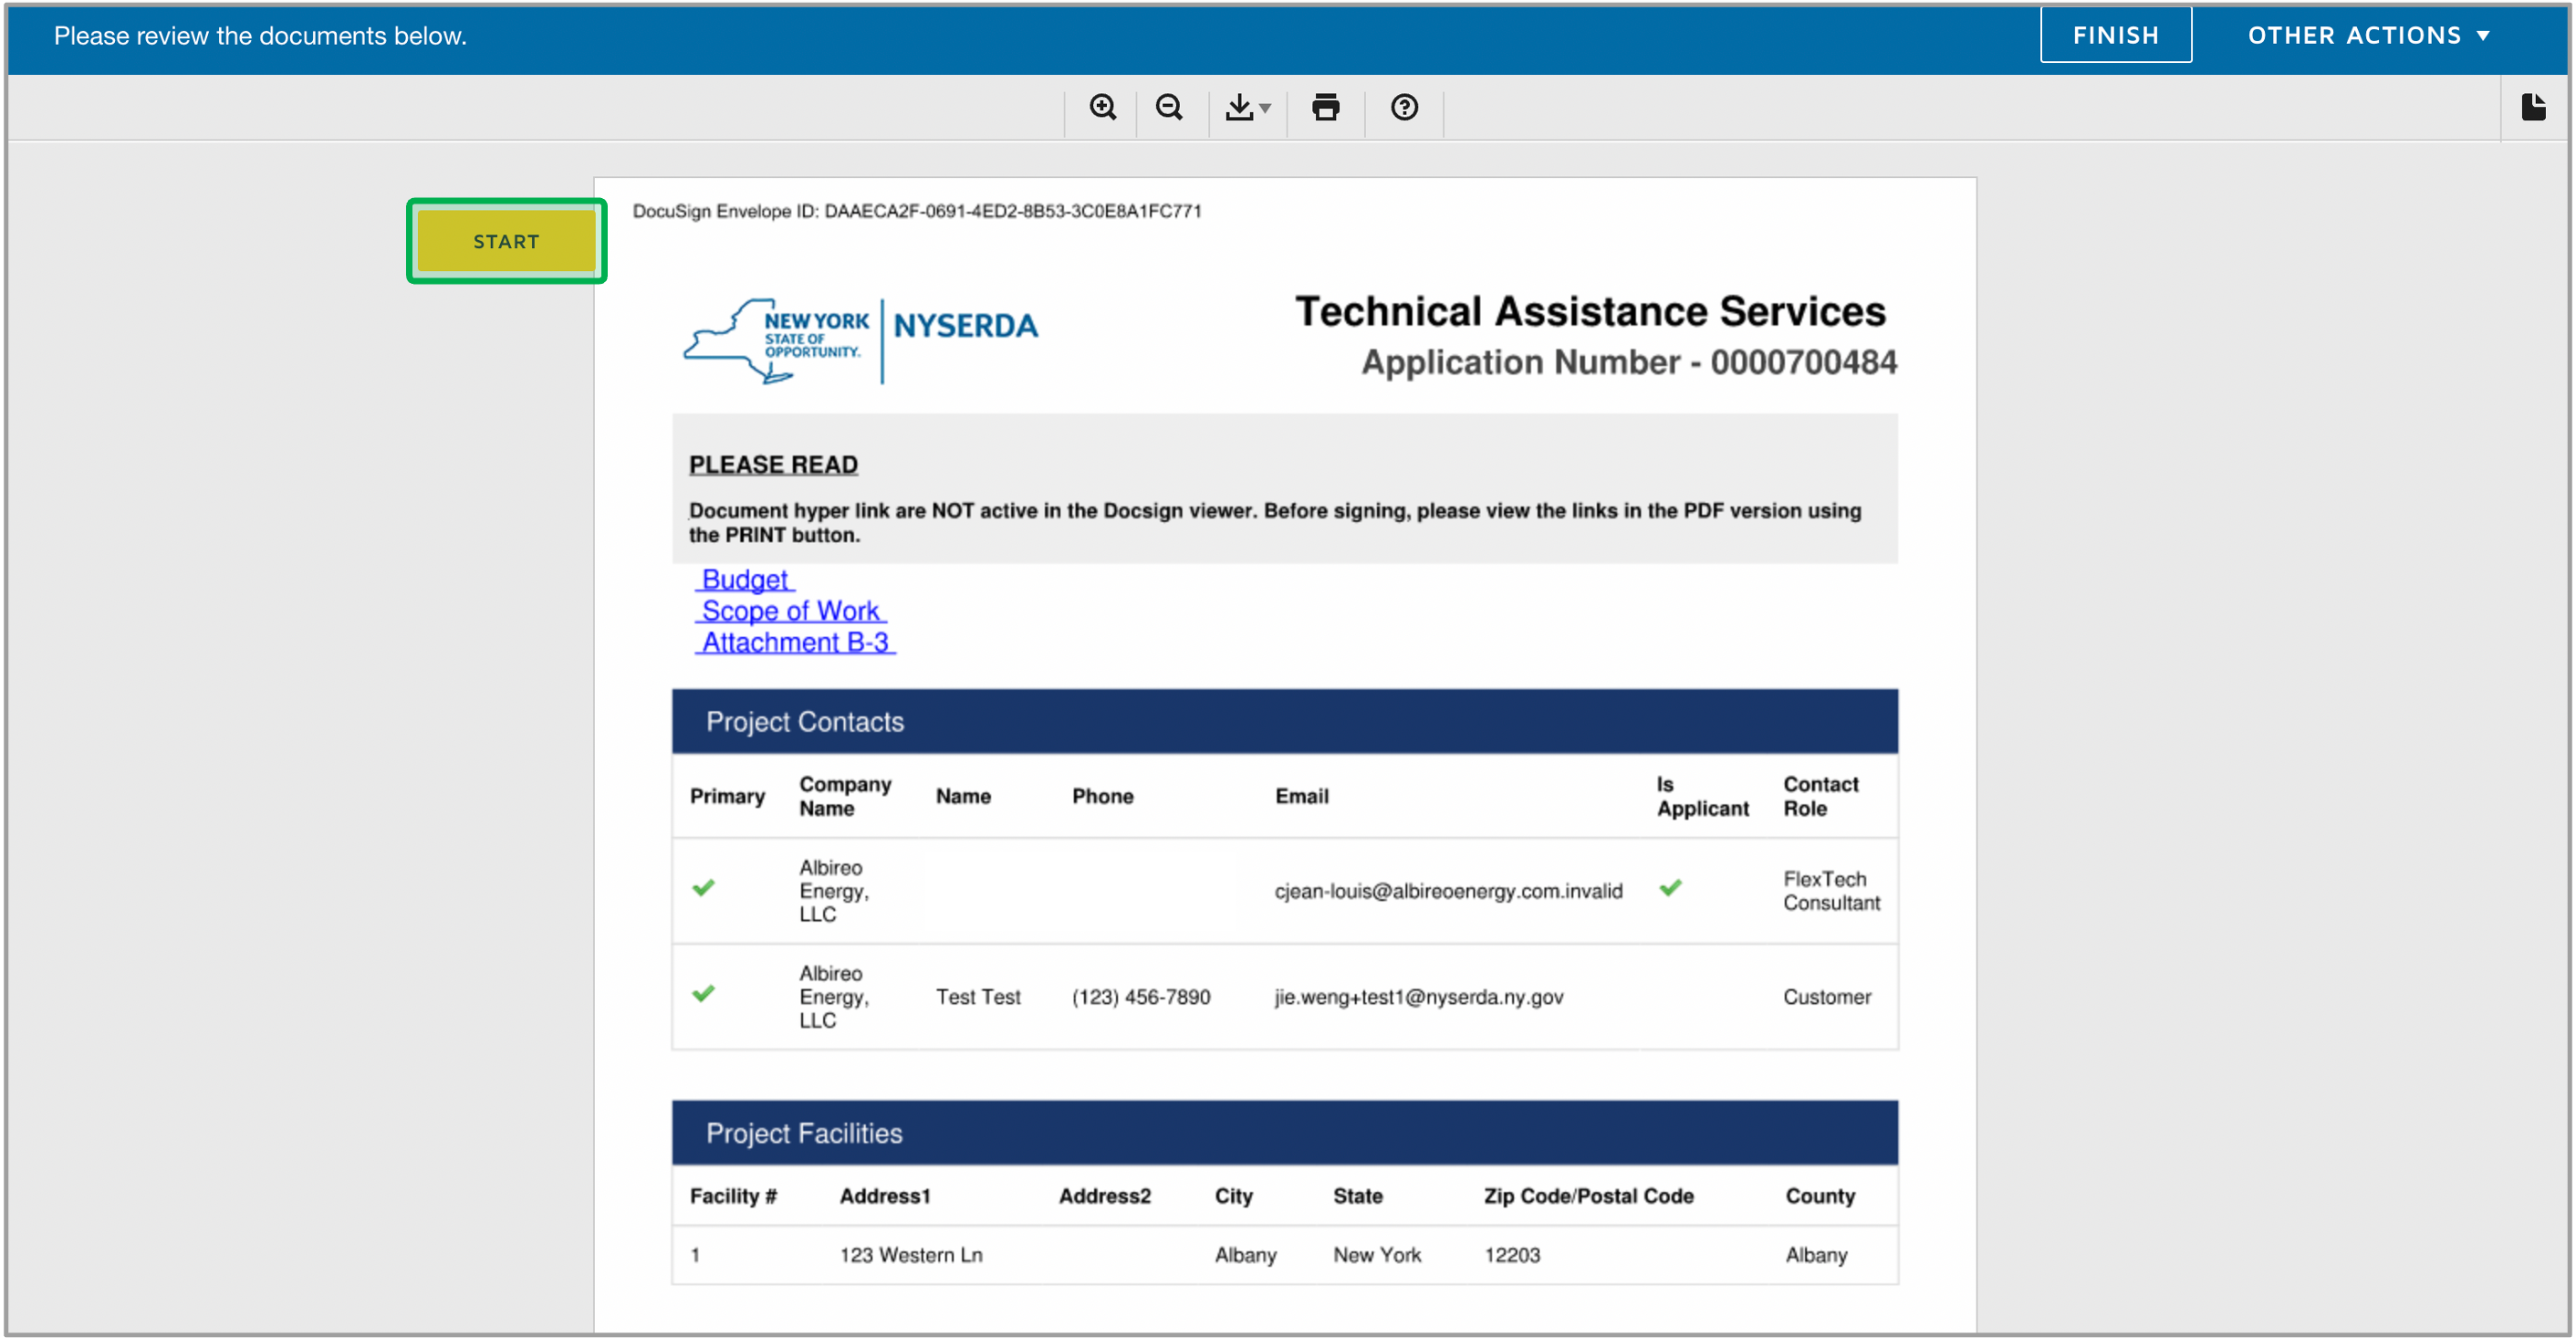
After you review the document, click the Start button for the page to redirect you to sign. | Expand |
|---|
| 
|
|
| UI Step |
|---|
At the bottom of the page, click the Sign button. | Expand |
|---|
| 
|
|
| UI Step |
|---|
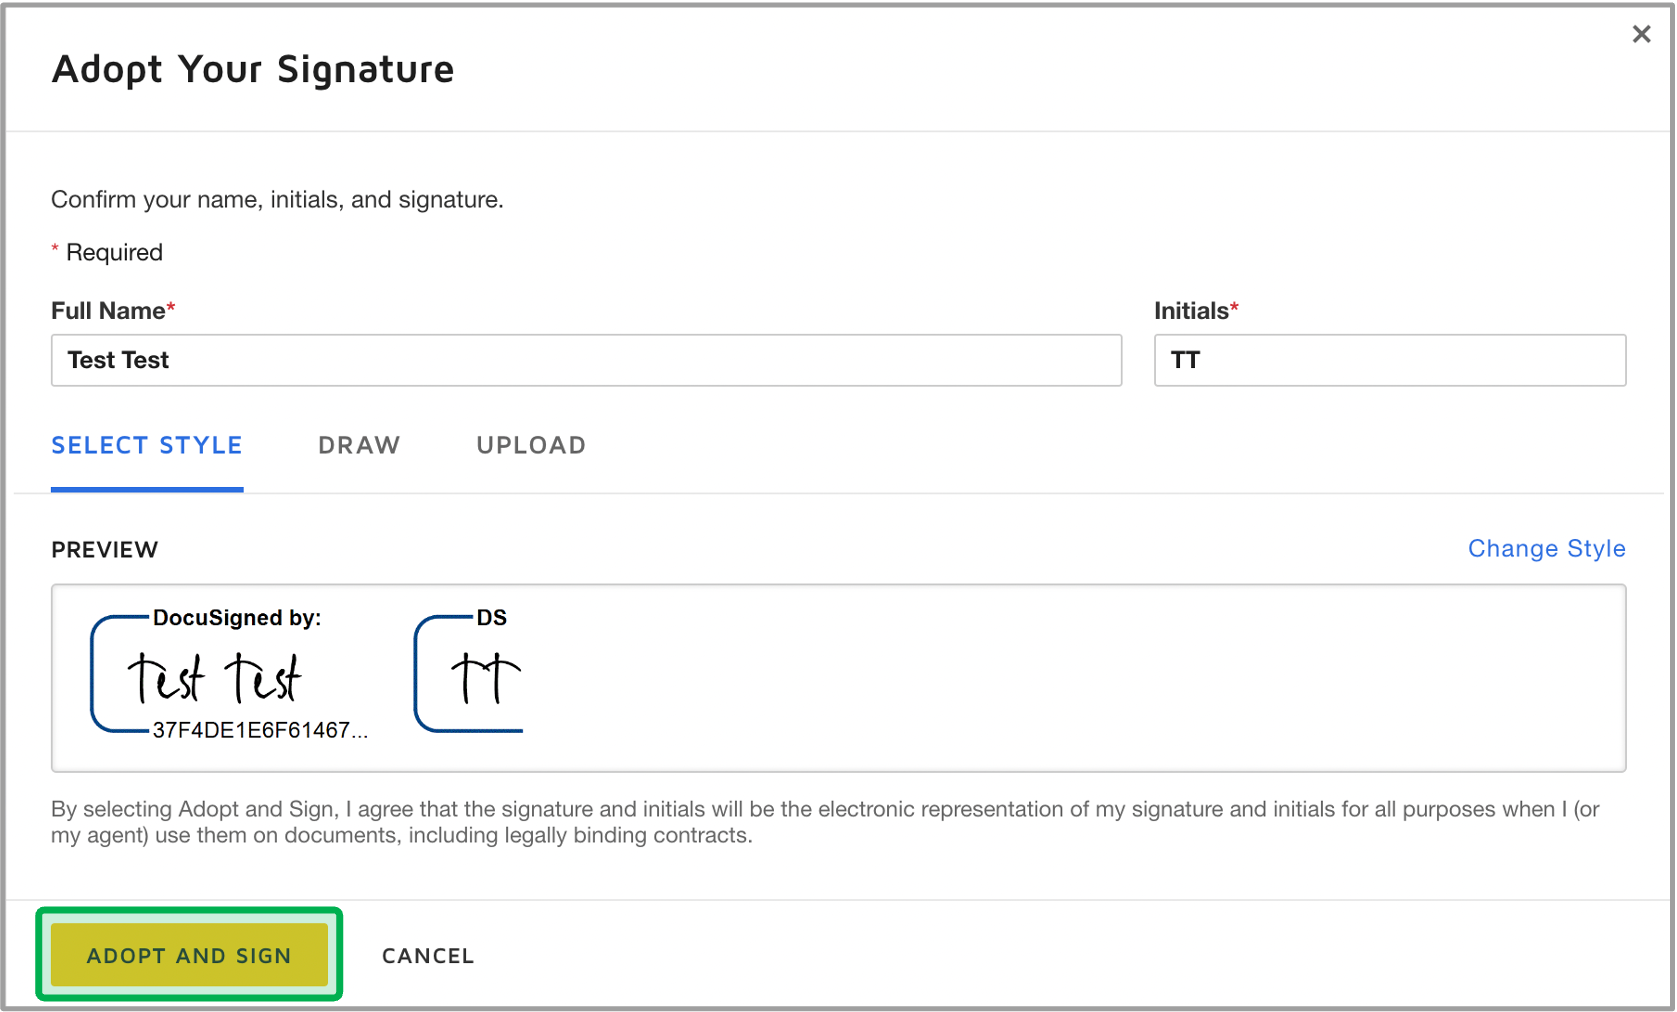
Review your signature then click the Adopt and Sign button. | Expand |
|---|
|  |
|
| UI Step |
|---|
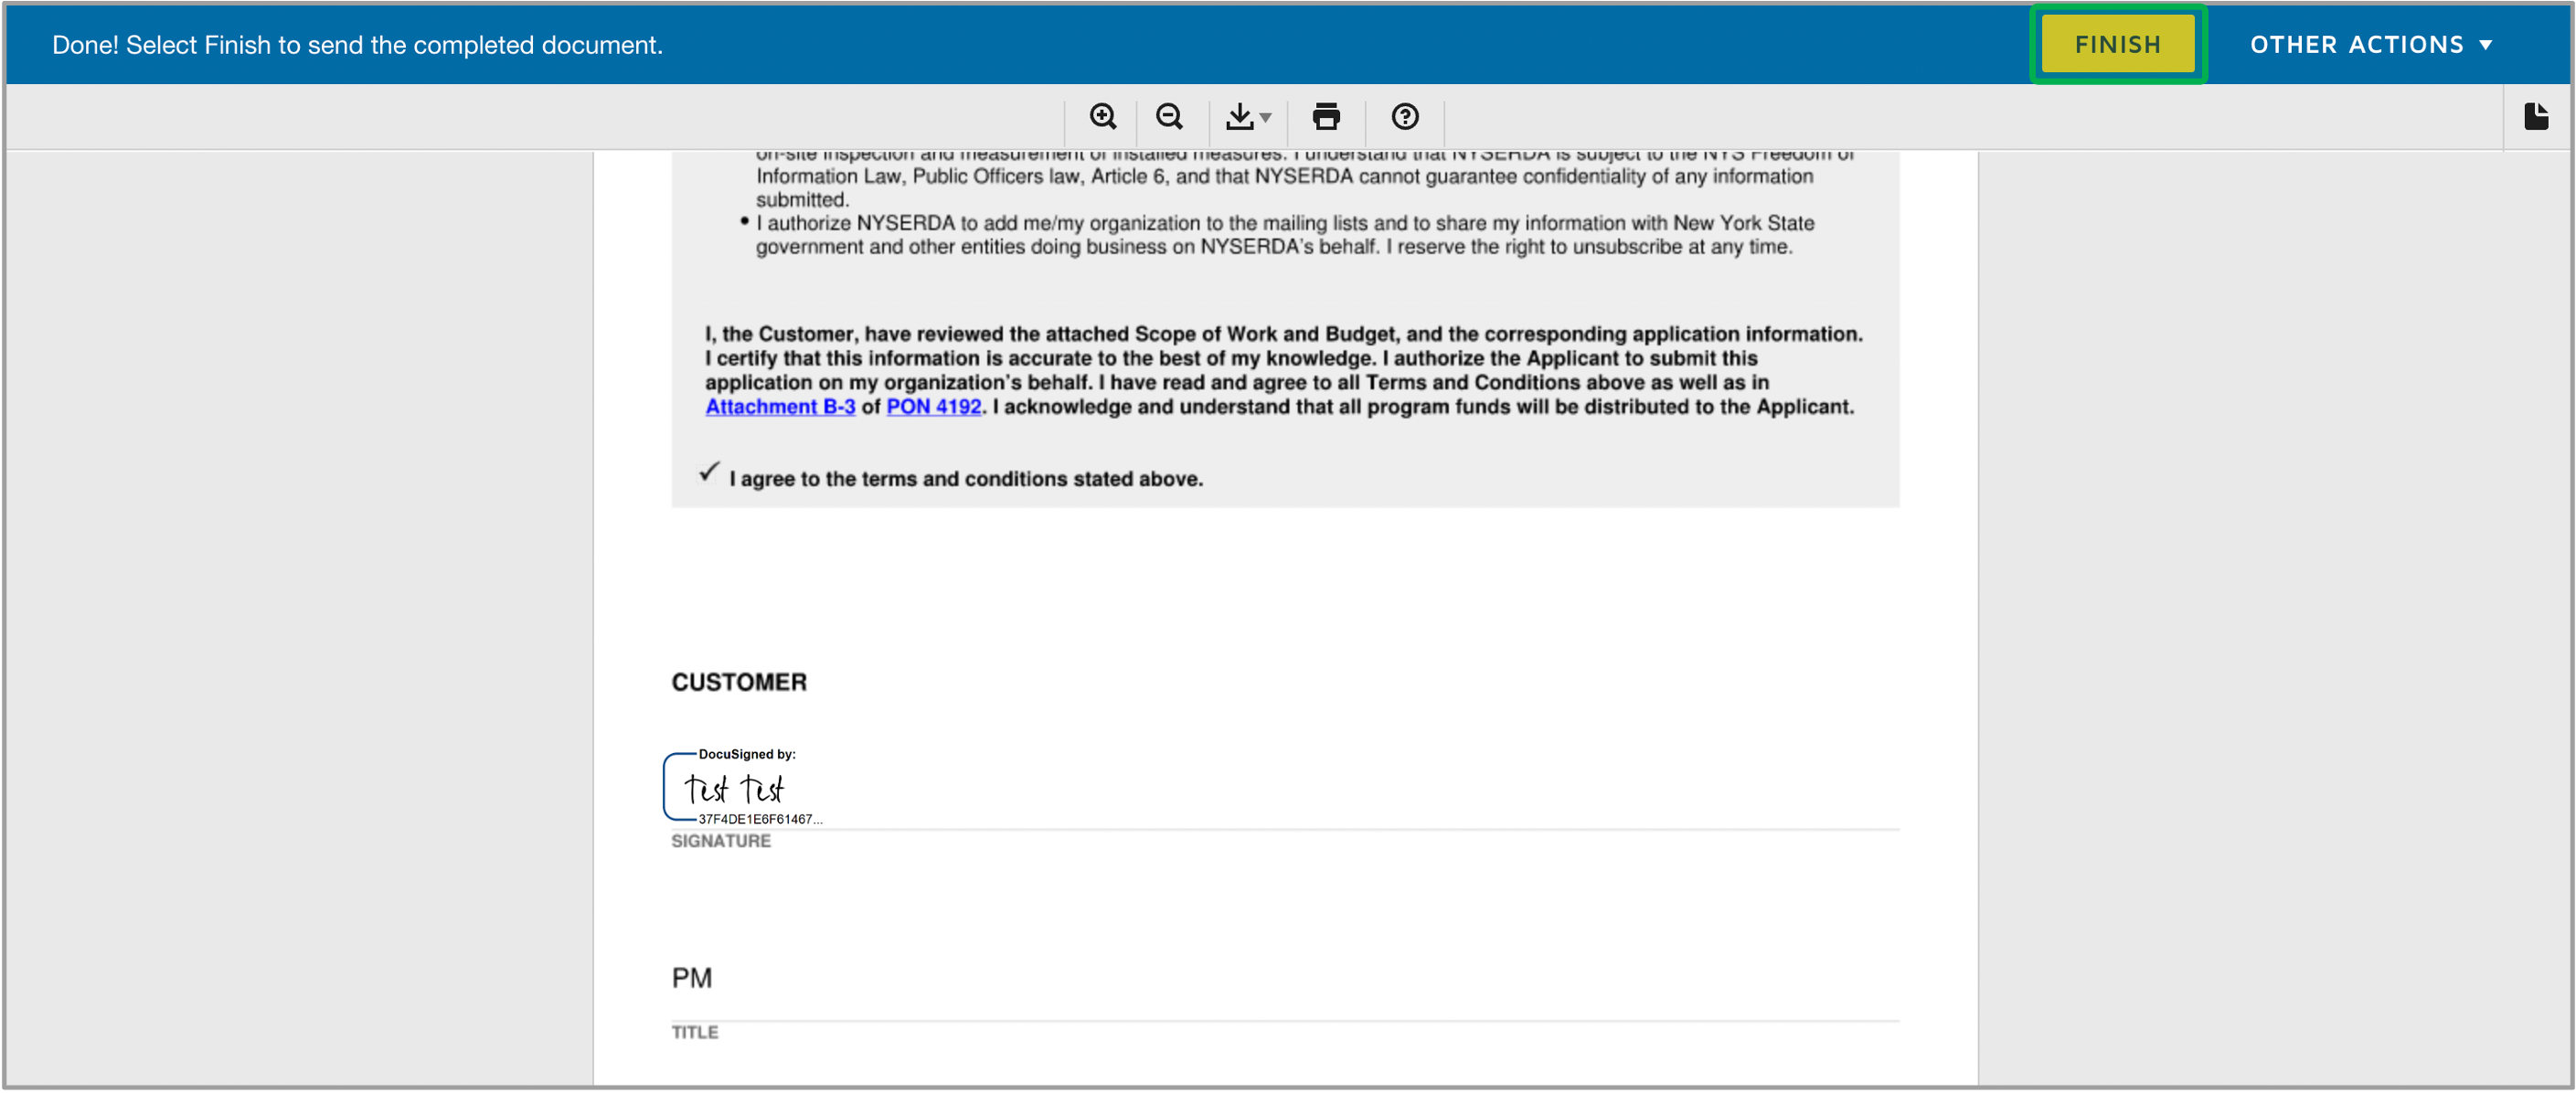
Click the Finish button to complete your Electronic Signature process. The page will redirect back to the Certification page.| Expand |
|---|
| 
|
|
|
|
| UI Expand |
|---|
| title | Consultant as the Applicant |
|---|
| | UI Steps |
|---|
| | UI Step |
|---|
Review the summary of your application, then at the bottom of the Certification page, check the Checkbox and thenclick the Send for Electronic Signature button. | Expand |
|---|
|  |
|
| UI Step |
|---|
Consultant should see a green bar once DocuSign is sent. The browser can be closed as this is the last screen that the Consultant will see if the DocuSign function is used. | Tip |
|---|
| Consultant can check on the status of their project by going to the Projects tab in the portal. The status will change from Unsubmitted to Submitted within 24 hours after the Customer signs the DocuSign agreement. |
| Expand |
|---|
|  Image Added Image Added |
|
| UI Step |
|---|
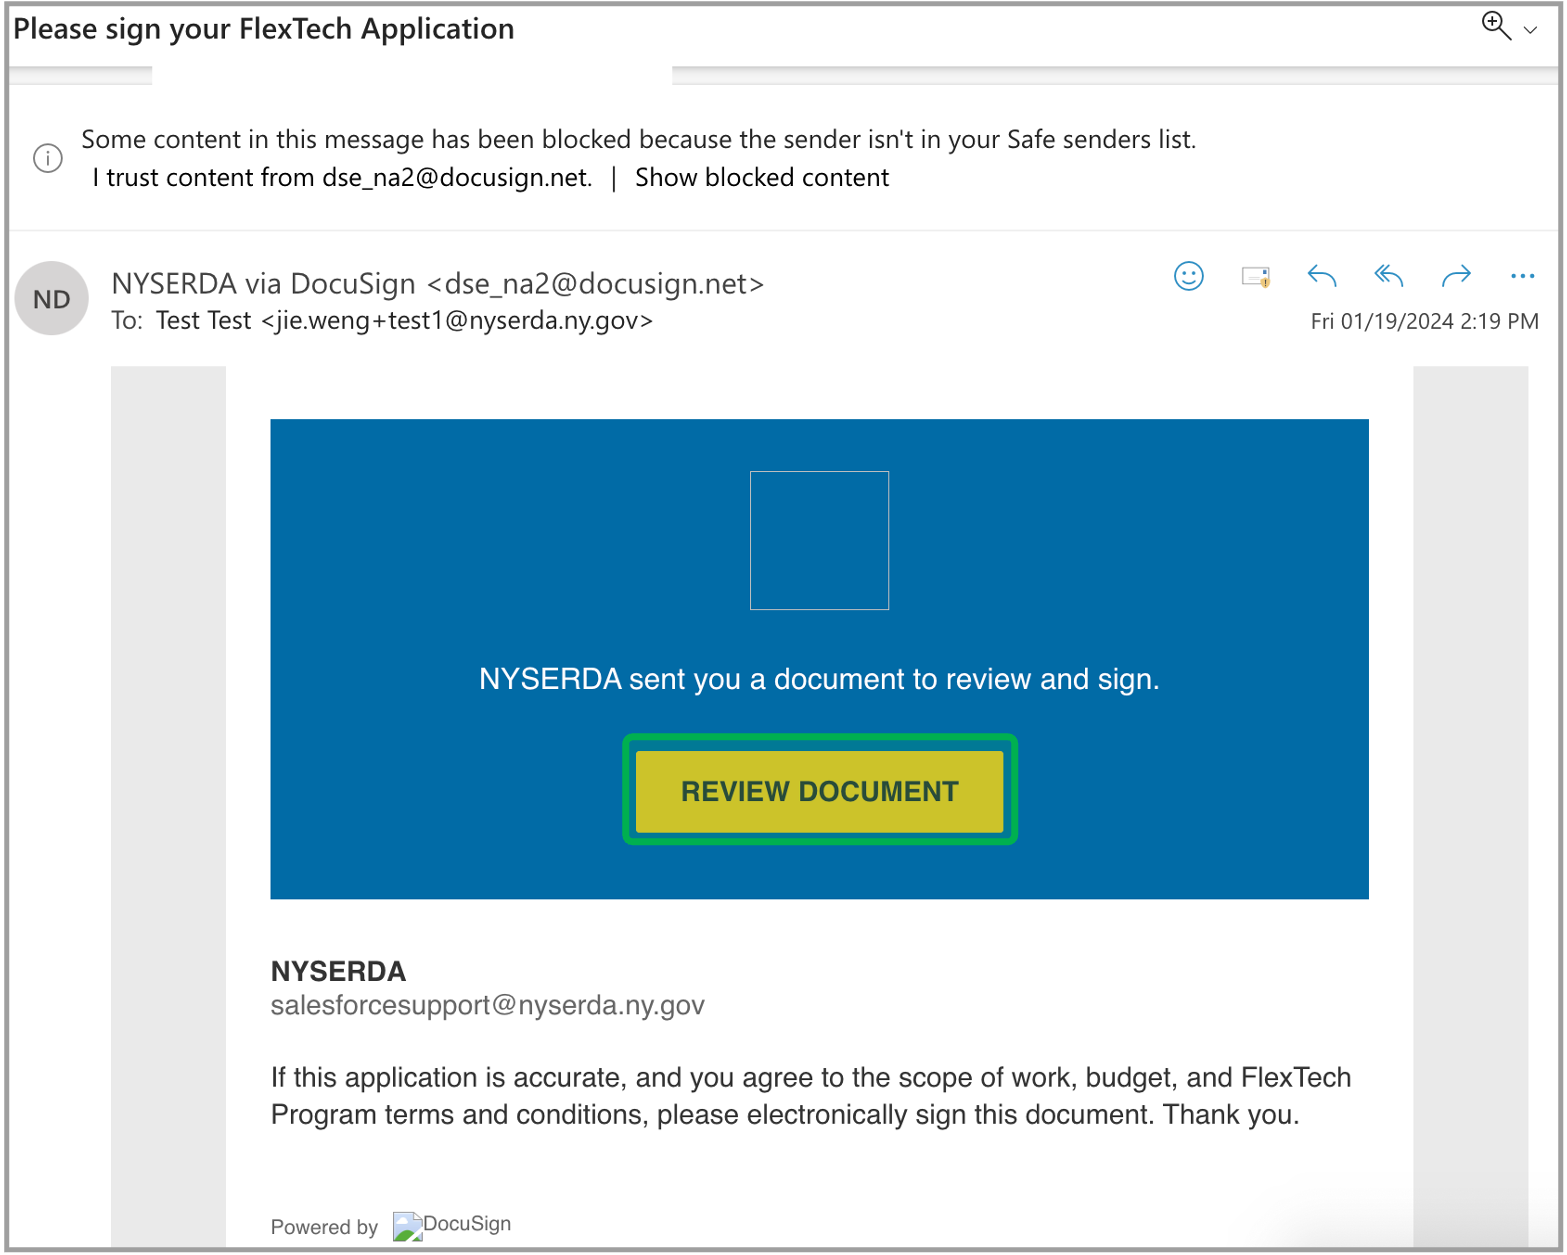
The Customer should expect an email from Docusign DocuSign to provide the signature, click Review Document. | Tip |
|---|
| The Customers Customer will have 30 days to provide signature. Please check your spam folder for the email to Docusignfrom DocuSign. The Consultant will receive an email confirming their signature the Customer's signature once they have done so. |
| Expand |
|---|
|  |
|
| UI Step |
|---|
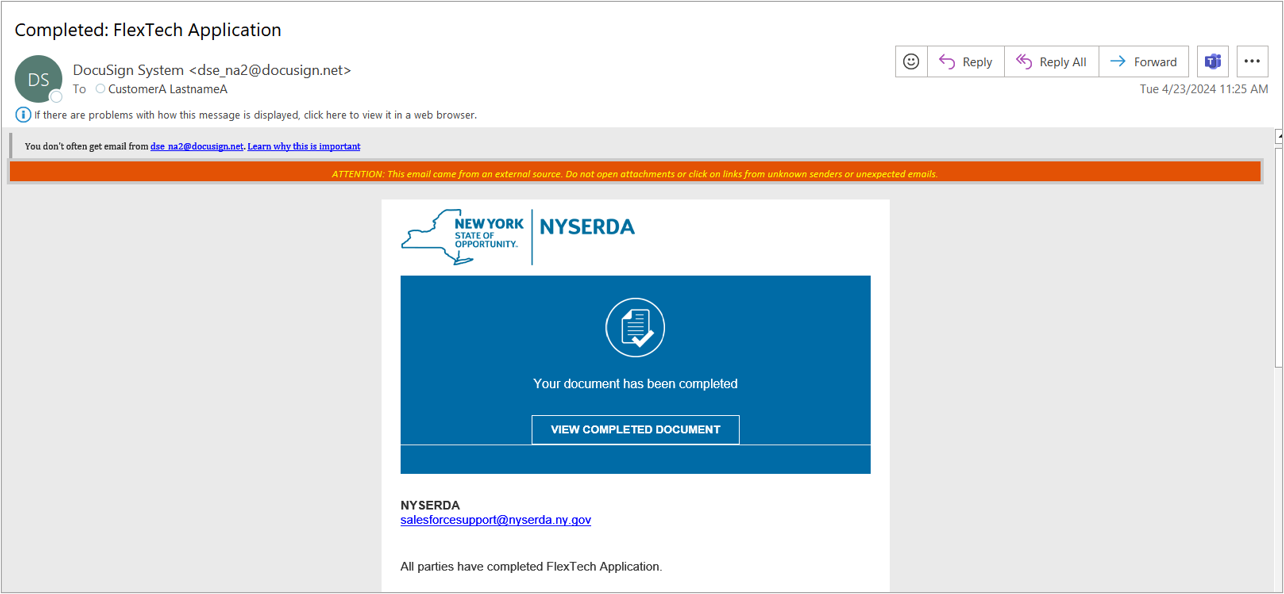
Once the Customer has electronically signed the application, all parties involved with the application will received receive an email confirmation that the application has been submitted. | Expand |
|---|
|  |
|
| UI Step |
|---|
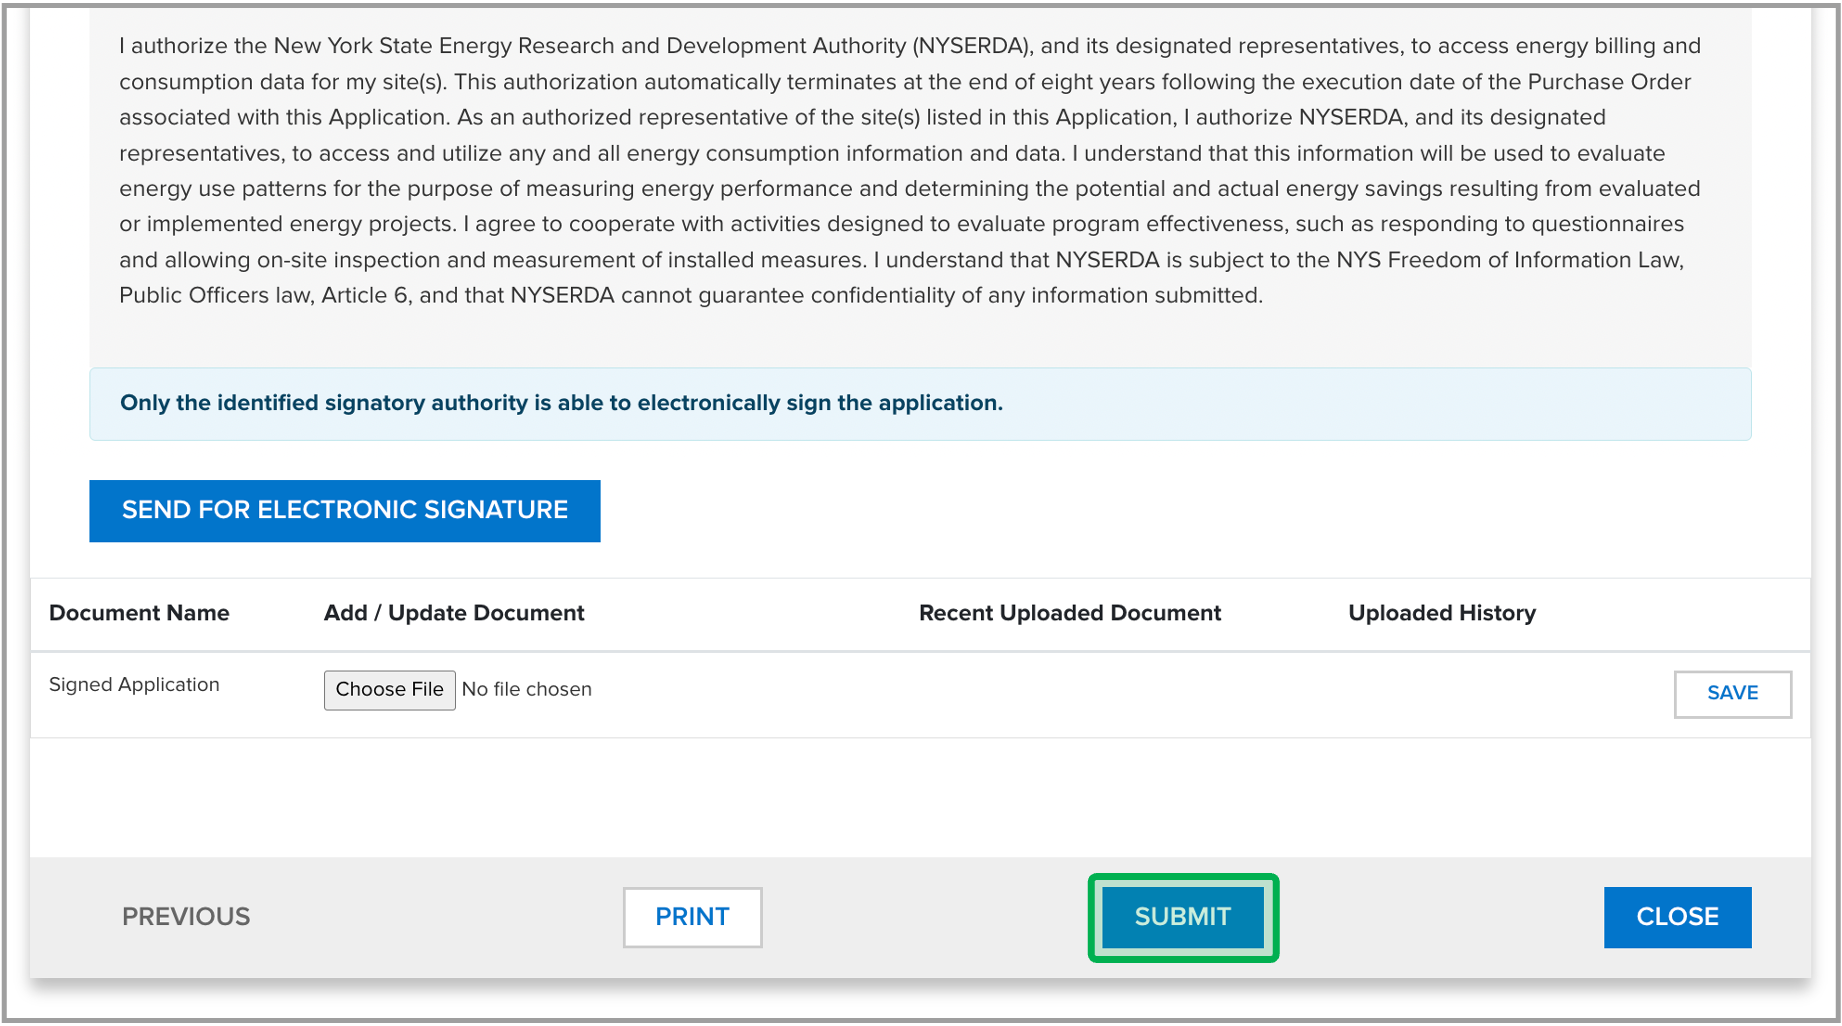
If you have received the customer's signature on the printed application, scan it into your system, upload it to the application, and click Submit. | Expand |
|---|
| 
|
|
|
|
| UI Expand |
|---|
| title | Consultant Submit Printed Application |
|---|
| | UI Steps |
|---|
| | UI Step |
|---|
At the bottom of the Certification page, click Print. | Expand |
|---|
|  Image Added Image Added |
|
| UI Step |
|---|
A downloadable Application PDF will open on a new window. Click the Print icon. | Expand |
|---|
|  Image Added Image Added |
|
| UI Step |
|---|
Once the application is signed, go back to the Certification page and click Choose File at the bottom to upload. | Expand |
|---|
|  Image Added Image Added |
|
| UI Step |
|---|
Click Save. | Expand |
|---|
|  Image Added Image Added |
|
| UI Step |
|---|
The window will refresh and a prompt at the top will state that you have successfully submitted your paper signature document. | Warning |
|---|
| This does not mean the application is submitted. |
| Expand |
|---|
|  Image Added Image Added |
|
| UI Step |
|---|
Scroll down to the bottom of the Certification page again. Check off the Terms and Conditions Box and click Submit. | Expand |
|---|
|  Image Added Image Added |
|
| UI Step |
|---|
The window will refresh again and a prompt at the top will state that your application has been submitted successfully.| Expand |
|---|
|  Image Added Image Added |
|
|
|
|
| Aura - Tab |
|---|
| | Panel |
|---|
| borderColor | #002D72 |
|---|
| bgColor | #F3F4F9 |
|---|
| titleColor | #ffffff |
|---|
| borderWidth | 1 |
|---|
| titleBGColor | #002D72 |
|---|
| borderStyle | none |
|---|
| title | Next Steps |
|---|
|
|
| UI Expand |
|---|
| title | Submission Verification |
|---|
| | Info |
|---|
| The instructions below guide you through the Submission Verification process. Once you submit the Project Application, you should expect the following communication via email: | Expand |
|---|
| title | Application submissionSubmission |
|---|
| Hello [User Name] NYSERDA has received your FlexTech Project application for FT - 0000701224 - TestingCustomer423 - 17 Columbia Circle. The project status has been updated to Submitted. Please note that this email does not commit NYSERDA to award a Purchase Order, or to pay any costs incurred. If you have any questions, please email FlexTech@nyserda.ny.gov. Thank you, The FlexTech Team |
|
|
| UI Expand |
|---|
| | Info |
|---|
| The instructions below guide you through the Document Rejection process. Once you submit the Project Application, NYSERDA staff will review and approve all required documents submitted. If any document(s) do not meet the requirement, it requirements, the document(s) status will be set to Rejected status and you are expected to upload a new revised document(s). You can expect the following communication via email if any document is rejected: | Expand |
|---|
| title | Document Rejection Email |
|---|
| Hello [User Name] There is additional information needed to complete the review of your Technical Assistance application FT - 0000000000 - test - test Street.
Please provide the following in two weeks: - a) Document Name - Scope of Work
b) File Name - Test.docx
c) Notes - Wrong Project SOW - a) Document Name - Budget
b) File Name - Test.docs
c) Notes - Incomplete
|
|
| UI Steps |
|---|
|
| UI Step |
|---|
If you receive a Document Rejection Email, access your NYSERDA SalesForce Portal. Then, navigate to the Projects tab and select All Waiting for Customer Response under Submitted Project under the dropdown list. |
| UI Step |
|---|
Under the new dropdown, locate your application and click on your Project Name Hyperlink. |
| UI Step |
|---|
In the Project Details page, scroll down to locate the Application Document Information section section. Then, look for any document with a Reject status. |
| UI Step |
|---|
Click the Choose File button to upload and re-submit the document. | Warning |
|---|
| File name or uploads can not exceed 40 characters. |
|
| UI Step |
|---|
Once you add the new document, click the Save Document button. |
| UI Step |
|---|
The rejected document should now show a Submitted status. |
|
|
|
|


