| Info |
|---|
| The instructions below provides guidance for contractors with the Workscope Submission step. The Workscope Submission will be assigned to the Contractor who accepted the Enrollment Acceptance step. |
| Aura - Tab Group |
|---|
| settings | {"generalSettings":{"tabSpacing":0,"tabWidth":50,"tabHeight":40,"direction":"vertical"},"activeSettings":{"backgroundColor":{"color":"#002d72"},"text":{"fontSize":16,"color":"#fff","textAlign":"left","fontWeight":"normal"}},"inactiveSettings":{"backgroundColor":{"color":"#f4f5f7"},"text":{"fontSize":16,"color":"#5e6c84","textAlign":"left","fontWeight":"normal"}},"contentSettings":{"backgroundColor":{"color":"#fff"},"border":{"style":"solid","width":2,"top":false,"bottom":false,"left":true,"right":false,"color":"#002d72"},"padding":{"top":10,"right":10,"bottom":10,"left":10}},"hoverSettings":{"backgroundColor":{"color":"#0073a4"},"text":{"fontSize":16,"color":"#ffffff","textAlign":"left","fontWeight":"normal"}}} |
|---|
| tab | 1 |
|---|
|
| Aura - Tab |
|---|
| title | Applicant Information |
|---|
|
| Panel |
|---|
| borderColor | #002D72 |
|---|
| bgColor | #F3F4F9 |
|---|
| titleColor | #ffffff |
|---|
| borderWidth | 1 |
|---|
| titleBGColor | #002D72 |
|---|
| borderStyle | none |
|---|
| title | Workscope Submission - Applicant Information |
|---|
|
|
| Info |
|---|
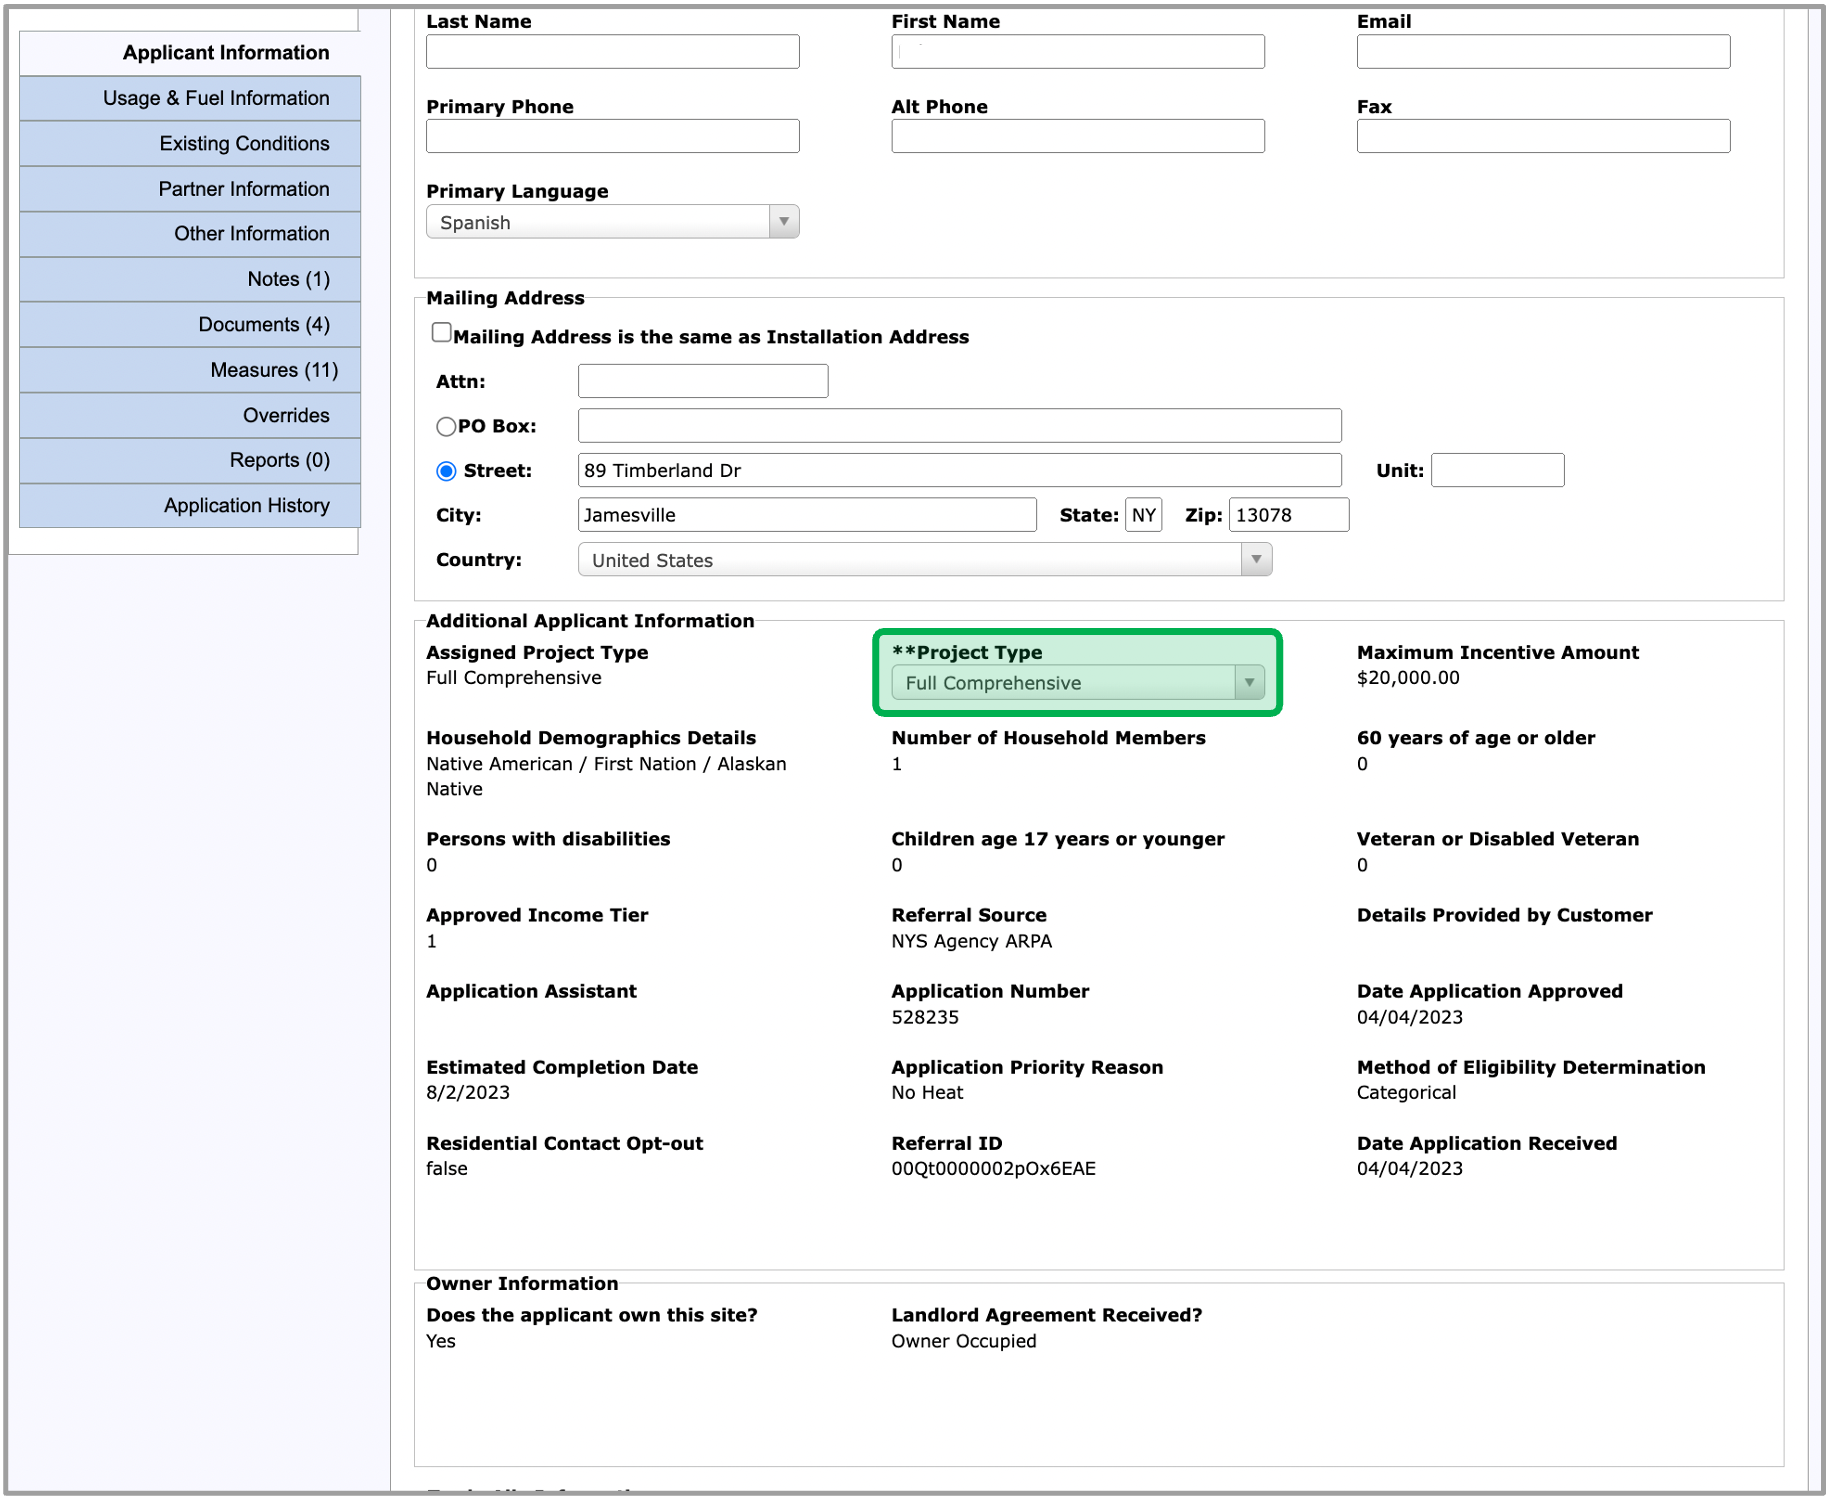
When the Workscope Submission is in the New status, complete the following on the Applicant Information tab. Any insulation areas that will be proposed for improvement must have the corresponding Existing Condition filled out (ie. If they are proposing garage ceiling insulation, they must fill in the garage ceiling fields in existing conditions). |
| UI Steps |
|---|
|
| UI Step |
|---|
Input/select the Additional Applicant Information and Owner Information fields. | Tip |
|---|
The fields will be prepopulated by the Salesforce API call when the enrollment is created. |
| Warning |
|---|
Proceed if the Project Type is set as Full Comprehensive or Muni Install. Audit Install is for non invasive measures, unless you are able to obtain the landload approval, in which case the Project Type can be changed to Full Comprehensive. |
| Expand |
|---|
| 
|
|
| UI Step |
|---|
Before the Contractor Assignment and Enrollment Acceptance workflow steps are developed, the Primary Trade Ally on the Workscope Submission step will default to the Trade Ally and Employee associated with the user that created the enrollment. |
| UI Step |
|---|
After every required field on the Applicant Information tab is filled out, input/select all required fields on these tabs: - Usage & Fuel Information
- Existing Conditions
- Partner Information
- Other Information
| Warning |
|---|
All required fields contains two ** (asterisk). |
|
| UI Step |
|---|
Once all of the required tabs are filled out, click the Save button and move on to the Existing Conditions tab. |
|
|
| Aura - Tab |
|---|
|
| Panel |
|---|
| borderColor | #002D72 |
|---|
| bgColor | #F3F4F9 |
|---|
| titleColor | #ffffff |
|---|
| borderWidth | 1 |
|---|
| titleBGColor | #002D72 |
|---|
| borderStyle | none |
|---|
| title | Workscope Submission - Usage & Fuel Information |
|---|
|
|
| Info |
|---|
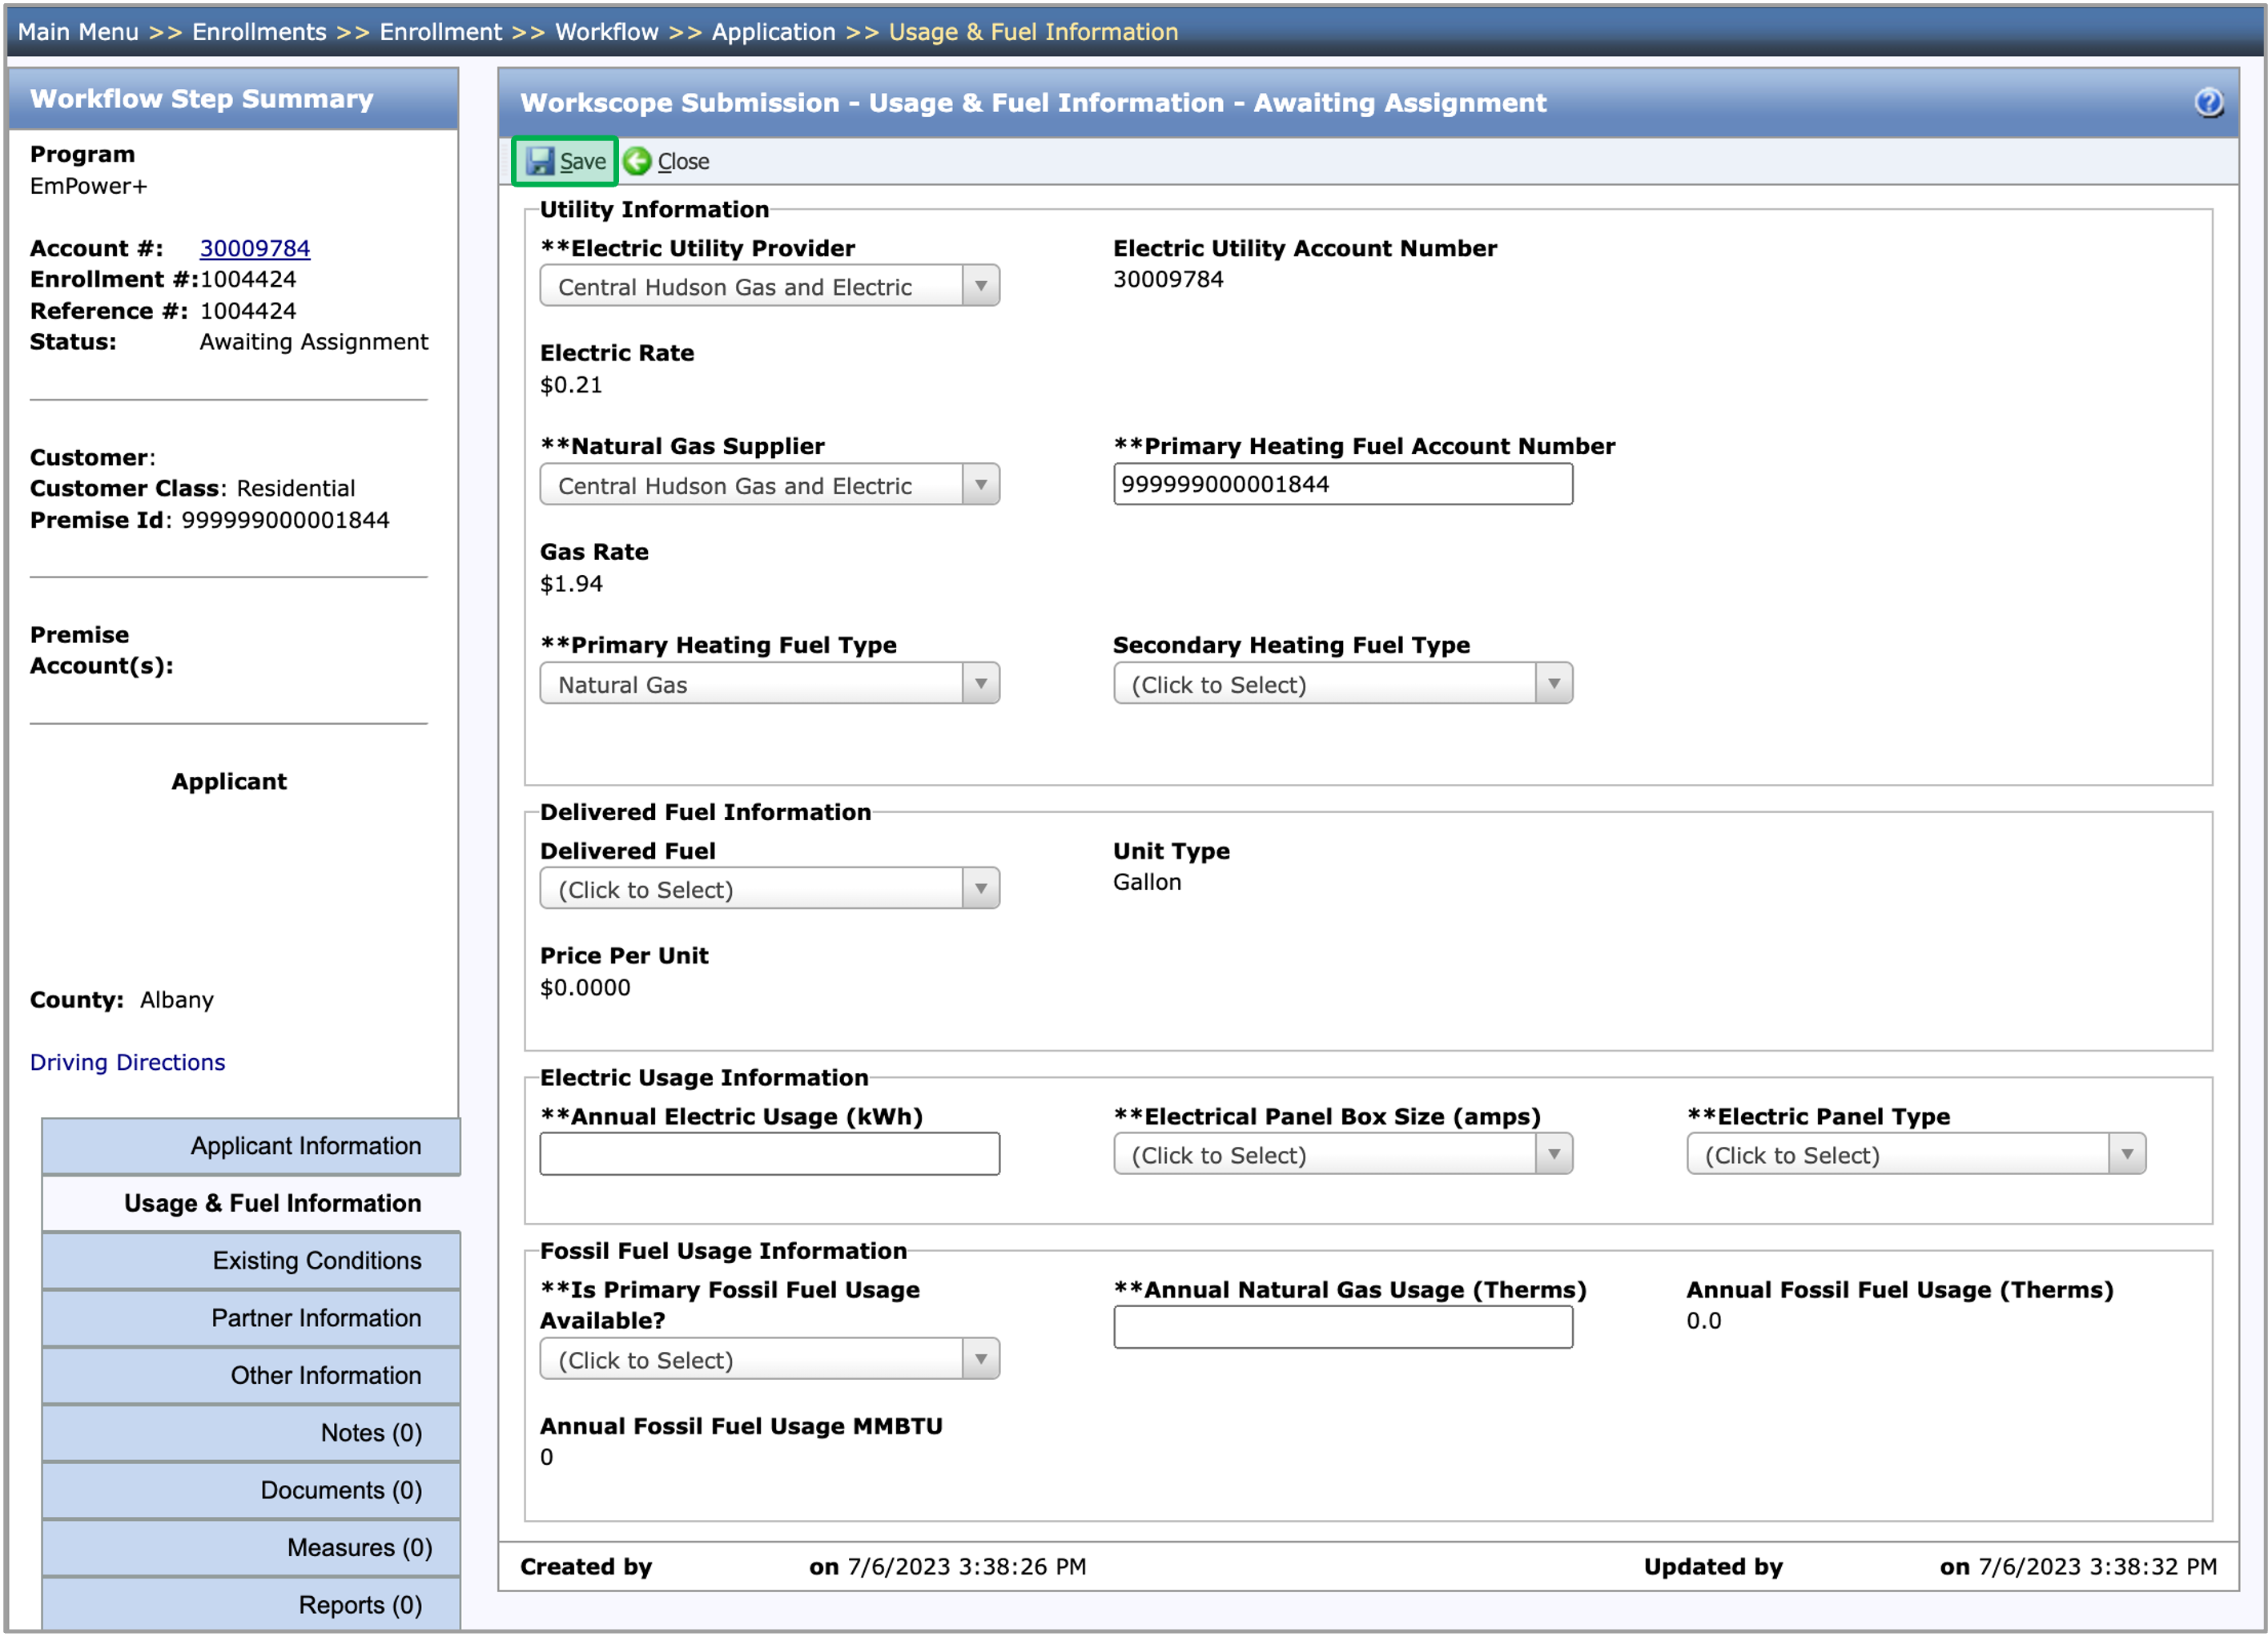
The instruction below provides guidance for contractors to complete the Usage & Fuel tab. Information in the Utility Information section on this tab will come from the Combined Residential Application for EmPower+ Enrollments but can be updated or changed if needed. |
| Section |
|---|
| Column |
|---|
|
| UI Steps |
|---|
|
| UI Step |
|---|
On the Usage & Fuel tab, fill in all of the required fields that contains two ** (asterisk). | Tip |
|---|
Some of the non-editable fields on this tab are calculated based on information added to editable fields. |
|
| UI Step |
|---|
Once all of the required fields are complete, click the Save button to save the Usage & Fuel information. |
|
|
| Column |
|---|
| 
|
|
|
| Aura - Tab |
|---|
|
| Panel |
|---|
| borderColor | #002D72 |
|---|
| bgColor | #F3F4F9 |
|---|
| titleColor | #ffffff |
|---|
| borderWidth | 1 |
|---|
| titleBGColor | #002D72 |
|---|
| borderStyle | none |
|---|
| title | Workscope Submission - Existing Conditions |
|---|
|
|
| Info |
|---|
The instruction below provides guidance for contractors to complete the Existing Conditions tab. Benefit to completing this information upfront will provide us pre-filled information in the Measures tab. |
| Section |
|---|
| Column |
|---|
|
| UI Steps |
|---|
|
| UI Step |
|---|
On the Existing Conditions tab, fill in all of the required fields that contains two ** (asterisk). | Tip |
|---|
The first two fields are preset and not editable for EmPower+ Enrollments. If the Needs Improvment option is selected under the Summary Section, you would be required to add at lease 1 associated Measure on the Measures tab to address the condition. |
|
| UI Step |
|---|
Once all of the required fields are complete, click the Save button and move on the Parner Information tab. |
|
|
| Column |
|---|
| 
|
|
|
| Aura - Tab |
|---|
|
| Panel |
|---|
| borderColor | #002D72 |
|---|
| bgColor | #F3F4F9 |
|---|
| titleColor | #ffffff |
|---|
| borderWidth | 1 |
|---|
| titleBGColor | #002D72 |
|---|
| borderStyle | none |
|---|
| title | Workscope Submission - Partner Information |
|---|
|
|
| Info |
|---|
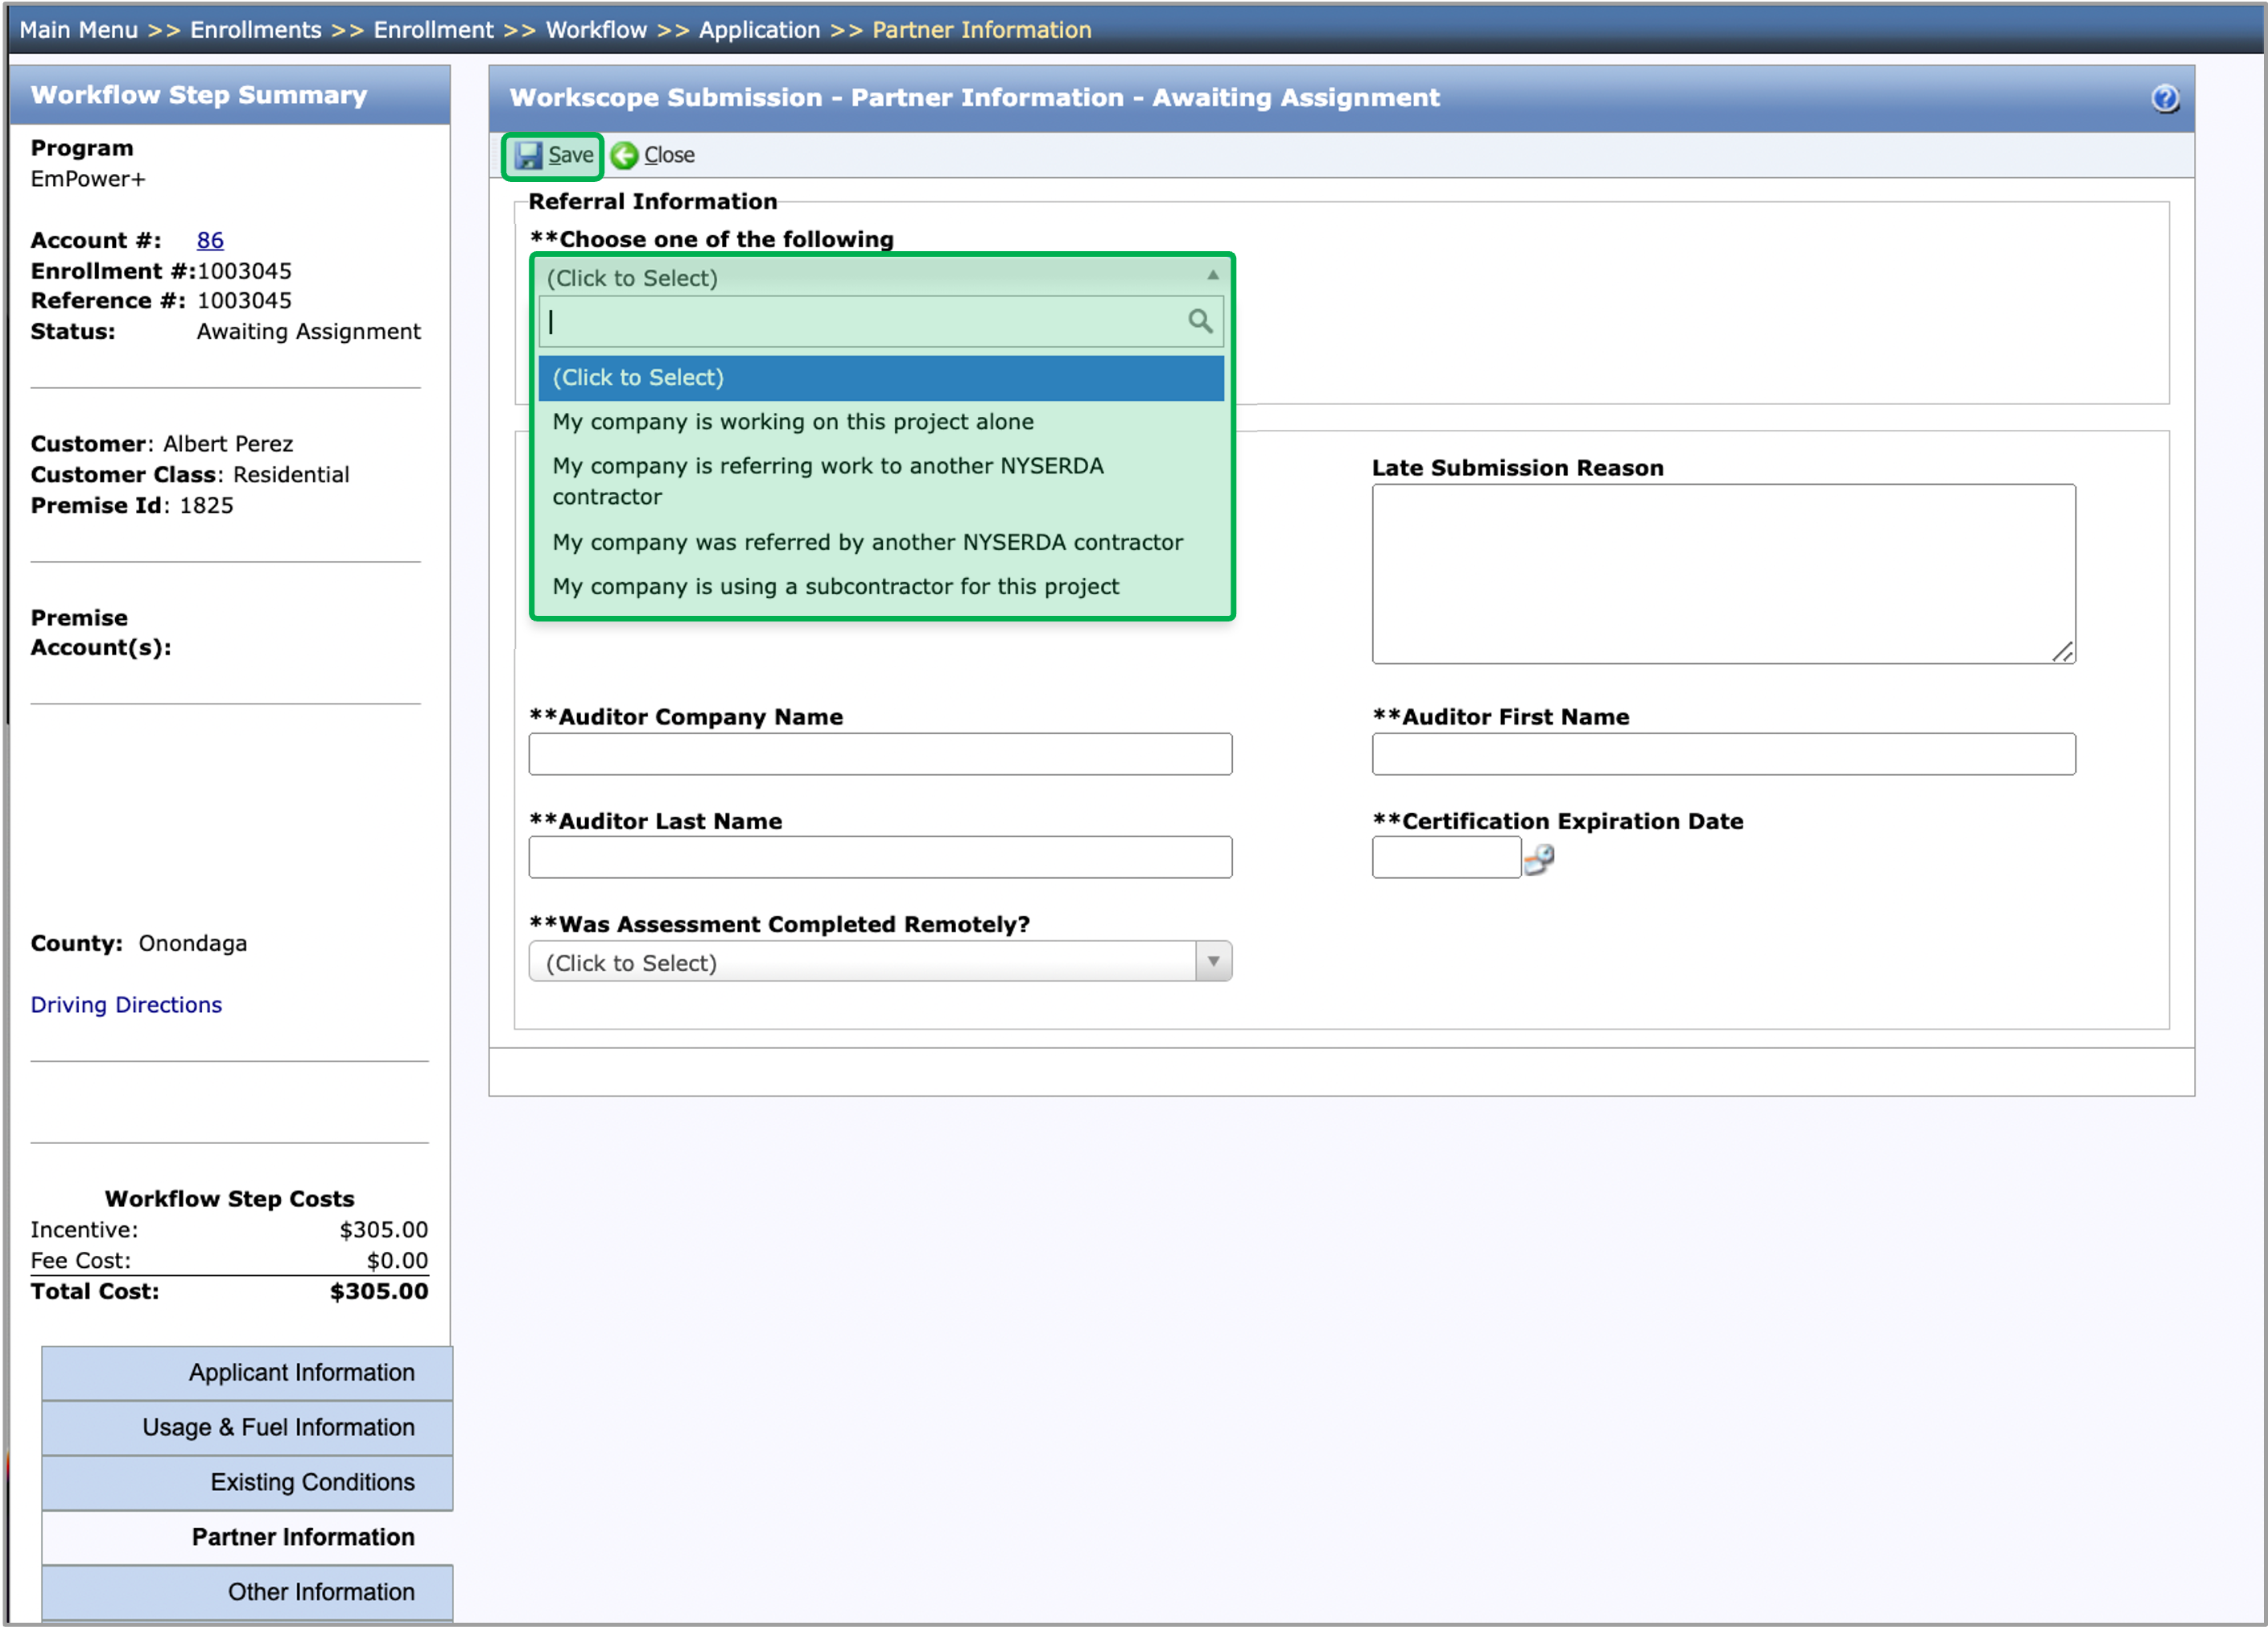
The instruction below provides guidance for contractors to complete the Partner Information tab. |
| Section |
|---|
| Column |
|---|
|
| UI Steps |
|---|
|
| UI Step |
|---|
On the Partner Information tab, choose an option under the Choose one of the following drop-down list. |
| UI Step |
|---|
Fill in all of the required fields that contains two ** (asterisk). | Tip |
|---|
Depending on the option you select, you may have to respond to additional questions. |
|
| UI Step |
|---|
Once all of the required fields are complete, click the Save button and move on the to Other Information tab. |
|
|
| Column |
|---|
| 
|
|
|
| Aura - Tab |
|---|
|
| Panel |
|---|
| borderColor | #002D72 |
|---|
| bgColor | #F3F4F9 |
|---|
| titleColor | #ffffff |
|---|
| borderWidth | 1 |
|---|
| titleBGColor | #002D72 |
|---|
| borderStyle | none |
|---|
| title | Workscope Submission - Other Information |
|---|
|
|
| Info |
|---|
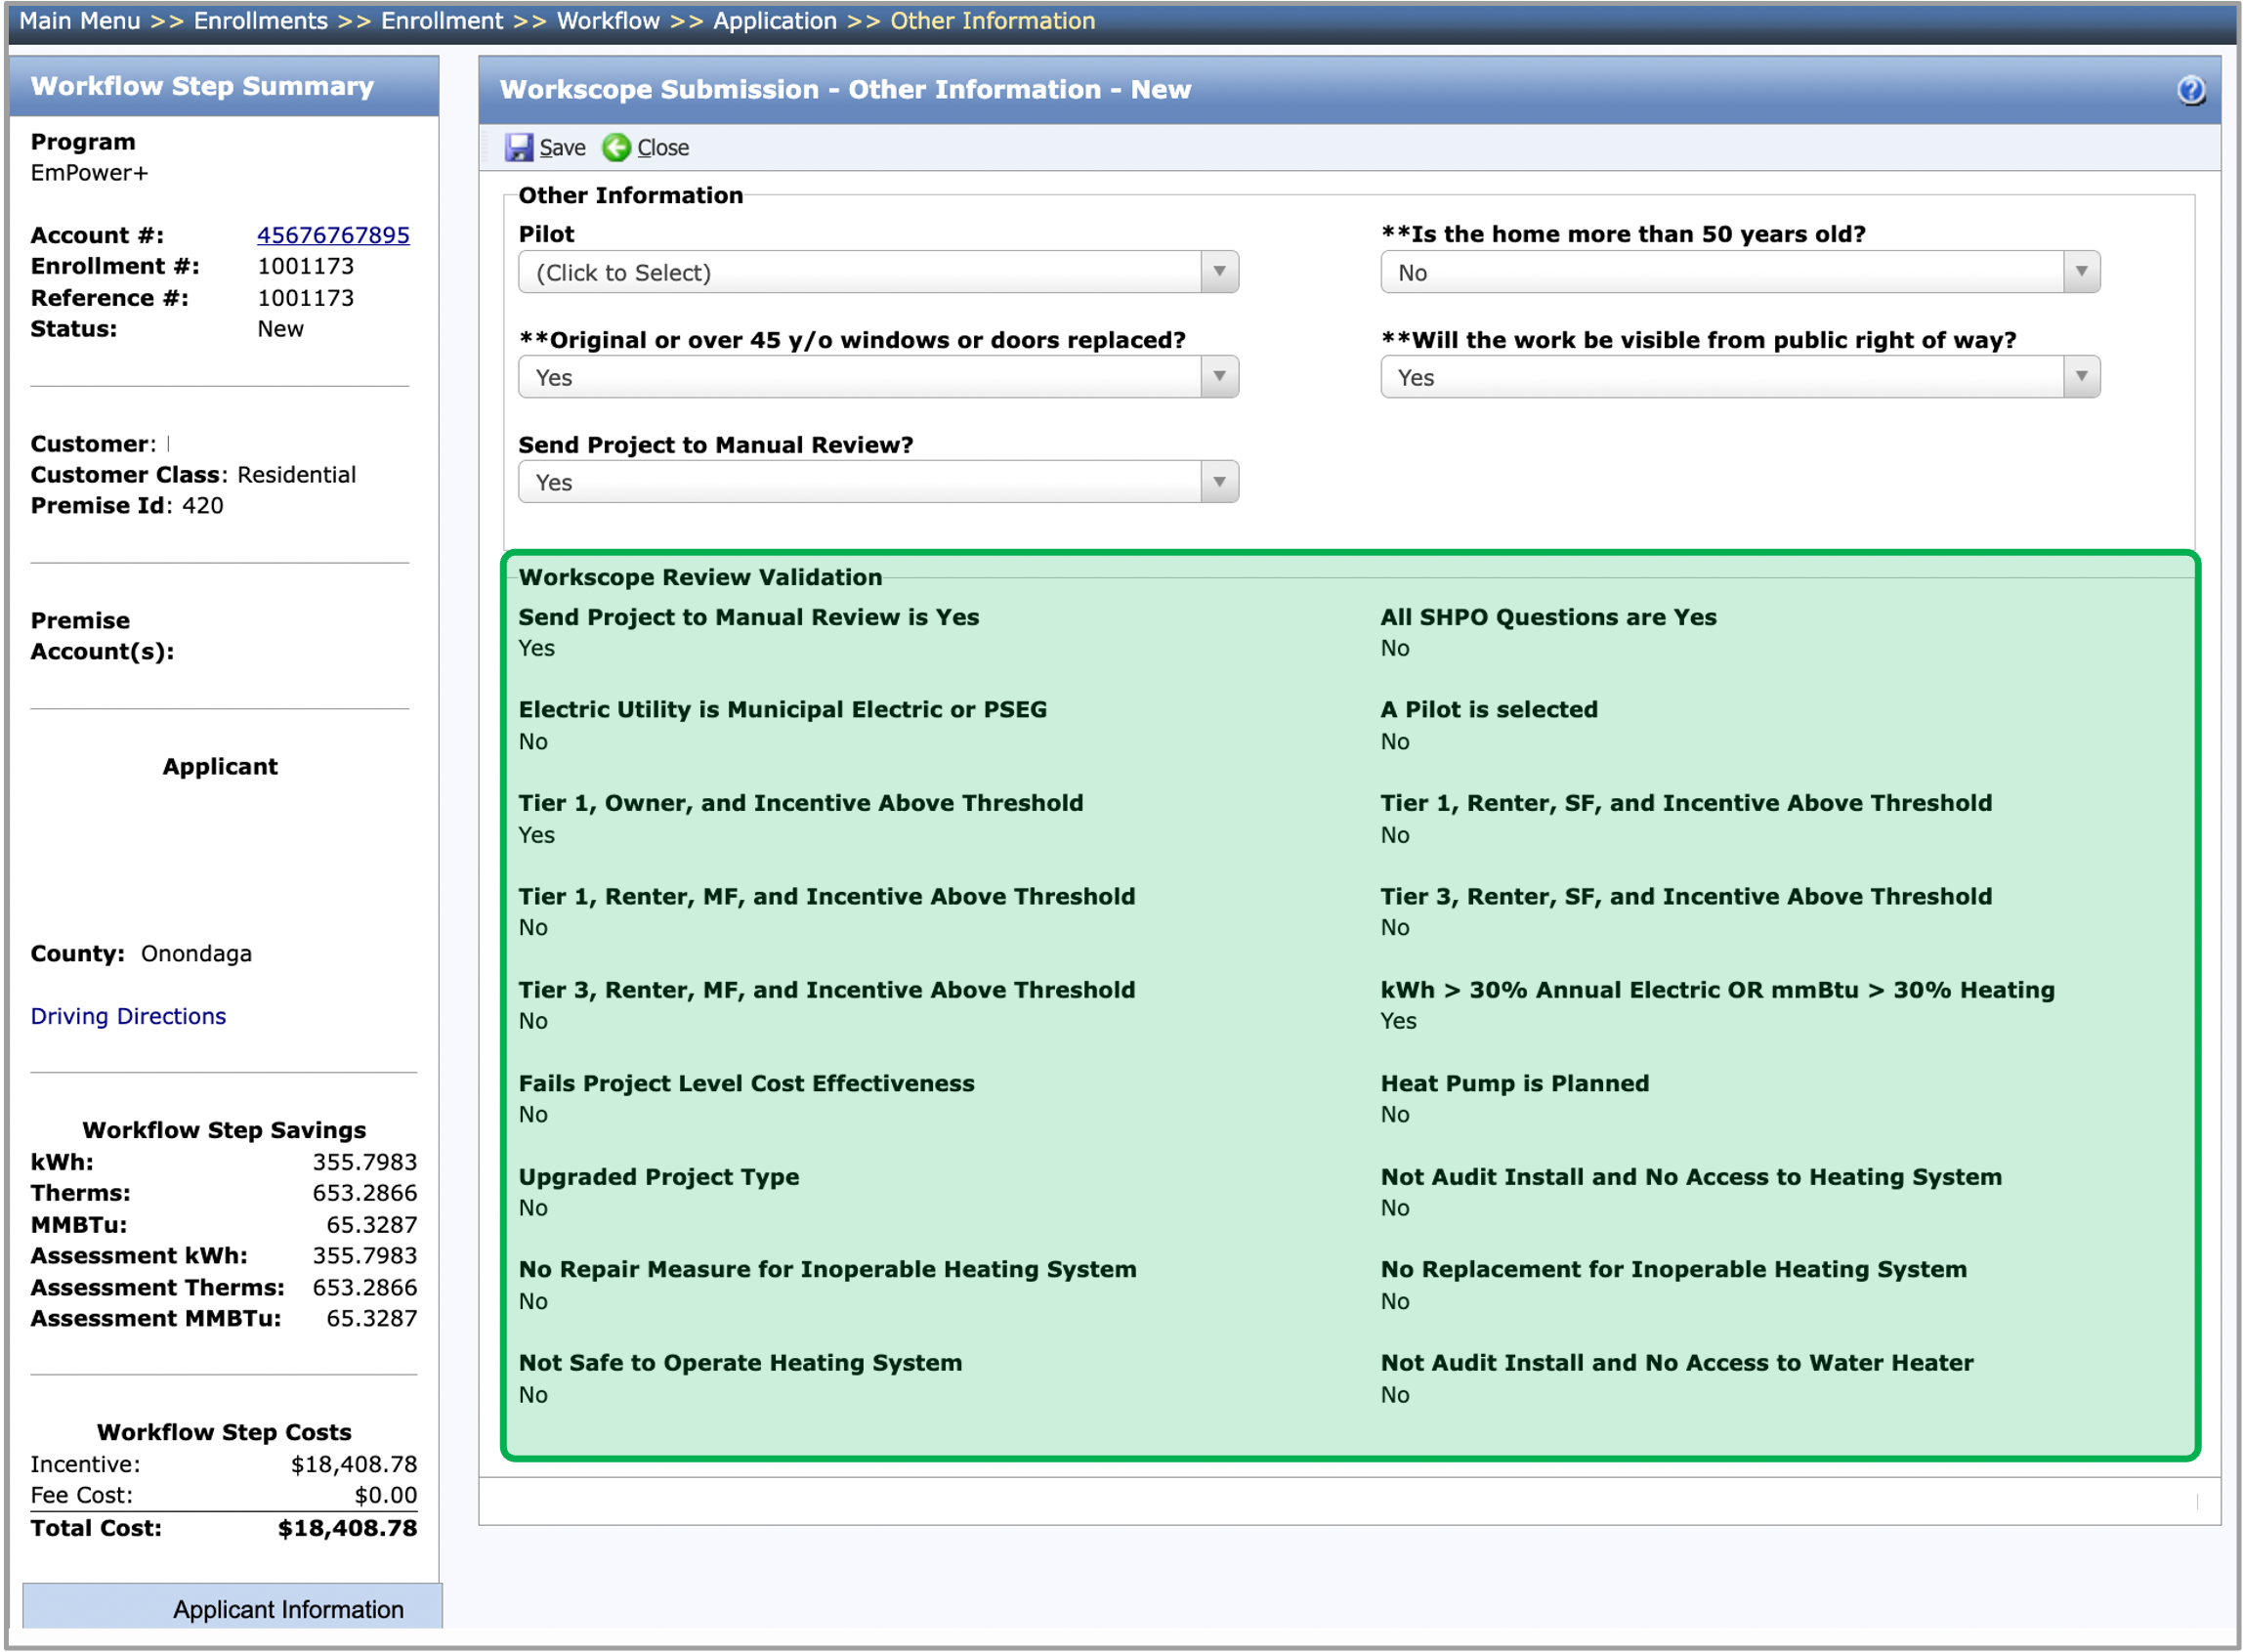
The instruction below provides guidance for contractors with the Workscope Review Validation field group in the Other Information tab. It is suggested to |
| Section |
|---|
| Column |
|---|
|
| UI Steps |
|---|
|
| UI Step |
|---|
On the Other Information tab, locate the Workscope Review Validation field group. |
| UI Step |
|---|
If any of the Workscope Review Validations indicate Yes, the workscope will be submitted for a manual review by ClearResults. |
| UI Step |
|---|
If all of the Workscope Review Validations indicate No, the workscope will be auto-approved and work may proceed. The NYHEP will move the project to Final Project Submission. | Tip |
|---|
If you would still like ClearResults to provide a manual review, select the Yes option under the Send Project to Manual Review? drop-down. |
|
| UI Step |
|---|
If the Project Type is Audit Install, the Final Project Review step will be generated next. |
| UI Step |
|---|
Once all of the required fields are filled out, click the Save button and move on to the Notes or Documents tab. |
|
|
| Column |
|---|
| 
|
|
|
| Aura - Tab |
|---|
|
| Panel |
|---|
| borderColor | #002D72 |
|---|
| bgColor | #F3F4F9 |
|---|
| titleColor | #ffffff |
|---|
| borderWidth | 1 |
|---|
| titleBGColor | #002D72 |
|---|
| borderStyle | none |
|---|
| title | Workscope Submission - Notes |
|---|
|
|
| Info |
|---|
The instructions below provides guidance for contractors to add notes. The following Notes will be displayed on the Notes tab: - The Notes that were added to this workflow step.
- The Notes that were added to a different workflow step that the user has access to.
- The Notes that were added to a different workflow step that the user does not have access to as long as the Note’s Who can view this note? field is set to Users with access to this enrollment.
|
| UI Steps |
|---|
|
| UI Step |
|---|
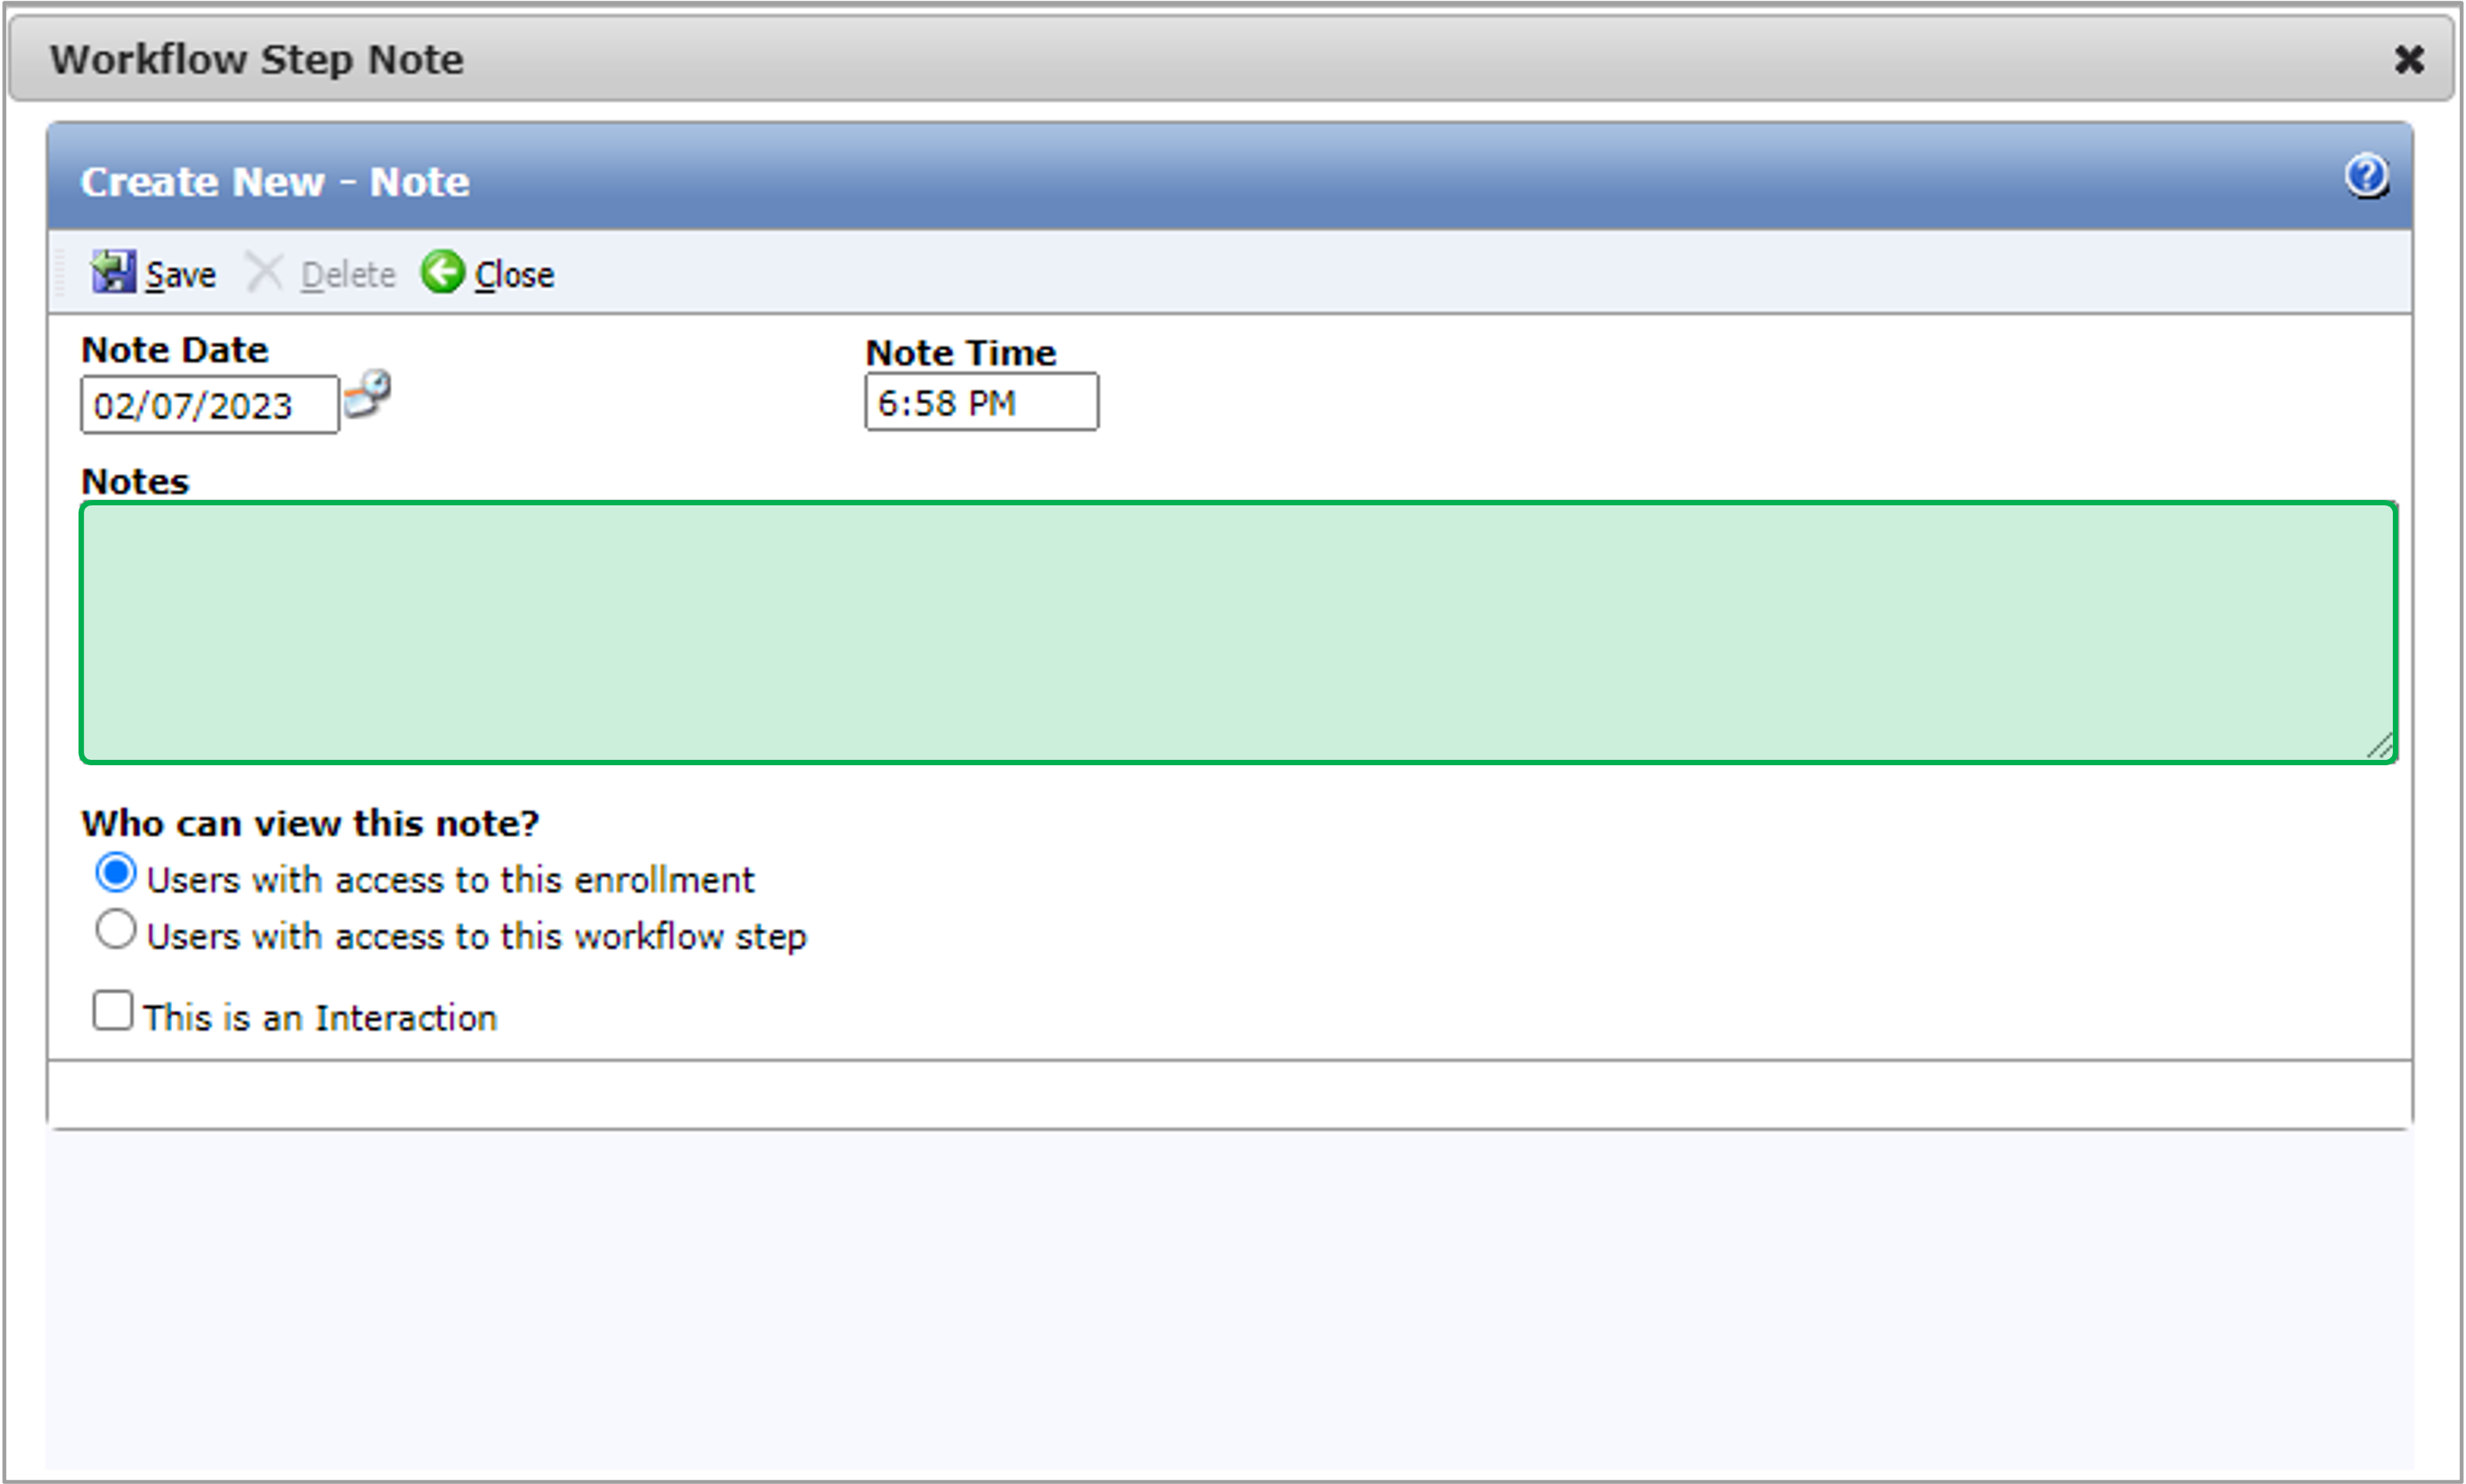
On the Notes tab, click the New Note button. A new Note dialog will open. | Expand |
|---|
| 
|
|
| UI Step |
|---|
Fill in the Notes field. | Tip |
|---|
The Note Date and Note Time fields will automatically populate with the date and time the user clicked New Note, but the user will have the ability to change the prepopulated values. |
| Expand |
|---|
| 
|
|
| UI Step |
|---|
The Who can view this note? field will default to Users with access to this enrollment. | Tip |
|---|
If a user changes the default value to Users with access to this workflow step, users who do not have access to the step that the Note originated from will not be able to see the Note on the steps that they can access or on the Enrollment Profile - Notes page. |
|
| UI Step |
|---|
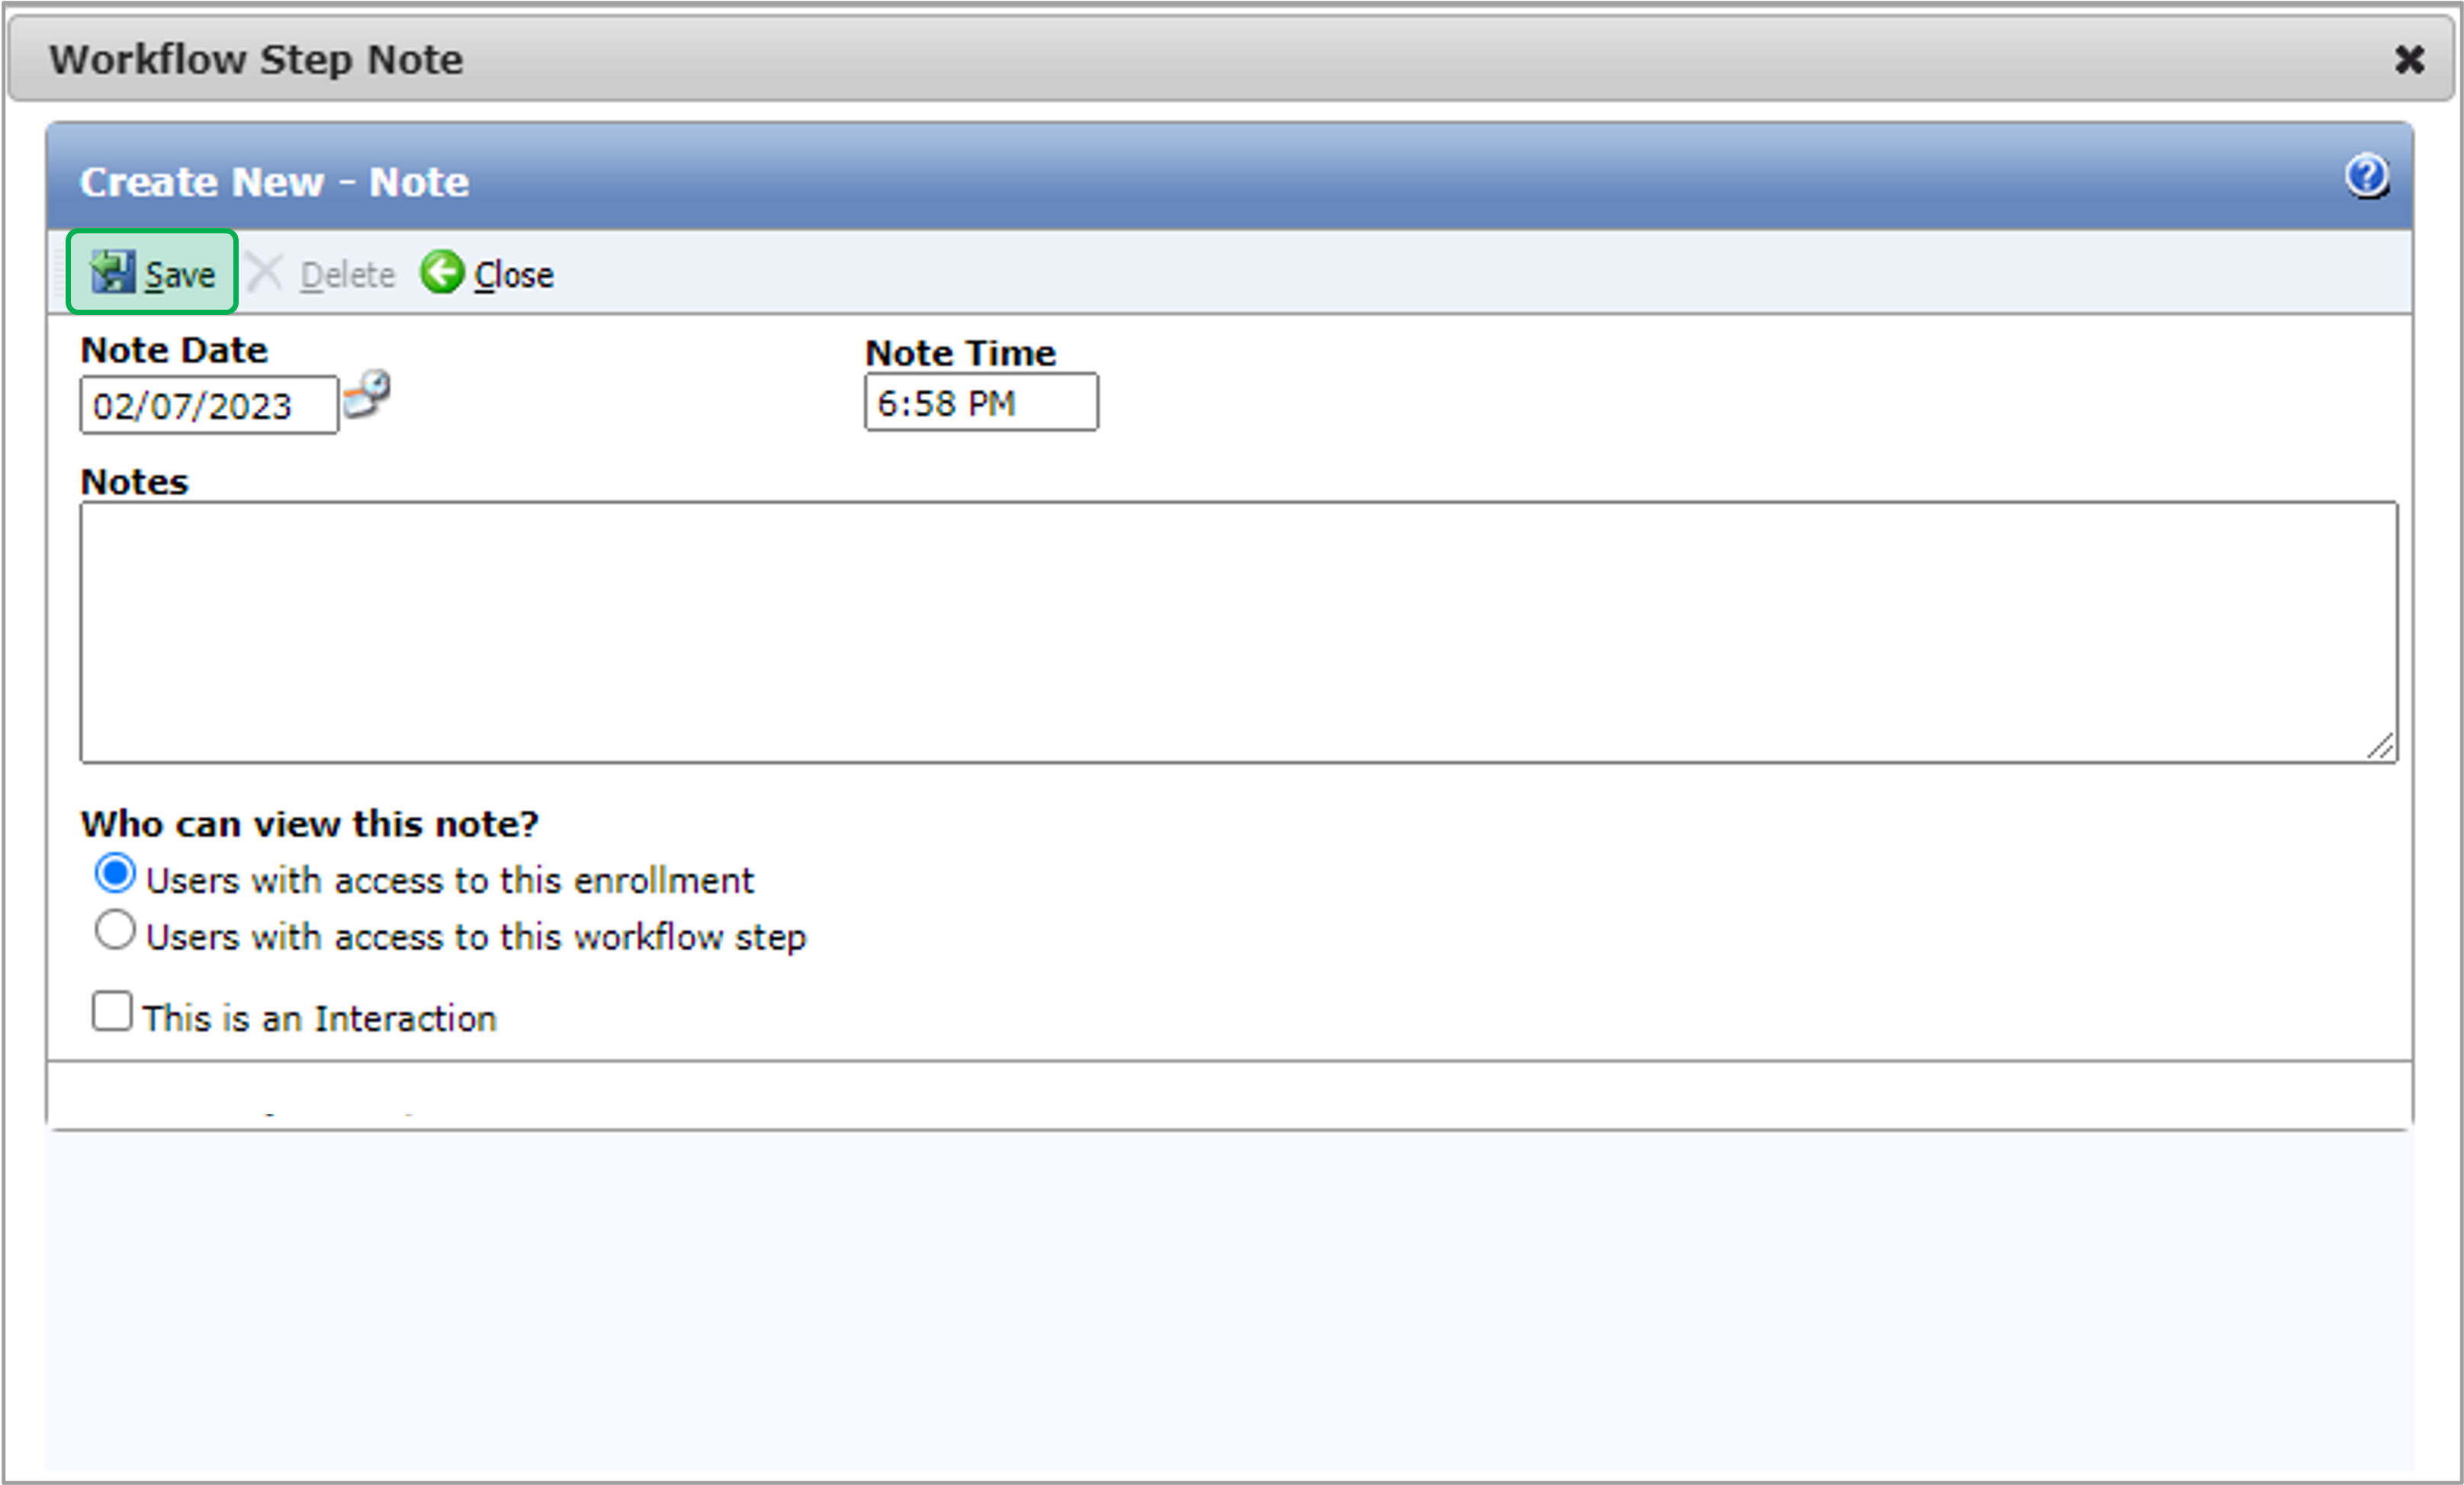
Click Save to save the new Note. | Tip |
|---|
After you click Save, if your user does not belong to a group with the Workflow Step Notes - Edit role, they will not be able to edit the Note. If your user does not belong to a group with the Workflow Step Notes - Delete role, they will not be able to delete the Note. |
| Expand |
|---|
| 
|
|
|
|
| Aura - Tab |
|---|
|
| Panel |
|---|
| borderColor | #002D72 |
|---|
| bgColor | #F3F4F9 |
|---|
| titleColor | #ffffff |
|---|
| borderWidth | 1 |
|---|
| titleBGColor | #002D72 |
|---|
| borderStyle | none |
|---|
| title | Workscope Submission - Documents |
|---|
|
|
| Info |
|---|
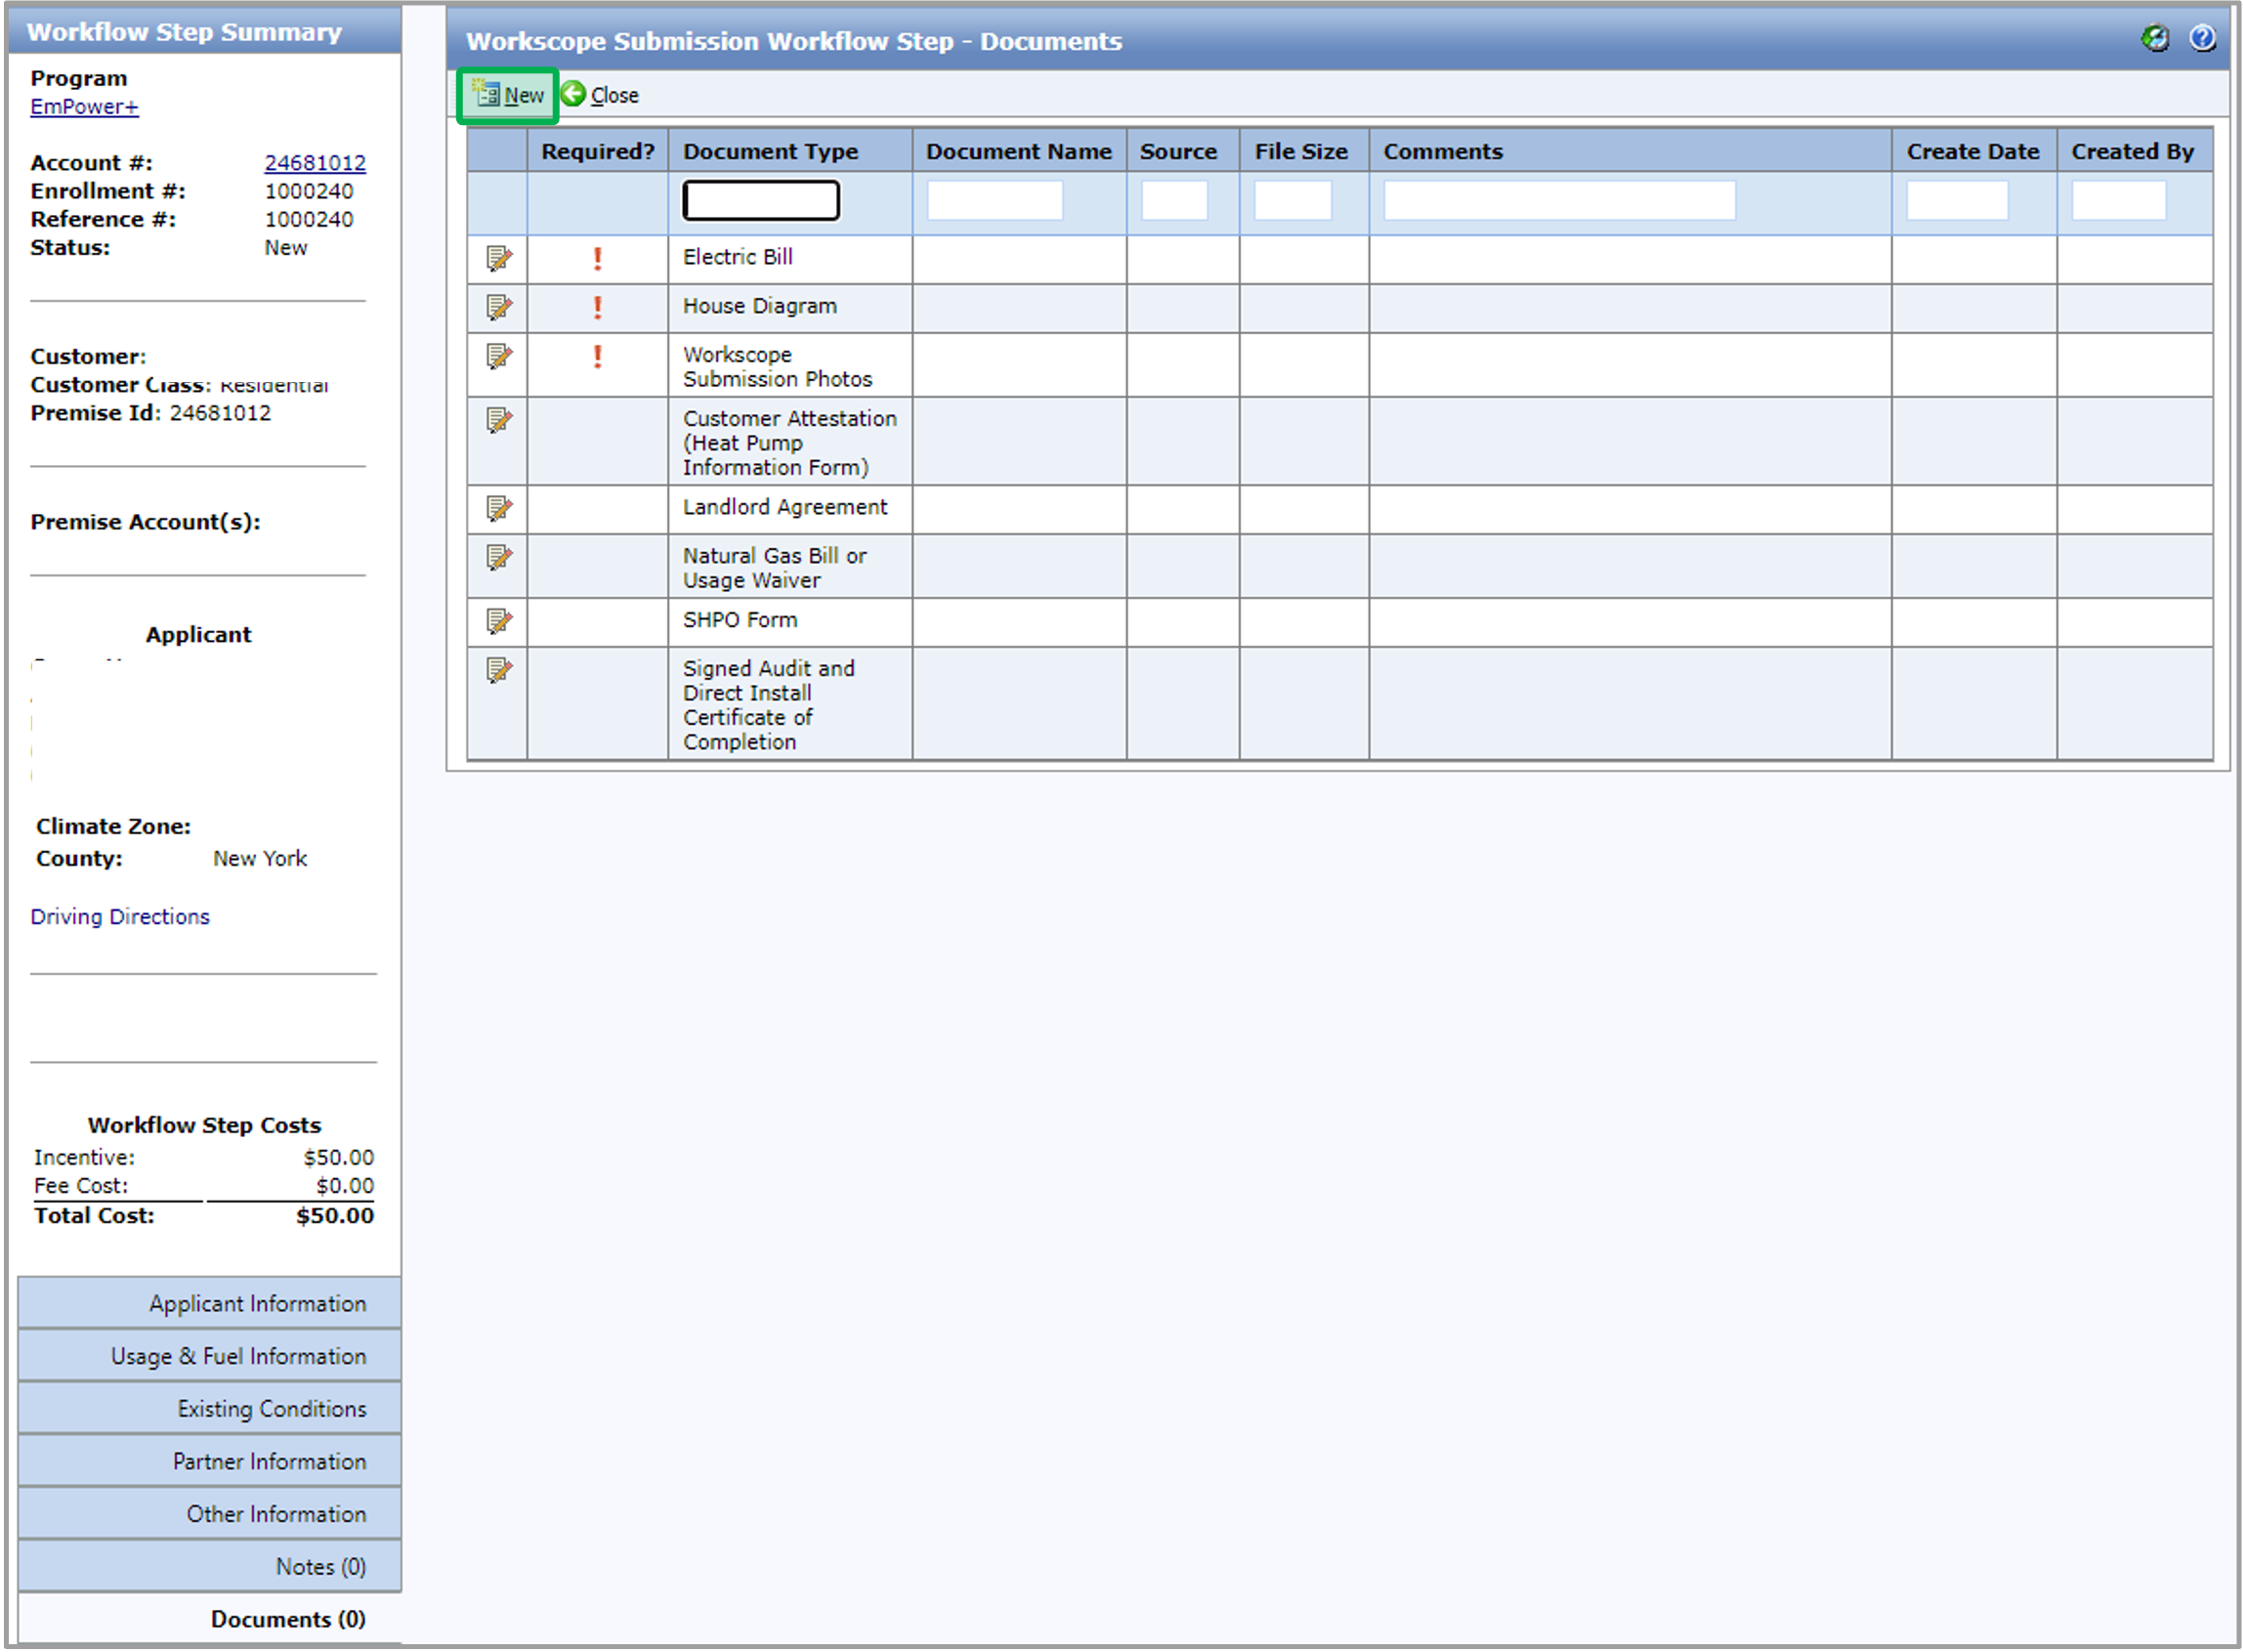
The instructions below provides guidance for contractors to upload documents. The required Document Types are listed under the Required column with red exclamation mark. |
| UI Expand |
|---|
| title | Upload Mutilple Documents |
|---|
|
| UI Steps |
|---|
|
| UI Step |
|---|
On the Document tab, click the New button at the top of the Documents tab. | Expand |
|---|
| 
|
|
| UI Step |
|---|
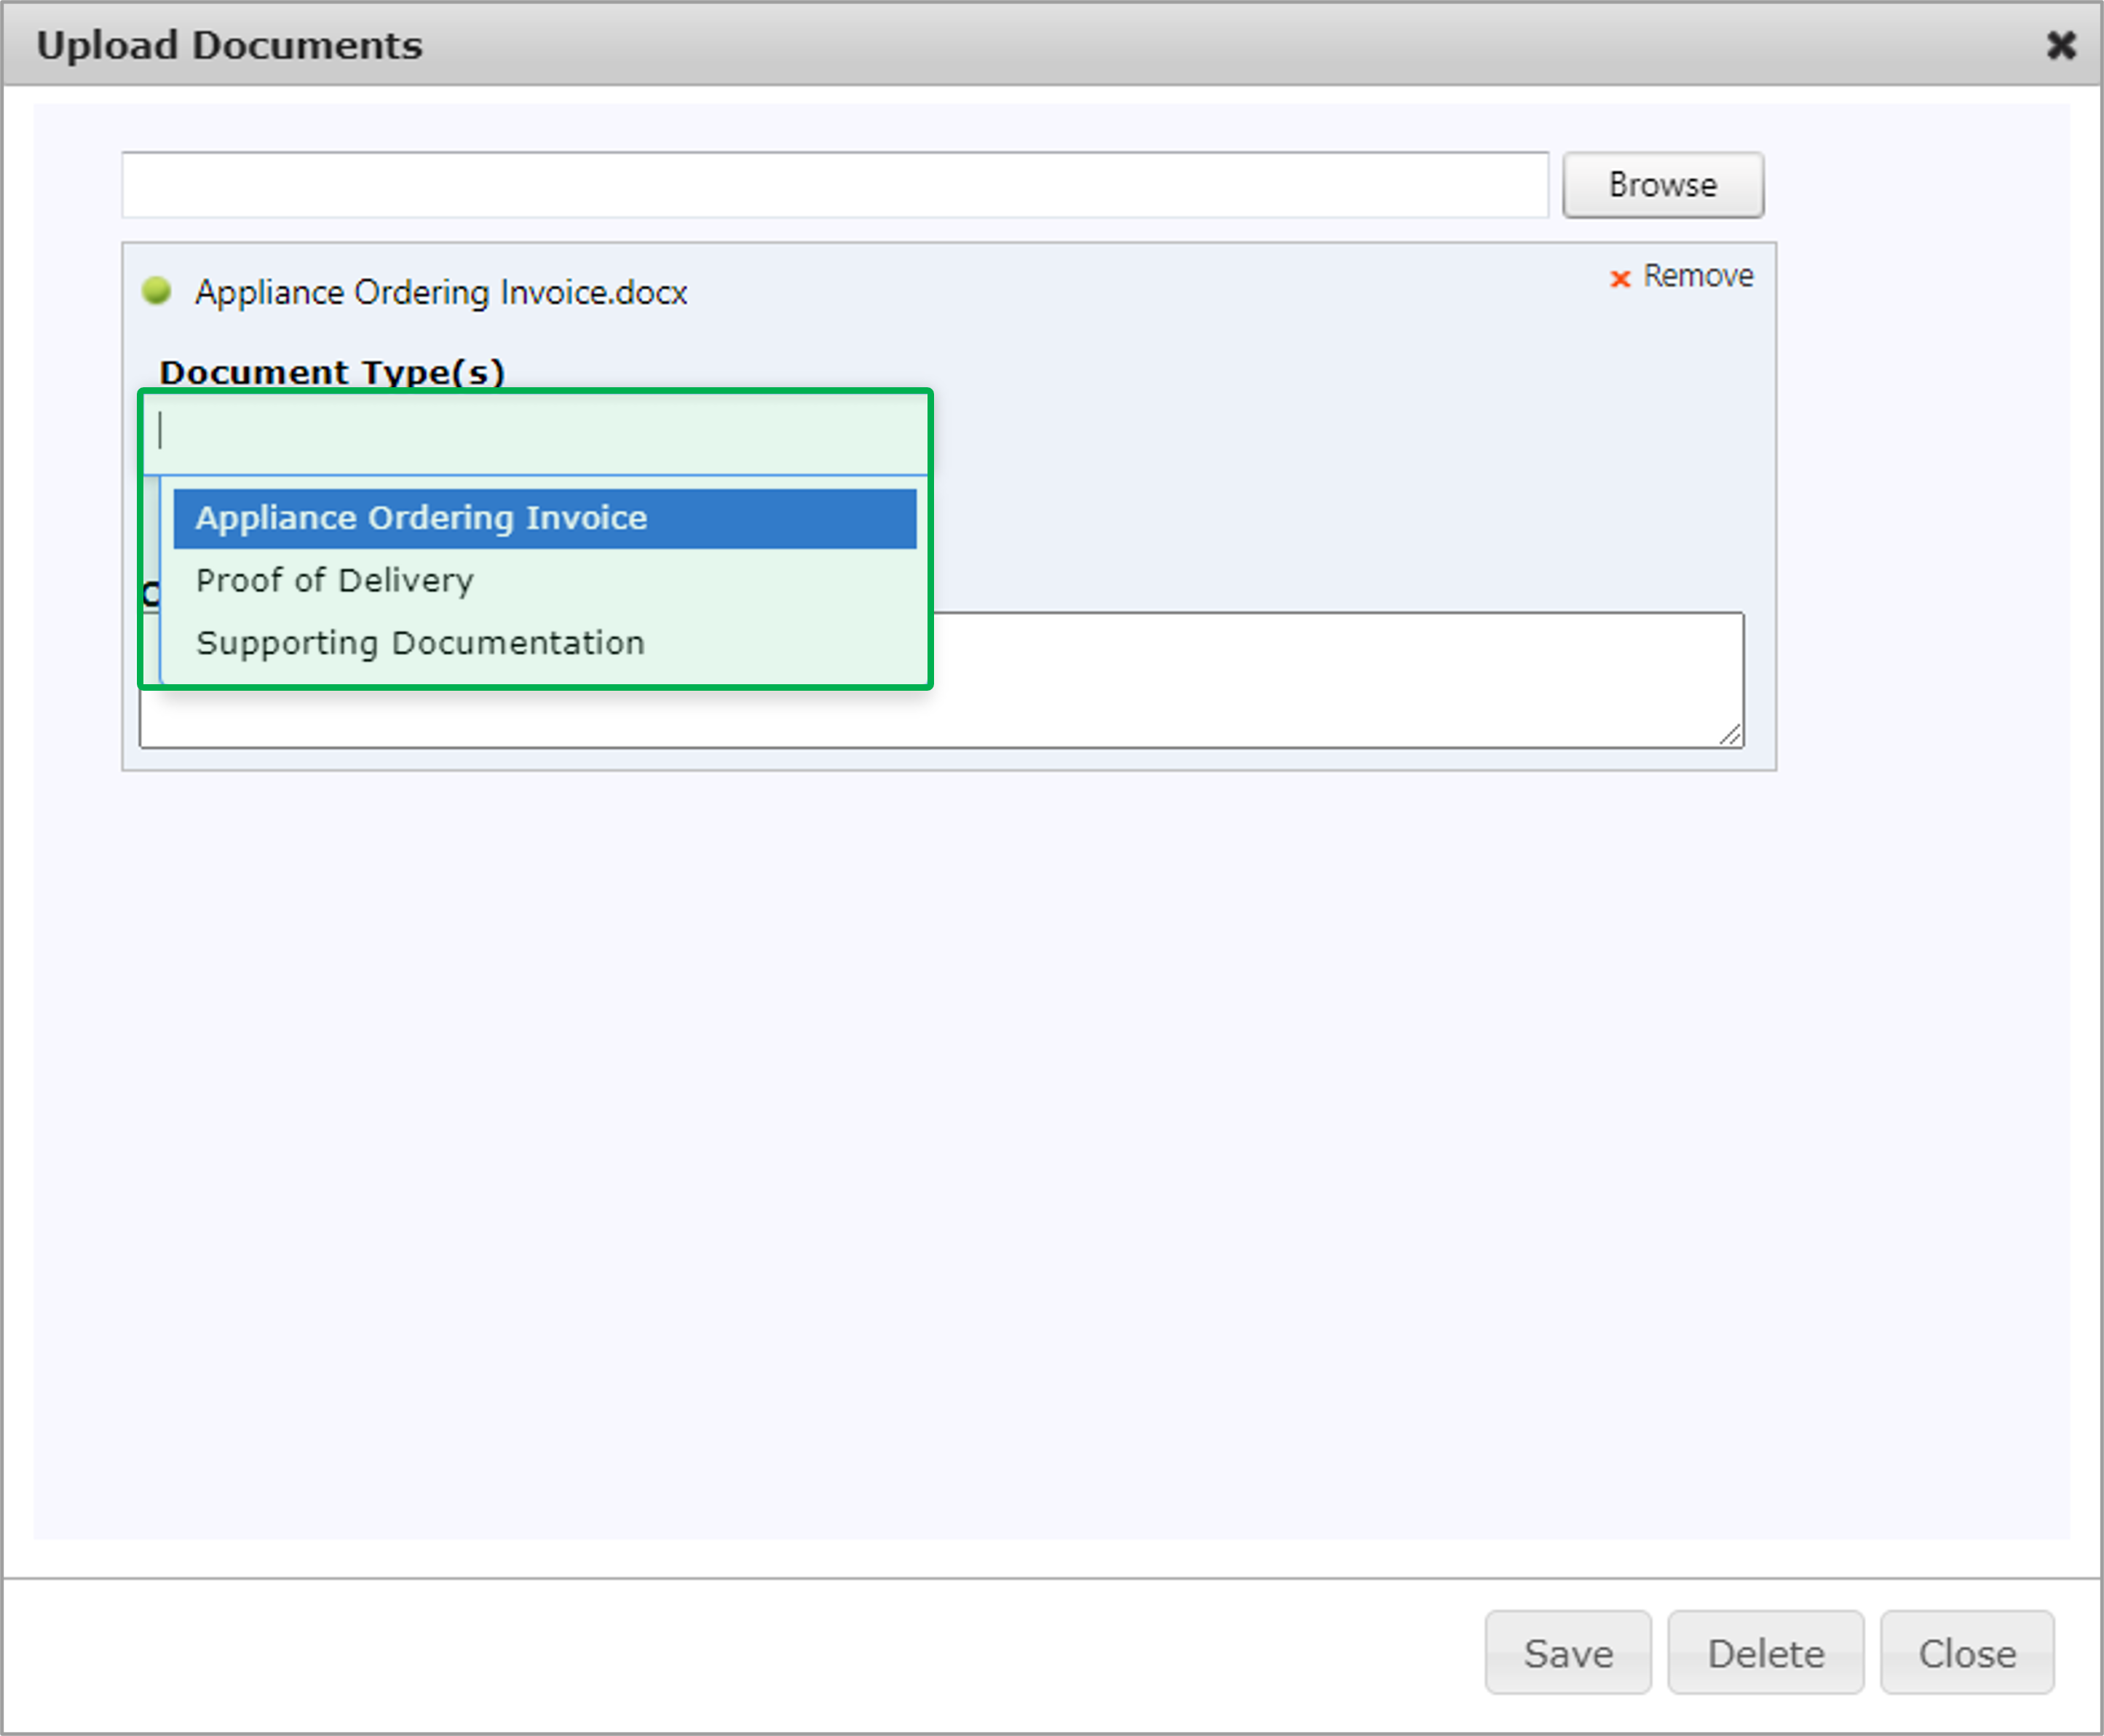
The Upload Documents dialog will open. You will need to select the Document Type for every file you choose in the Upload Documents dialog. When finished, click Save. | Expand |
|---|
| 
|
|
|
|
| UI Expand |
|---|
| title | Upload Single Document |
|---|
|
| UI Steps |
|---|
|
| UI Step |
|---|
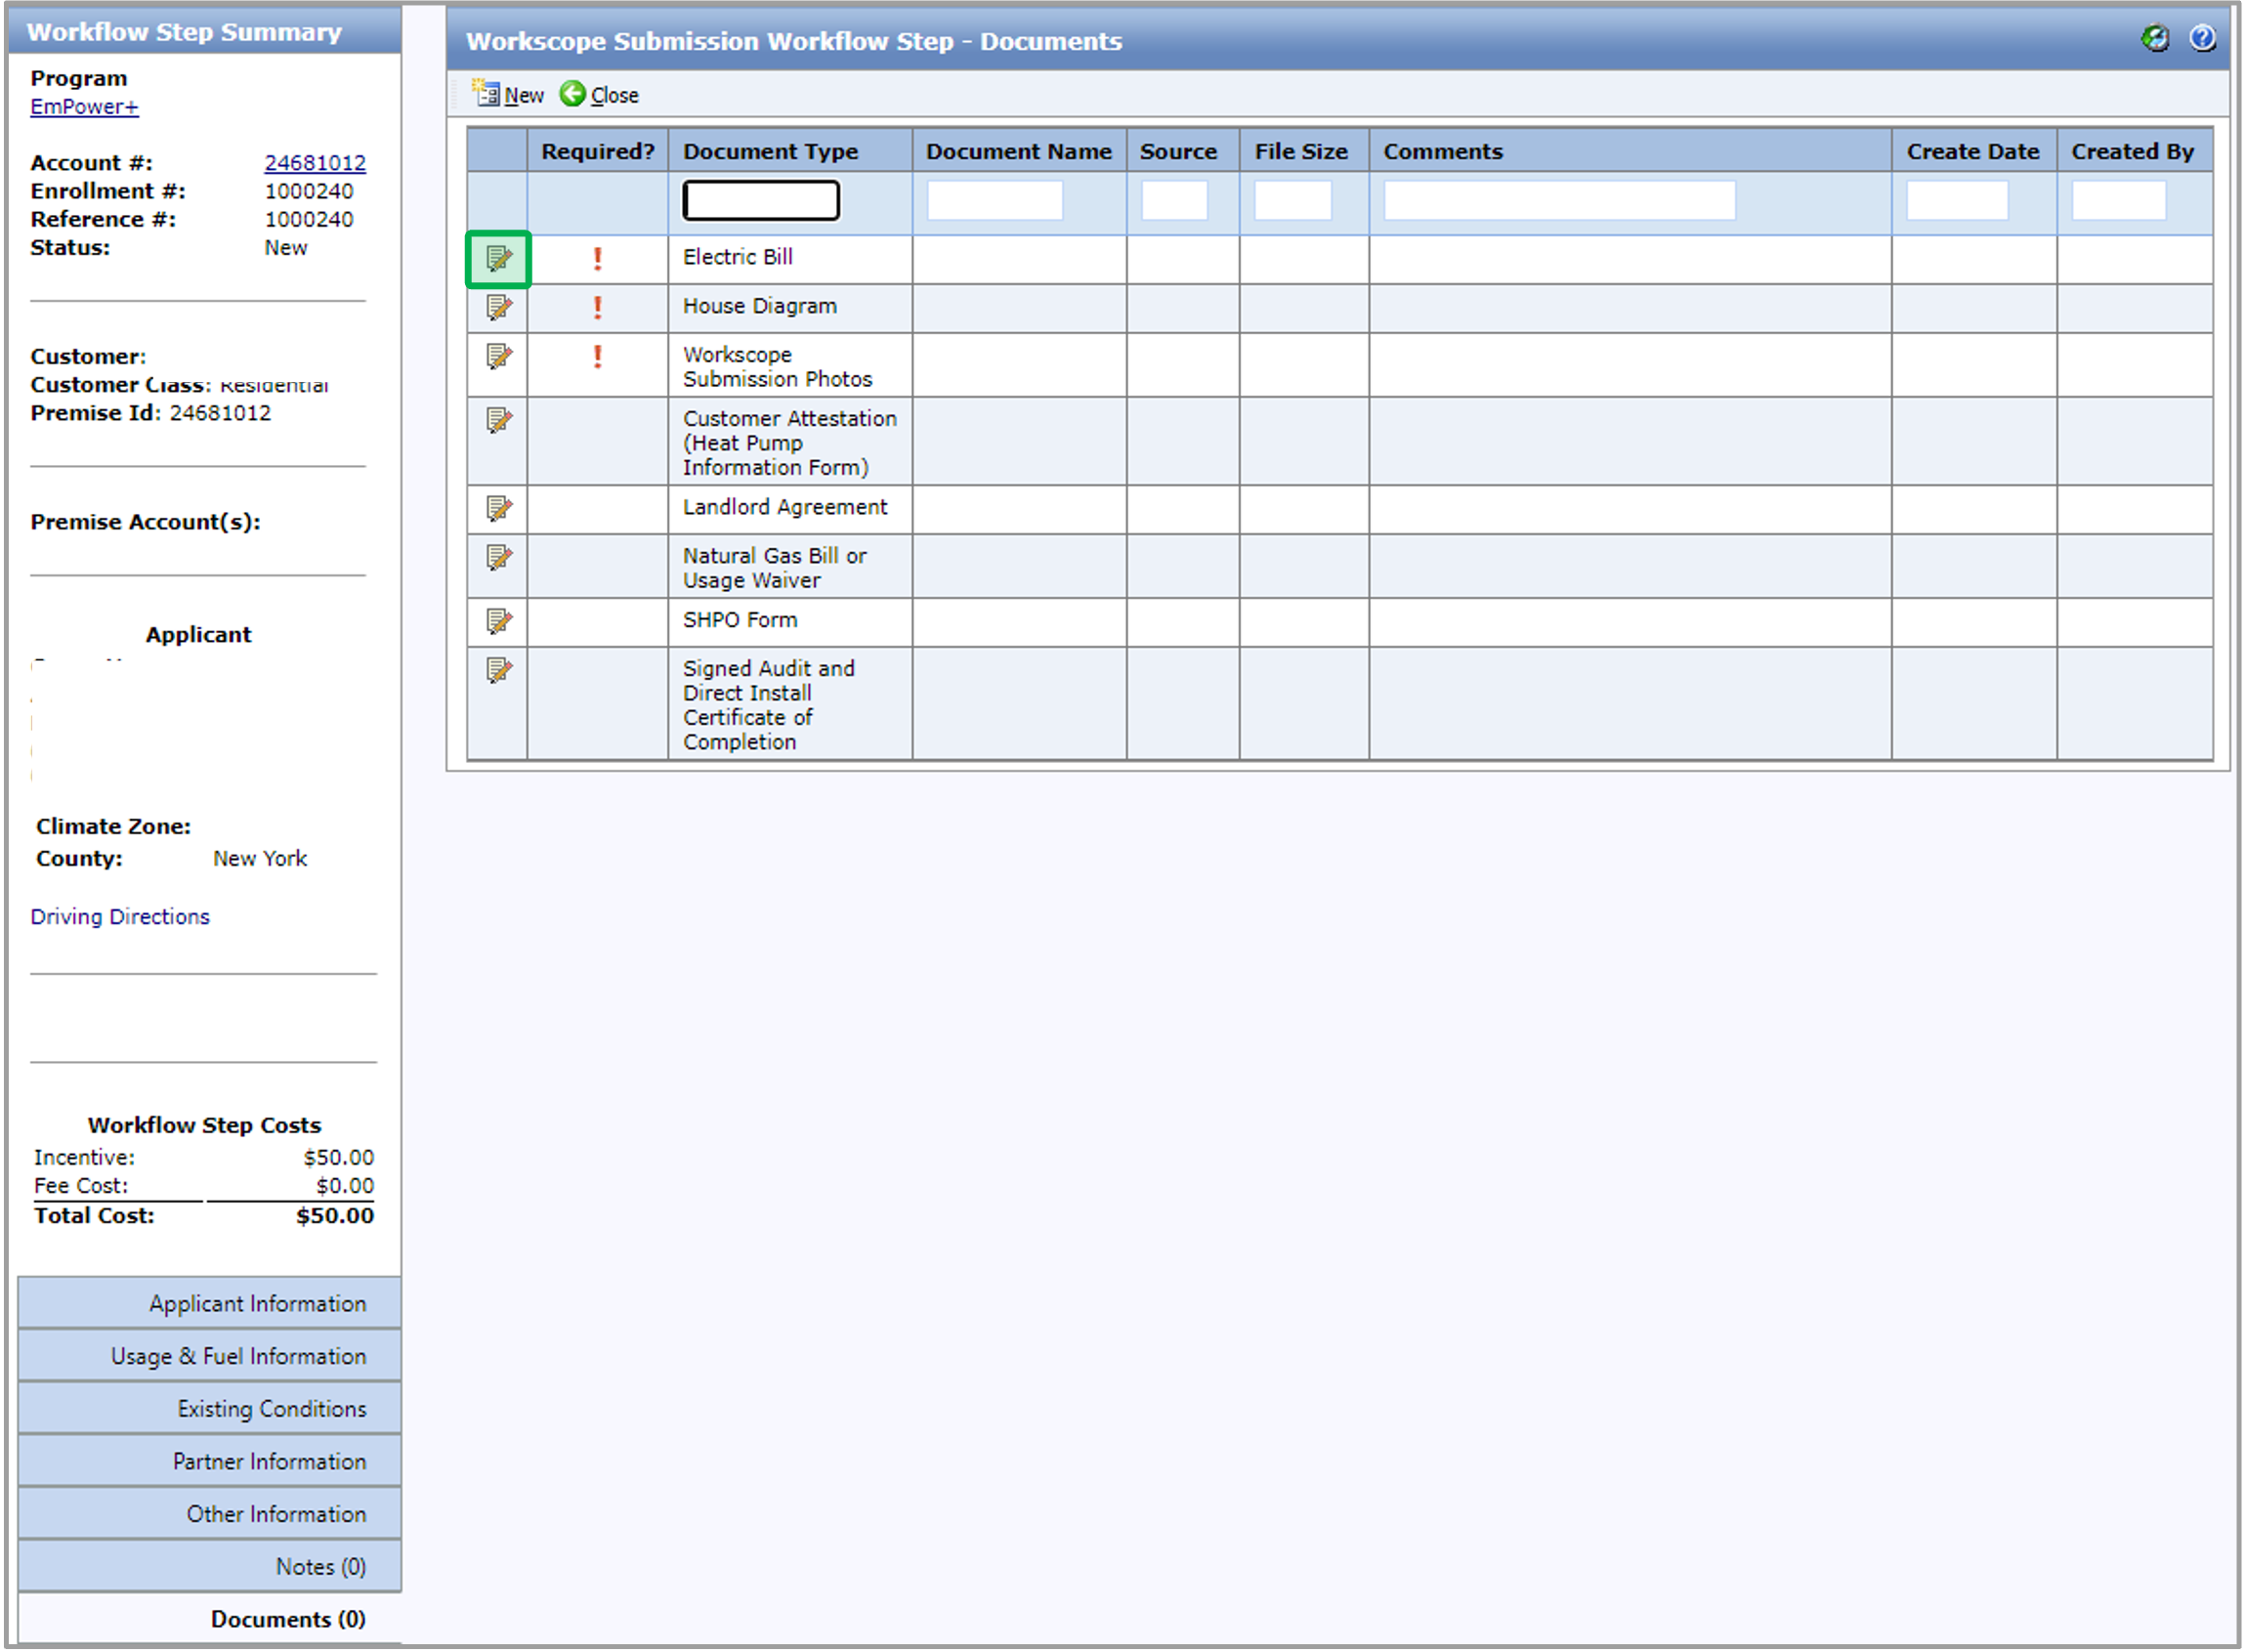
On the Document tab, click the Edit button icon in that Document Type’s row, the Document dialog will open. | Expand |
|---|
| 
|
|
| UI Step |
|---|
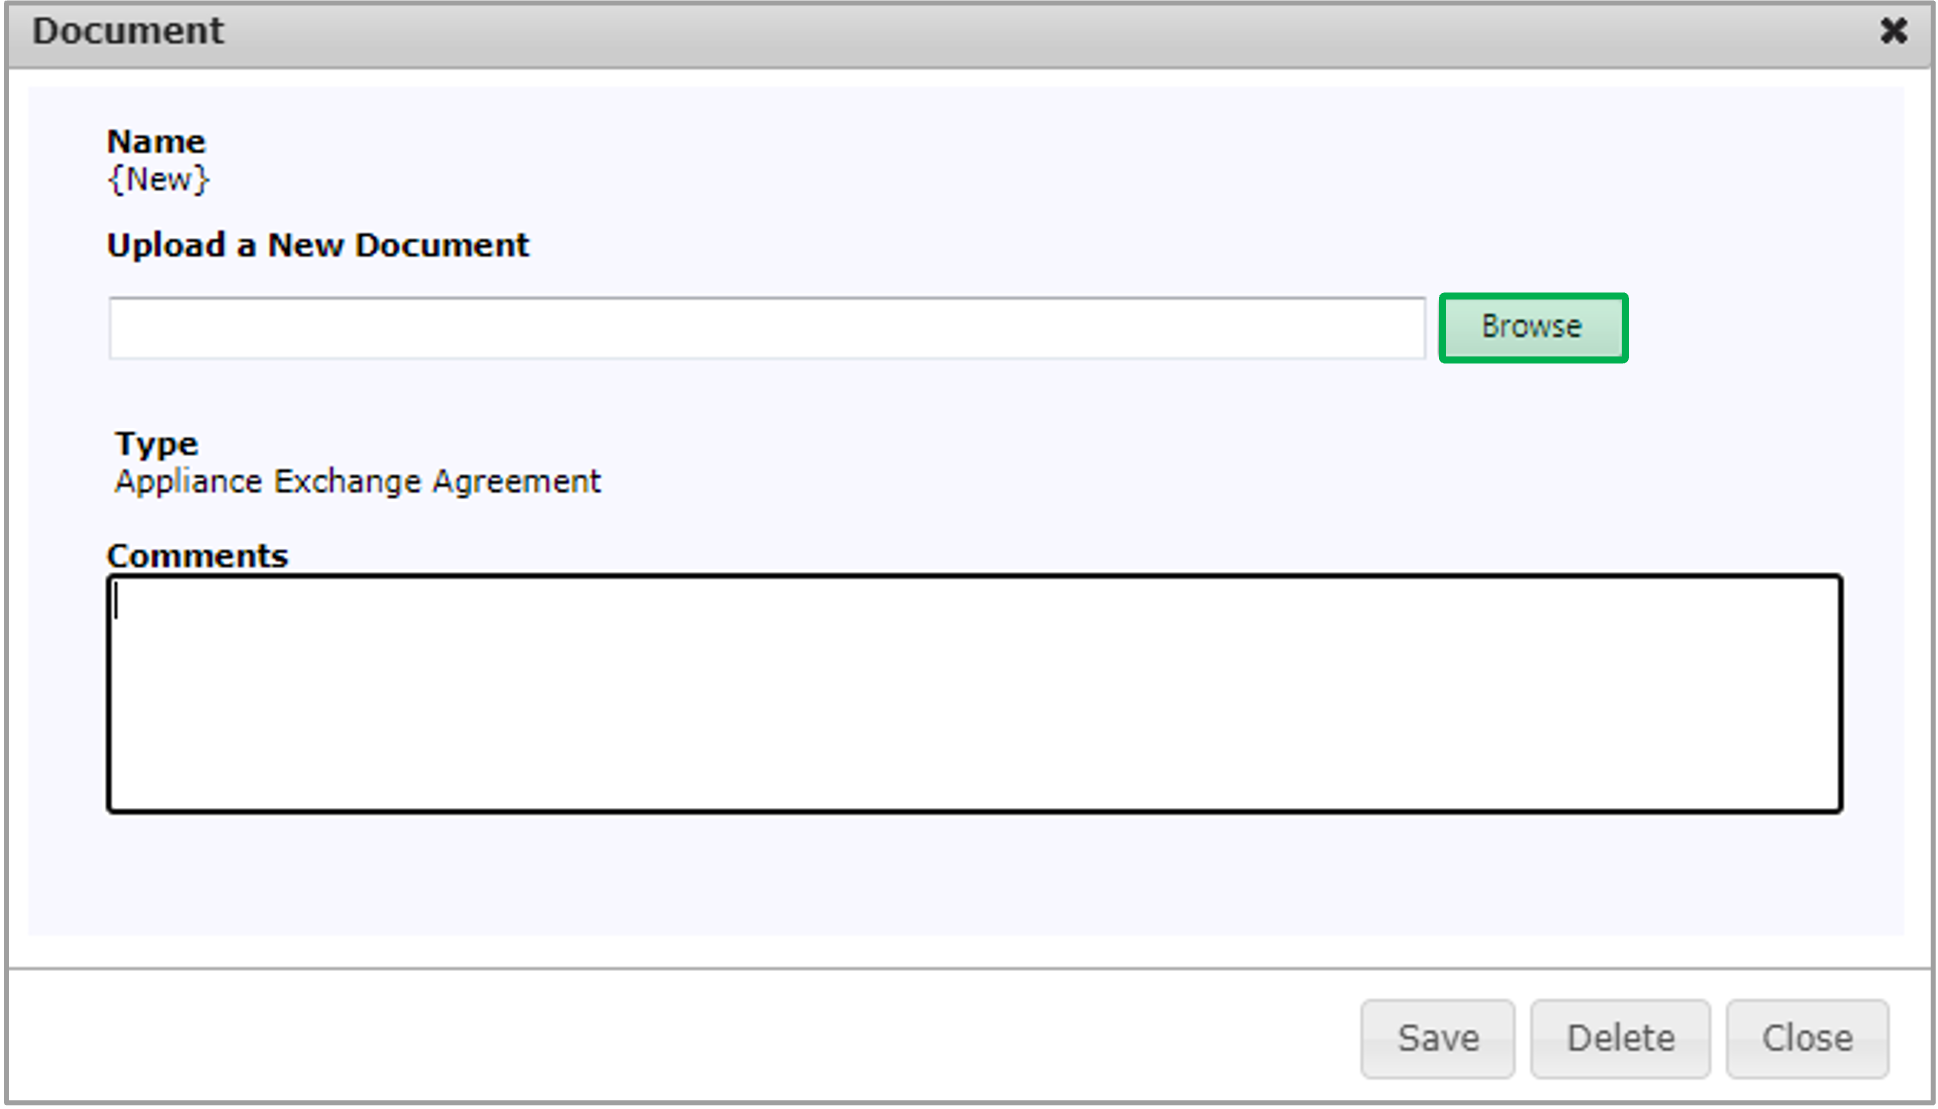
Click Browse to select a file to upload. | Tip |
|---|
After you’ve selected a file, you can remove it by clicking the x Remove button. |
| Expand |
|---|
| 
|
|
| UI Step |
|---|
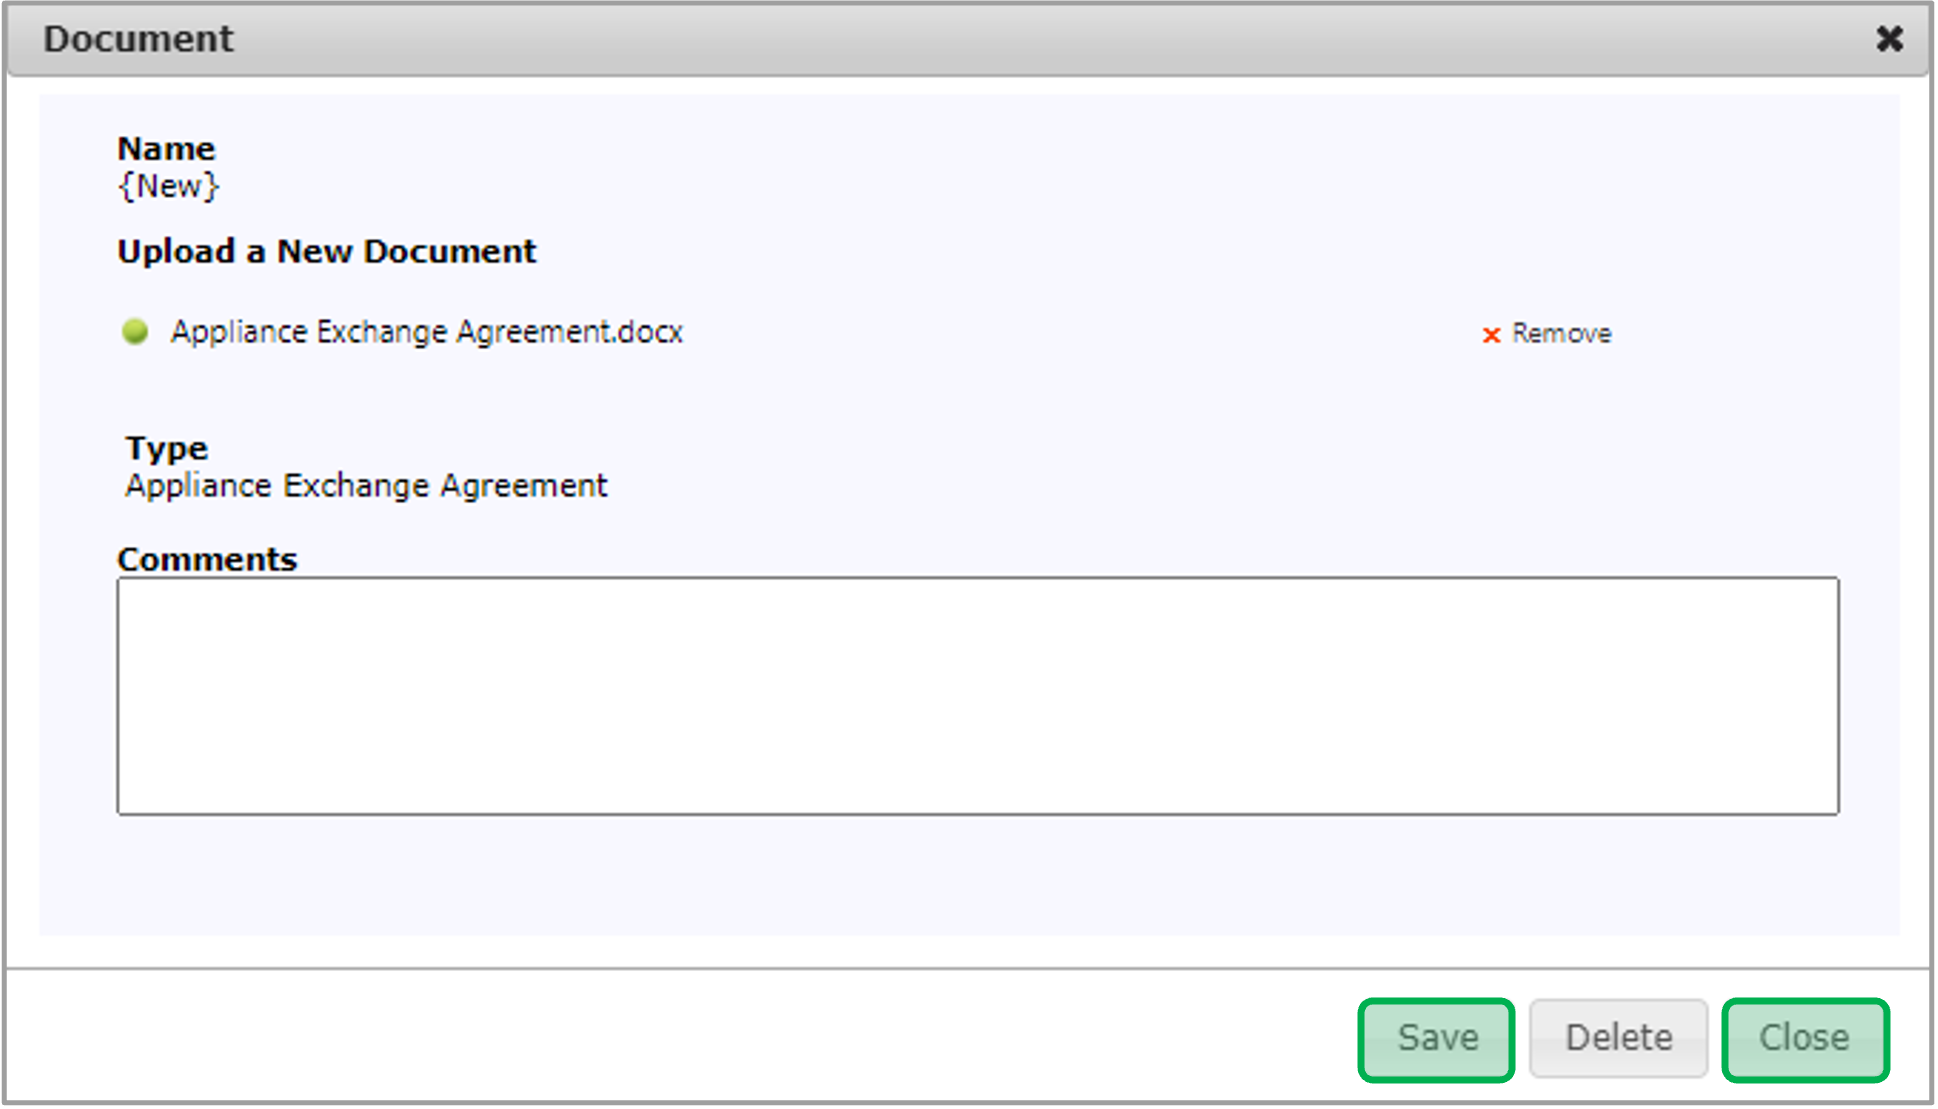
After the file is uploaded for the Document Type, click Save and then click Close to upload the file and close the dialog. | Expand |
|---|
| 
|
|
| UI Step |
|---|
To view an uploaded document, click the Document Name Hyperlink. | Expand |
|---|
| 
|
|
|
|
|
| Aura - Tab |
|---|
|
| Panel |
|---|
| borderColor | #002D72 |
|---|
| bgColor | #F3F4F9 |
|---|
| titleColor | #ffffff |
|---|
| borderWidth | 1 |
|---|
| titleBGColor | #002D72 |
|---|
| borderStyle | none |
|---|
| title | Workscope Submission - Measures |
|---|
|
|
| Info |
|---|
The instruction below provides guidance for contractors to complete the required data entry fields when adding measures to the Workscope Submission step. Three measures will be added to the Workscope Submission step by default. Do not delete these measures and complete the required data entry fields for these measures. For a full list of all program measures that may help with this tab, please access the NY HEP Measures List. |
| UI Steps |
|---|
|
| UI Step |
|---|
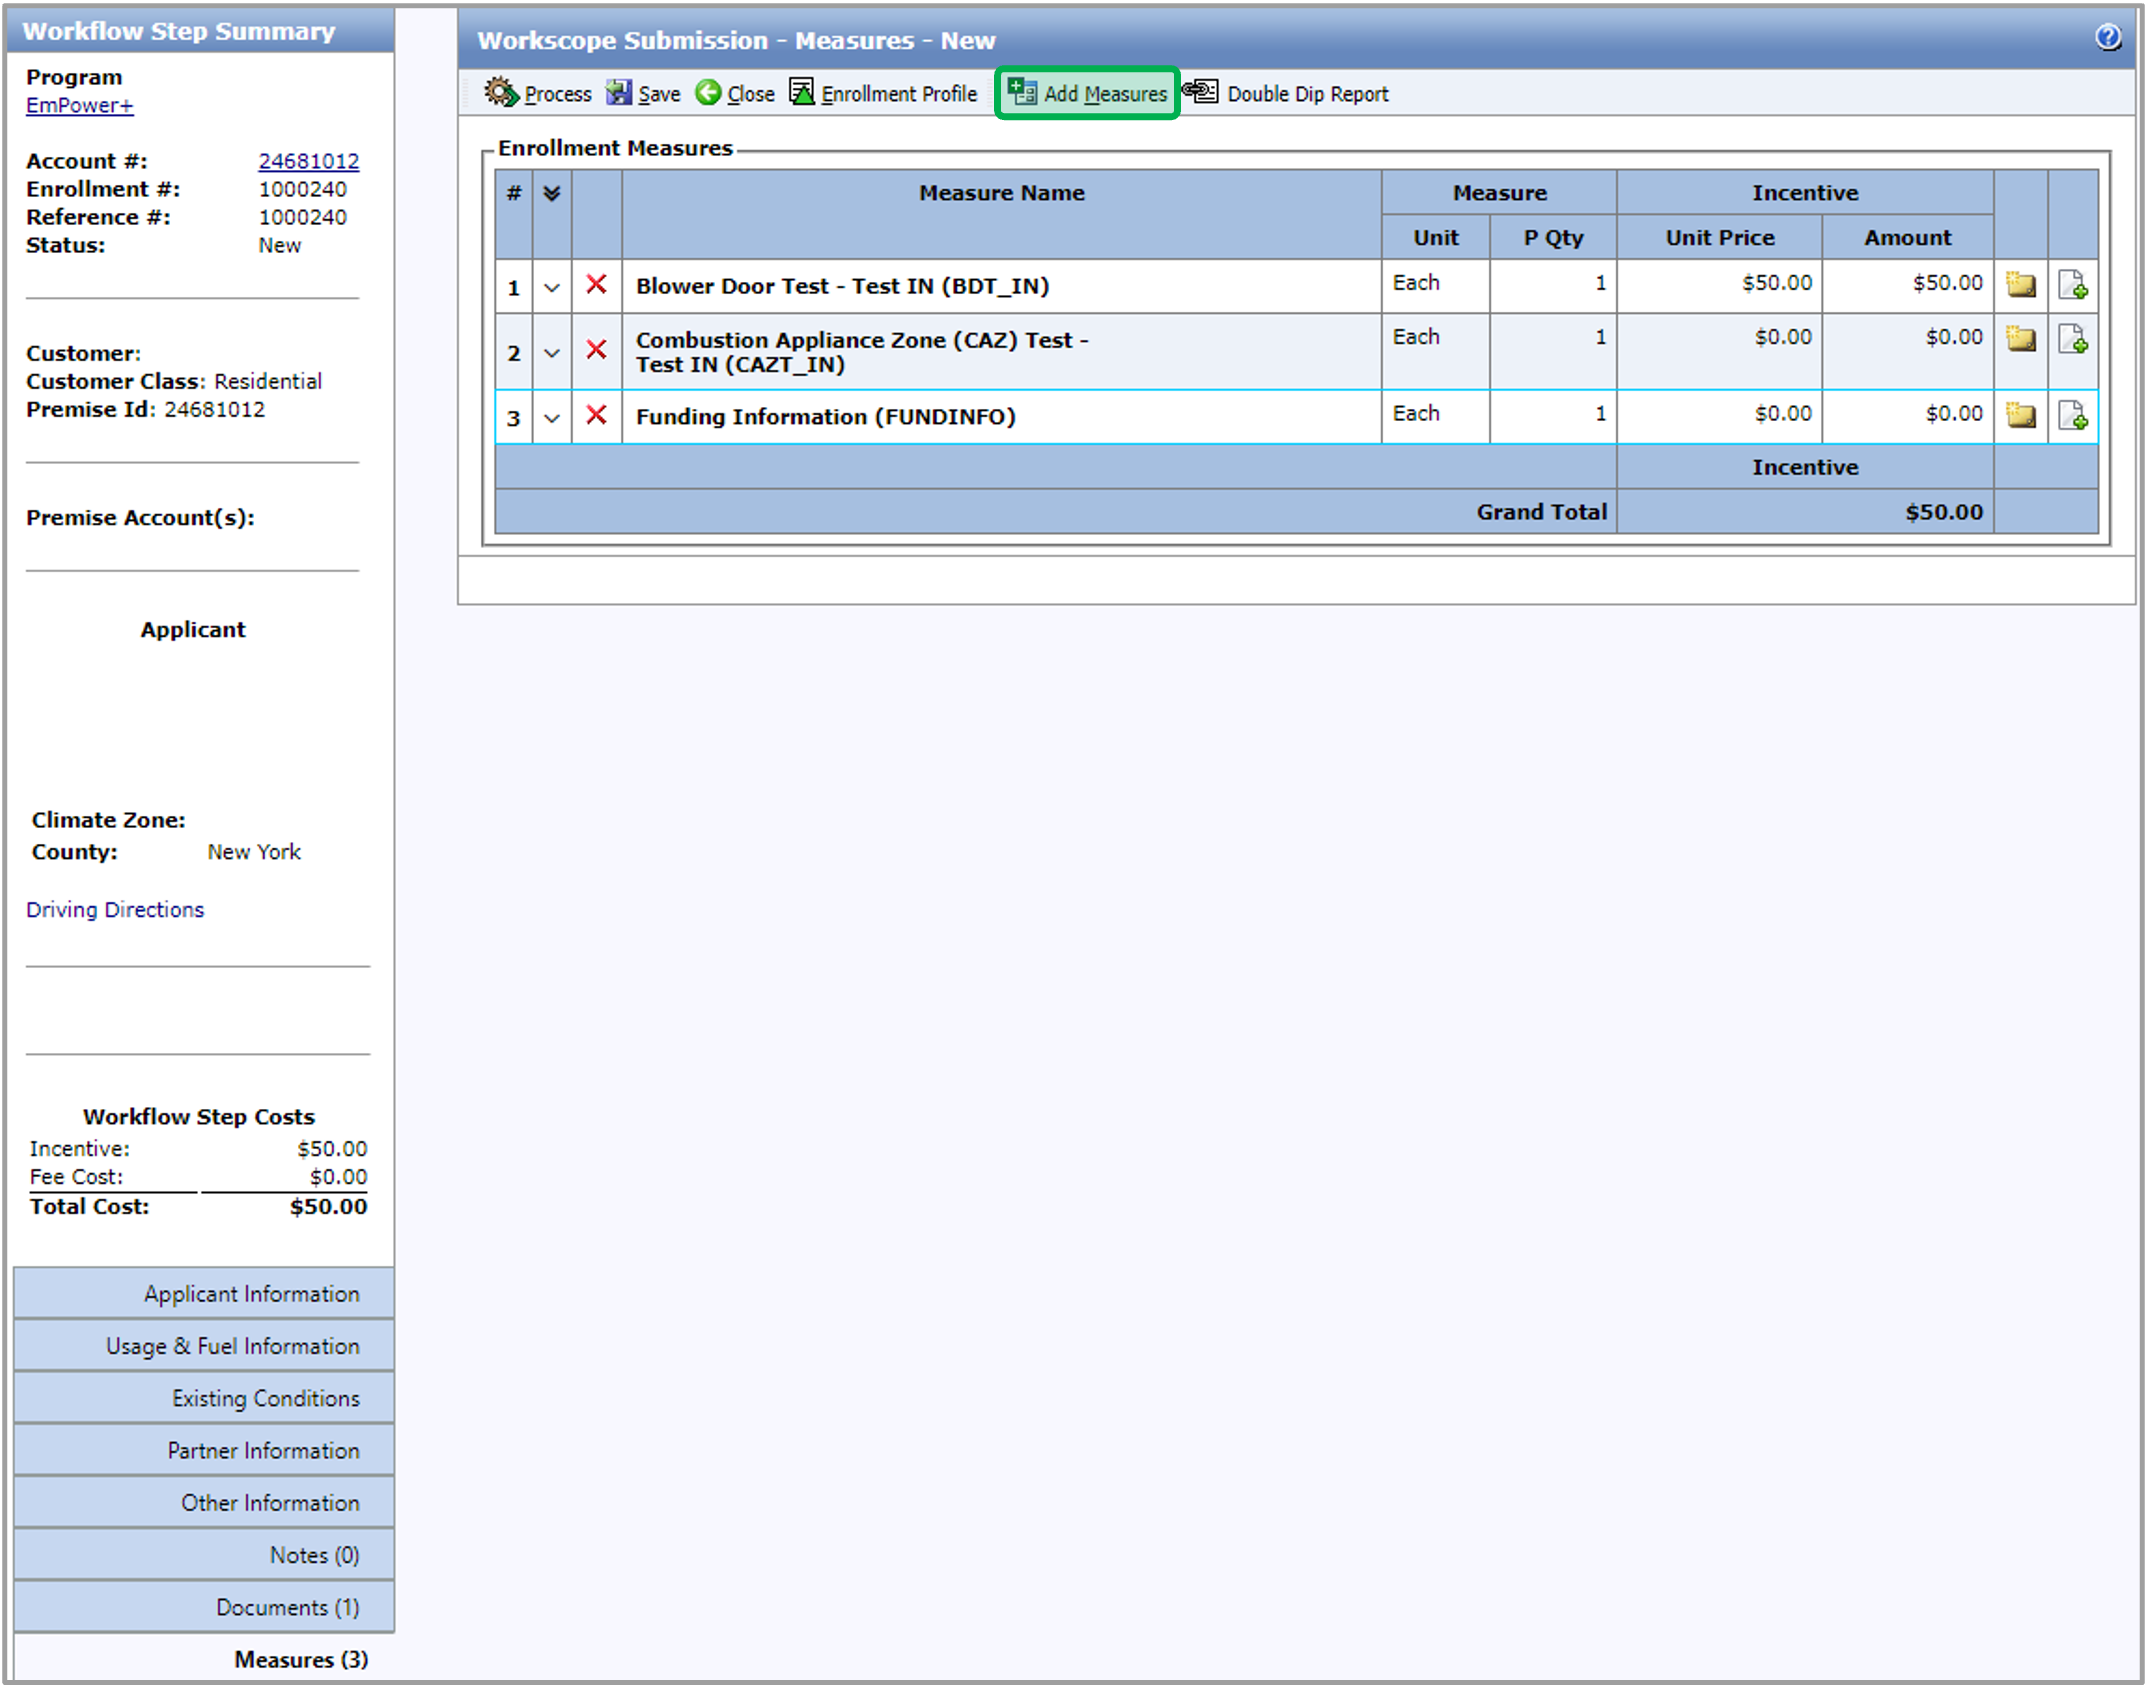
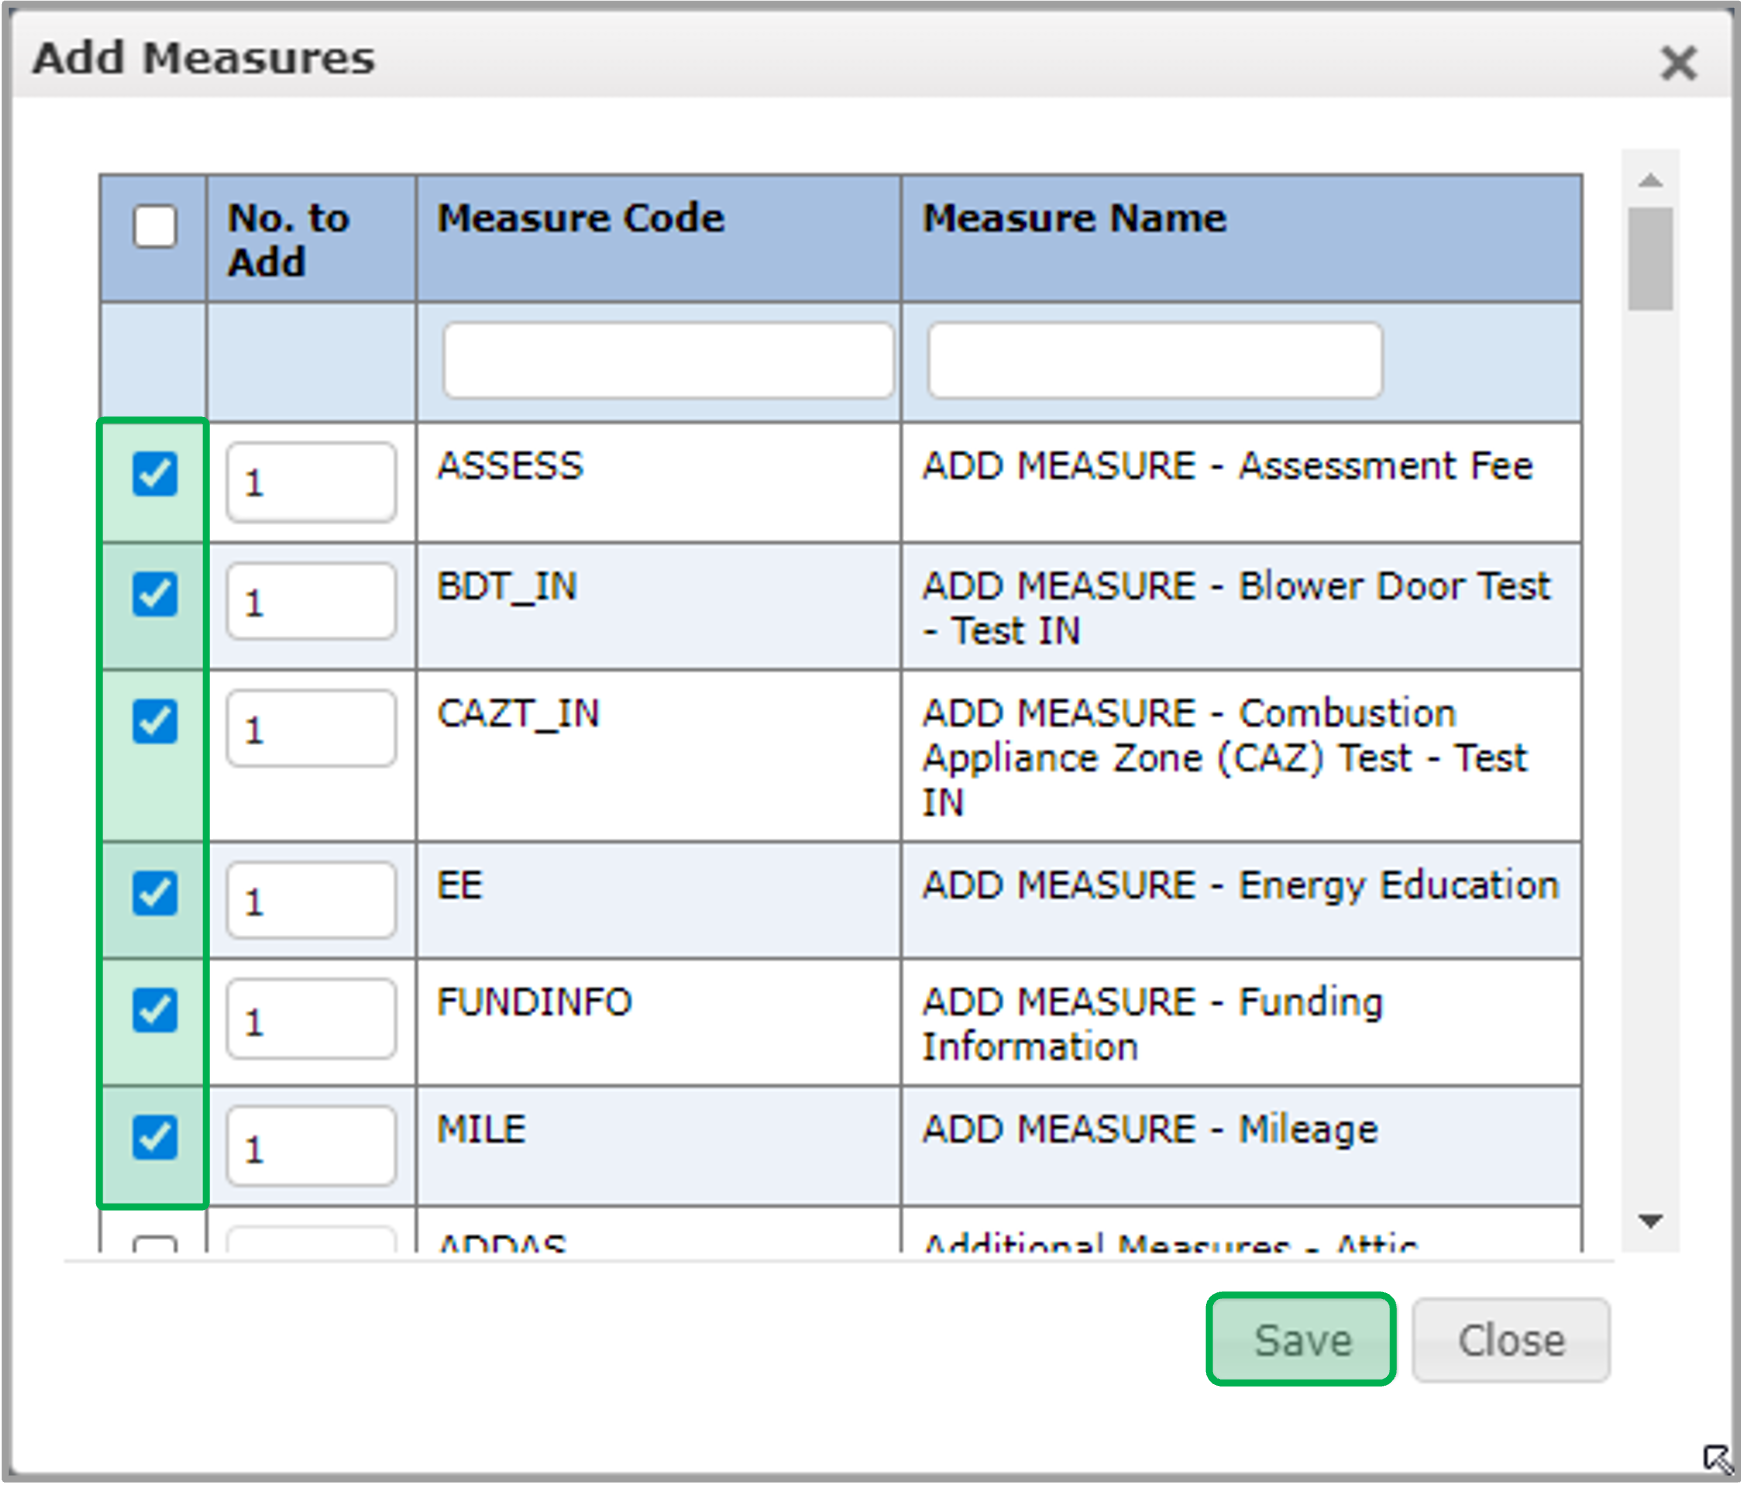
On the Measures tab, click the Add Measures button. The Add Measures dialog will open. | Expand |
|---|
| 
|
|
| UI Step |
|---|
To select one or more measures to add to the step, check the box in the left-hand column. To add the selected measures to the step, click the Save button in the dialog. | Tip |
|---|
If you increase the No. to Add value after selecting the measure, the system will add that many unique instances of the measure to the Add Measure step. |
| Expand |
|---|
| 
|
|
| UI Step |
|---|
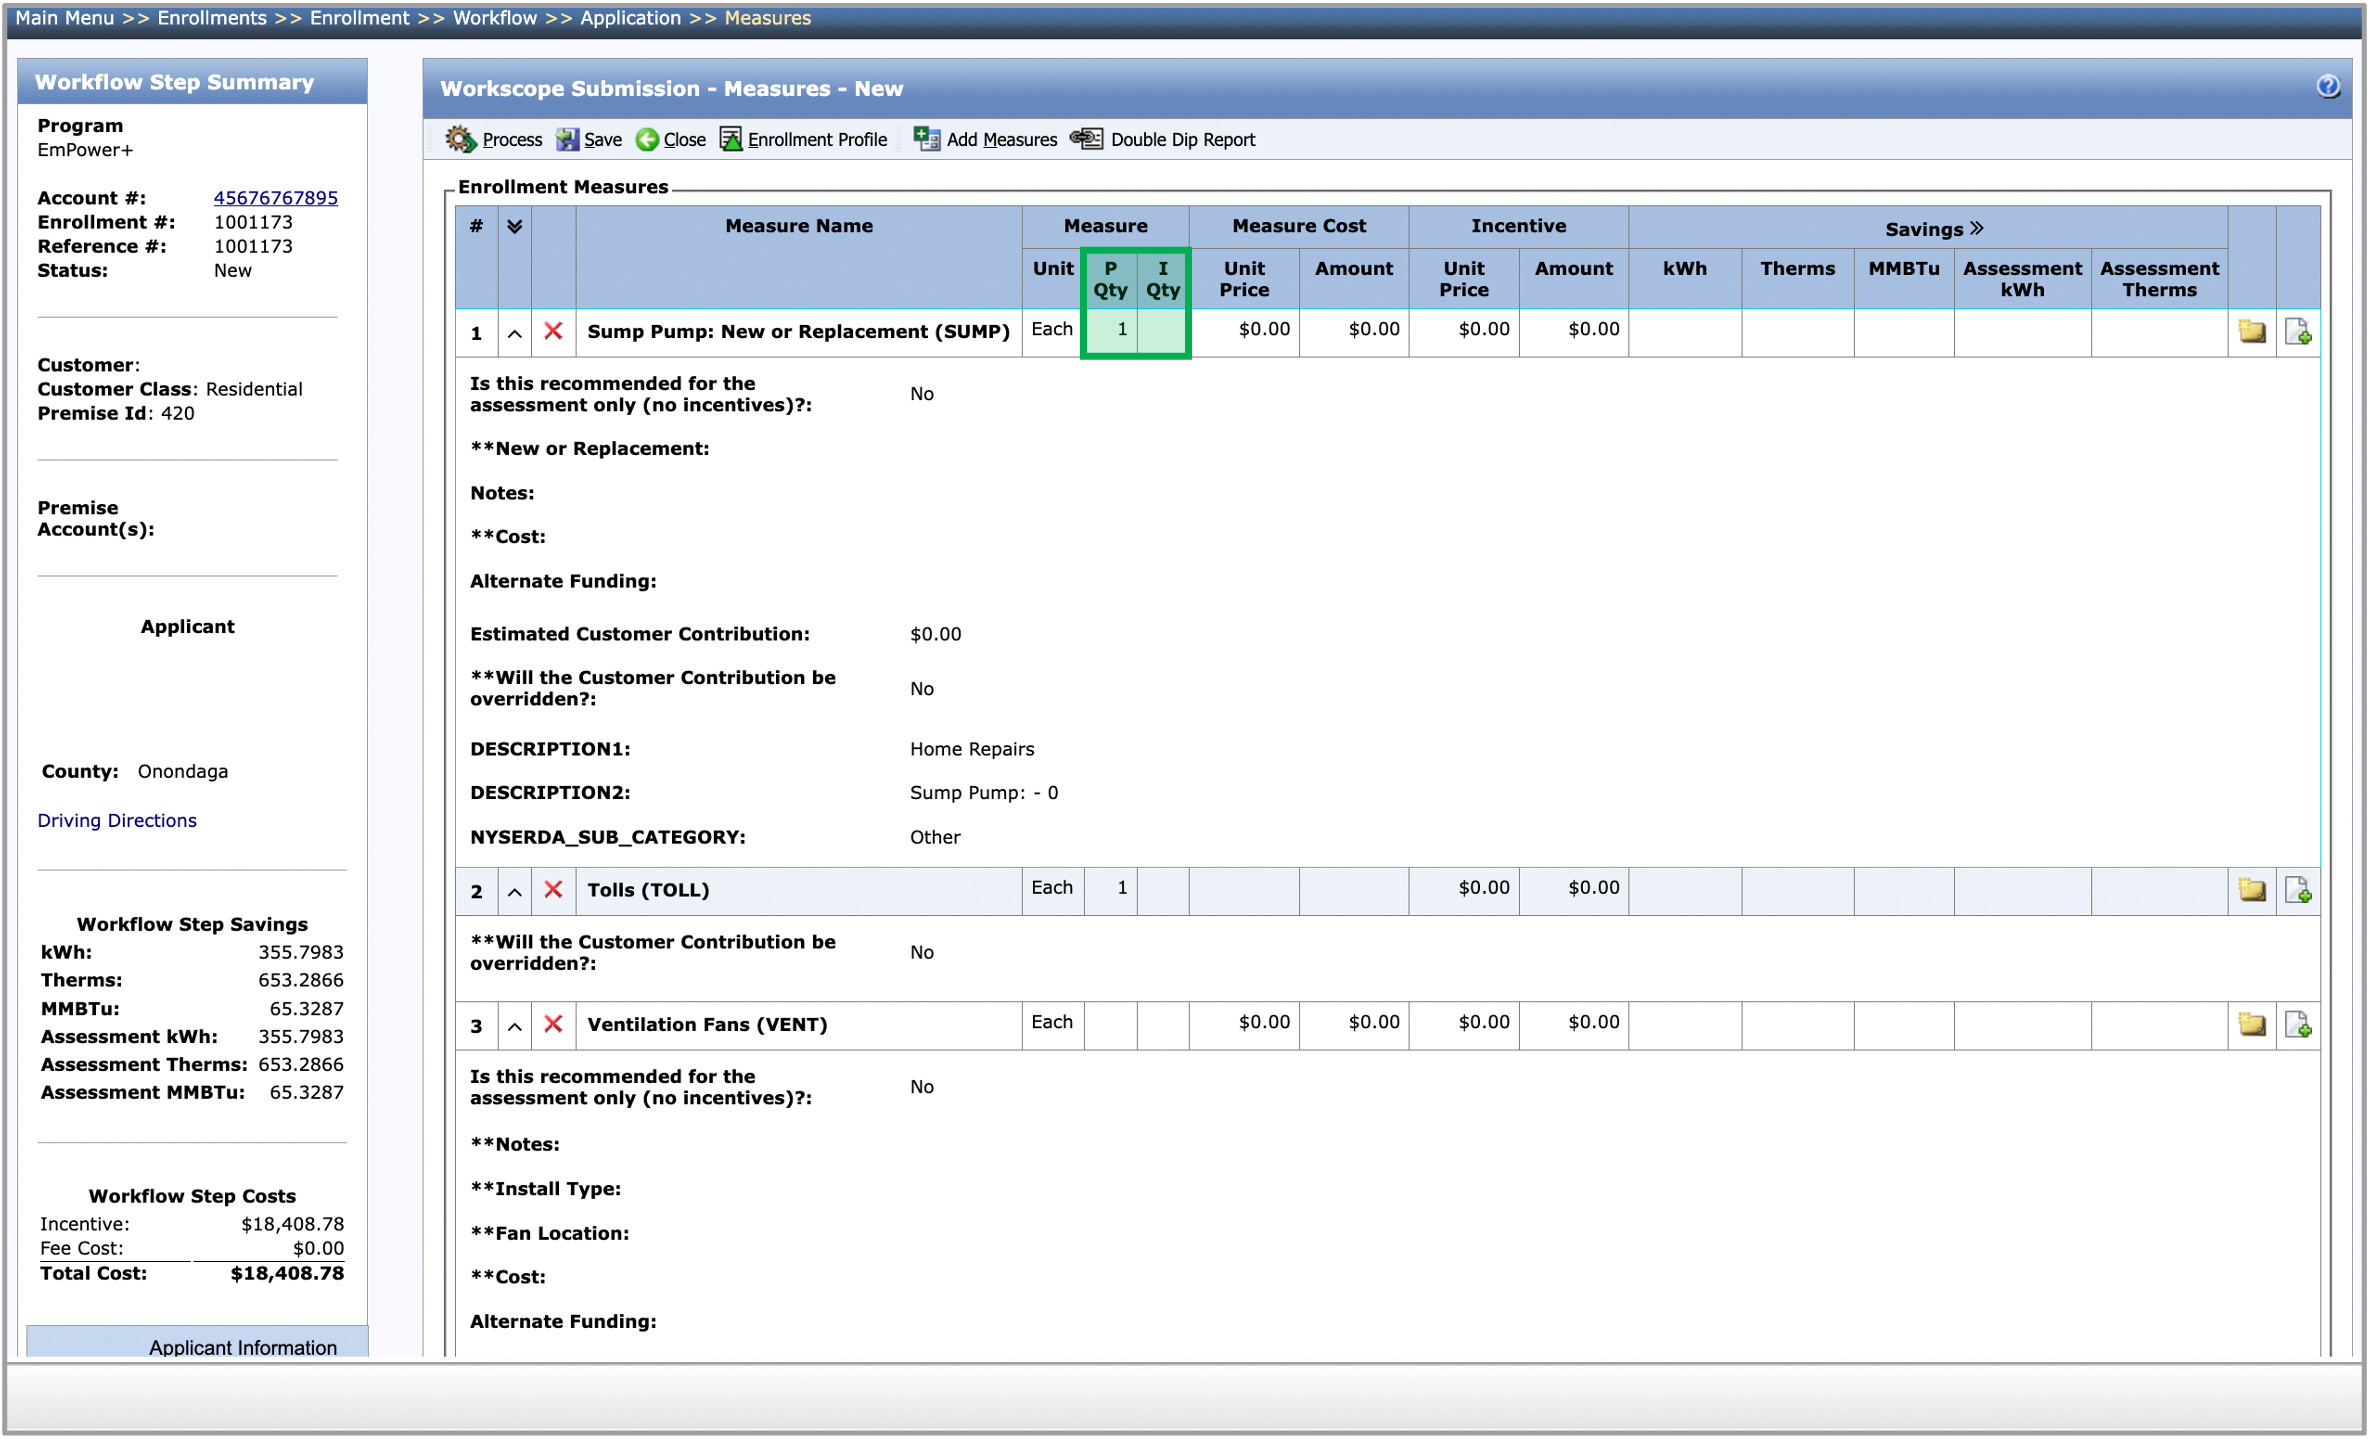
After you add one or more measures to the step, enter each measure’s P Qty (planned quantity) or I Qty (installed quantity) if it is not prepopulated. Then, click anywhere on the section to complete the data entry fields for each measure. | Tip |
|---|
Required fields are denoted with **. After all the measures are added and all the data entry fields are filled out, the Appliance Request step can be processed. |
| Expand |
|---|
| 
|
|
| UI Step |
|---|
After all the measures are added and all the data entry fields are filled out, the Assessment Submission step can be processed. Click the Process button at the top of the Measures tab or the Applicant Information tab. | Tip |
|---|
If there are any missing fields, a popup will appear notifying you of what is missing. |
|
| UI Step |
|---|
Once all of the required fields are filled out, move on the to the Reports tab as everything will be saved automatically in Measures. |
|
|
|
|


