Versions Compared

Key

  • This line was added.
  • This line was removed.
  • Formatting was changed.


Aura - Title
color#002d72
textAlignleft
fontSize28
lineHeight28
cloudTextDemo Title
tagh1
fontWeightbold
Participating Contractors: Appliance Enrollments
Aura - Divider
serializedStyles{"alignment":{"horizontal":"start"},"icon":{"name":"faPaperPlane","color":"#333","size":24},"text":{"color":"#333","fontSize":14,"textAlign":"left","fontWeight":"bold","text":"Aura Divider"},"border":{"top":false,"right":false,"bottom":true,"left":false,"color":"#002d72","style":"solid","width":2},"size":{}}
typeregular
Info
iconfalse

Introduction Placeholder


Appliance Request

Aura - Tab Group
settings{"generalSettings":{"tabSpacing":0,"tabWidth":40,"tabHeight":40,"direction":"vertical"},"activeSettings":{"backgroundColor":{"color":"#002d72"},"text":{"fontSize":16,"color":"#fff","textAlign":"left","fontWeight":"normal"}},"inactiveSettings":{"backgroundColor":{"color":"#f4f5f7"},"text":{"fontSize":16,"color":"#5e6c84","textAlign":"left","fontWeight":"normal"}},"contentSettings":{"backgroundColor":{"color":"#fff"},"border":{"style":"solid","width":2,"top":false,"bottom":false,"left":true,"right":false,"color":"#002d72"},"padding":{"top":10,"right":10,"bottom":10,"left":10}},"hoverSettings":{"backgroundColor":{"color":"#0073a4"},"text":{"fontSize":16,"color":"#ffffff","textAlign":"left","fontWeight":"normal"}}}
tab1


Aura - Tab
titleApplicant Information


Panel
borderColor#002D72
bgColor#F3F4F9
titleColor#ffffff
borderWidth1
titleBGColor#002D72
borderStylenone
titleApplicant Information


Info

This tab will be prepopulated with the information on the Customer/Account/Premise.

If you need to change the Customer Information, Installation Address, or Mailing Address, you can make those changes on the Applicant Information tab, then click Save.


UI Steps
sizesmall


UI Step

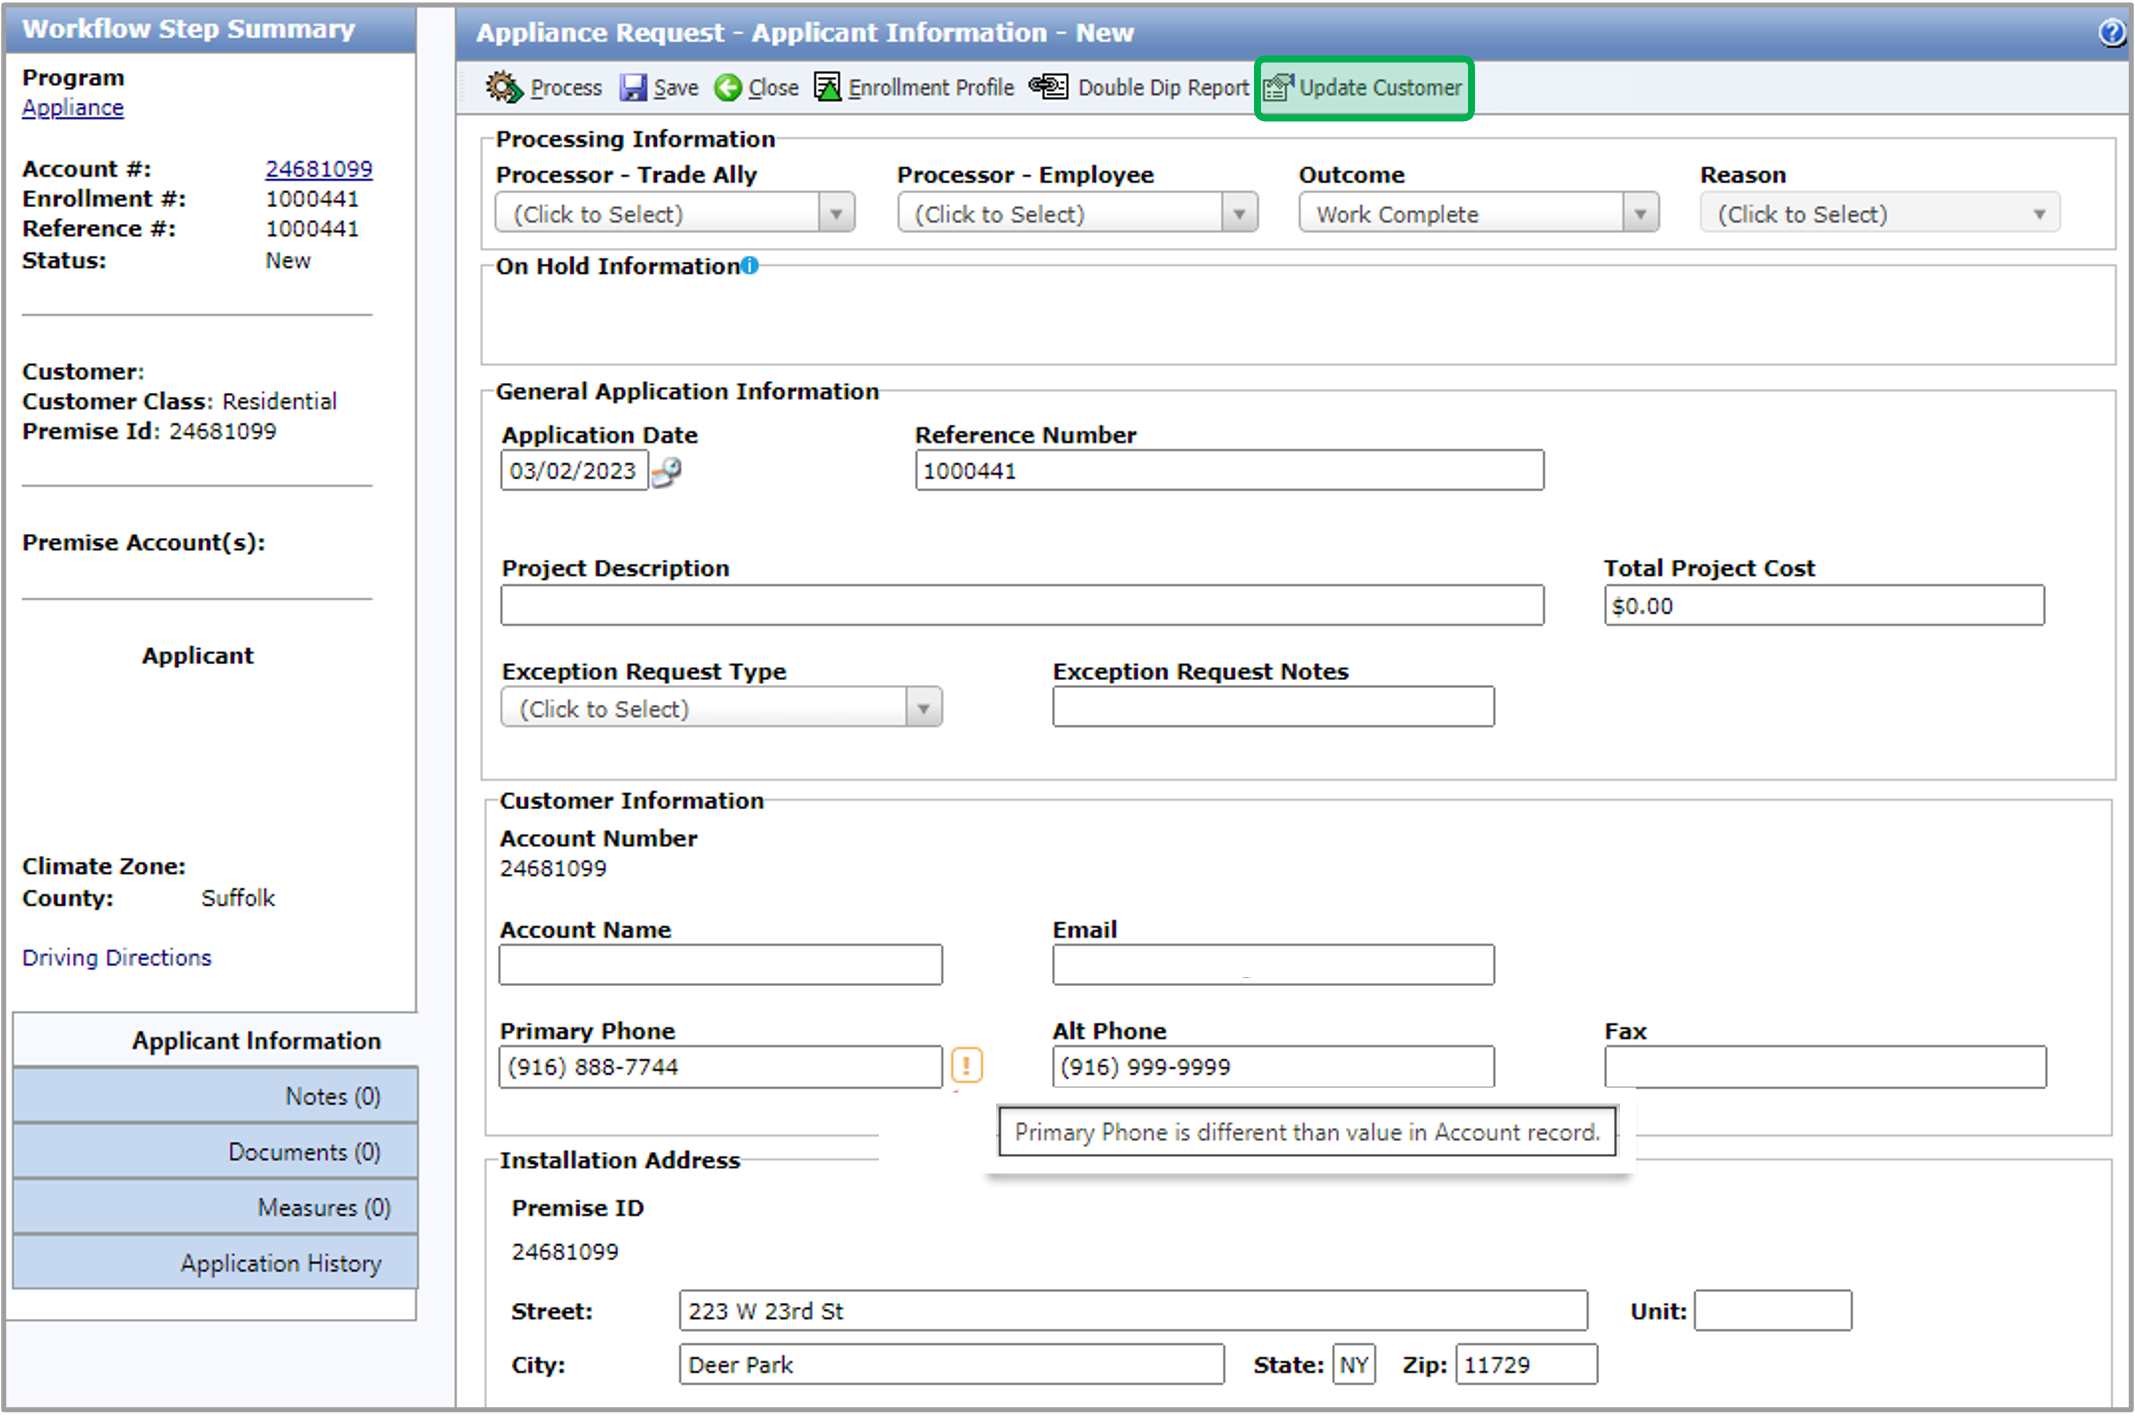
If the new value does not match the value that’s saved on the Customer/Account/Premise, an orange exclamation mark will be displayed next to it. If you hover over the exclamation mark, a tooltip will be displayed indicating that the values are different. You can click the Update Customer button to update the value that’s saved on the Customer/Account/Premise.


UI Step

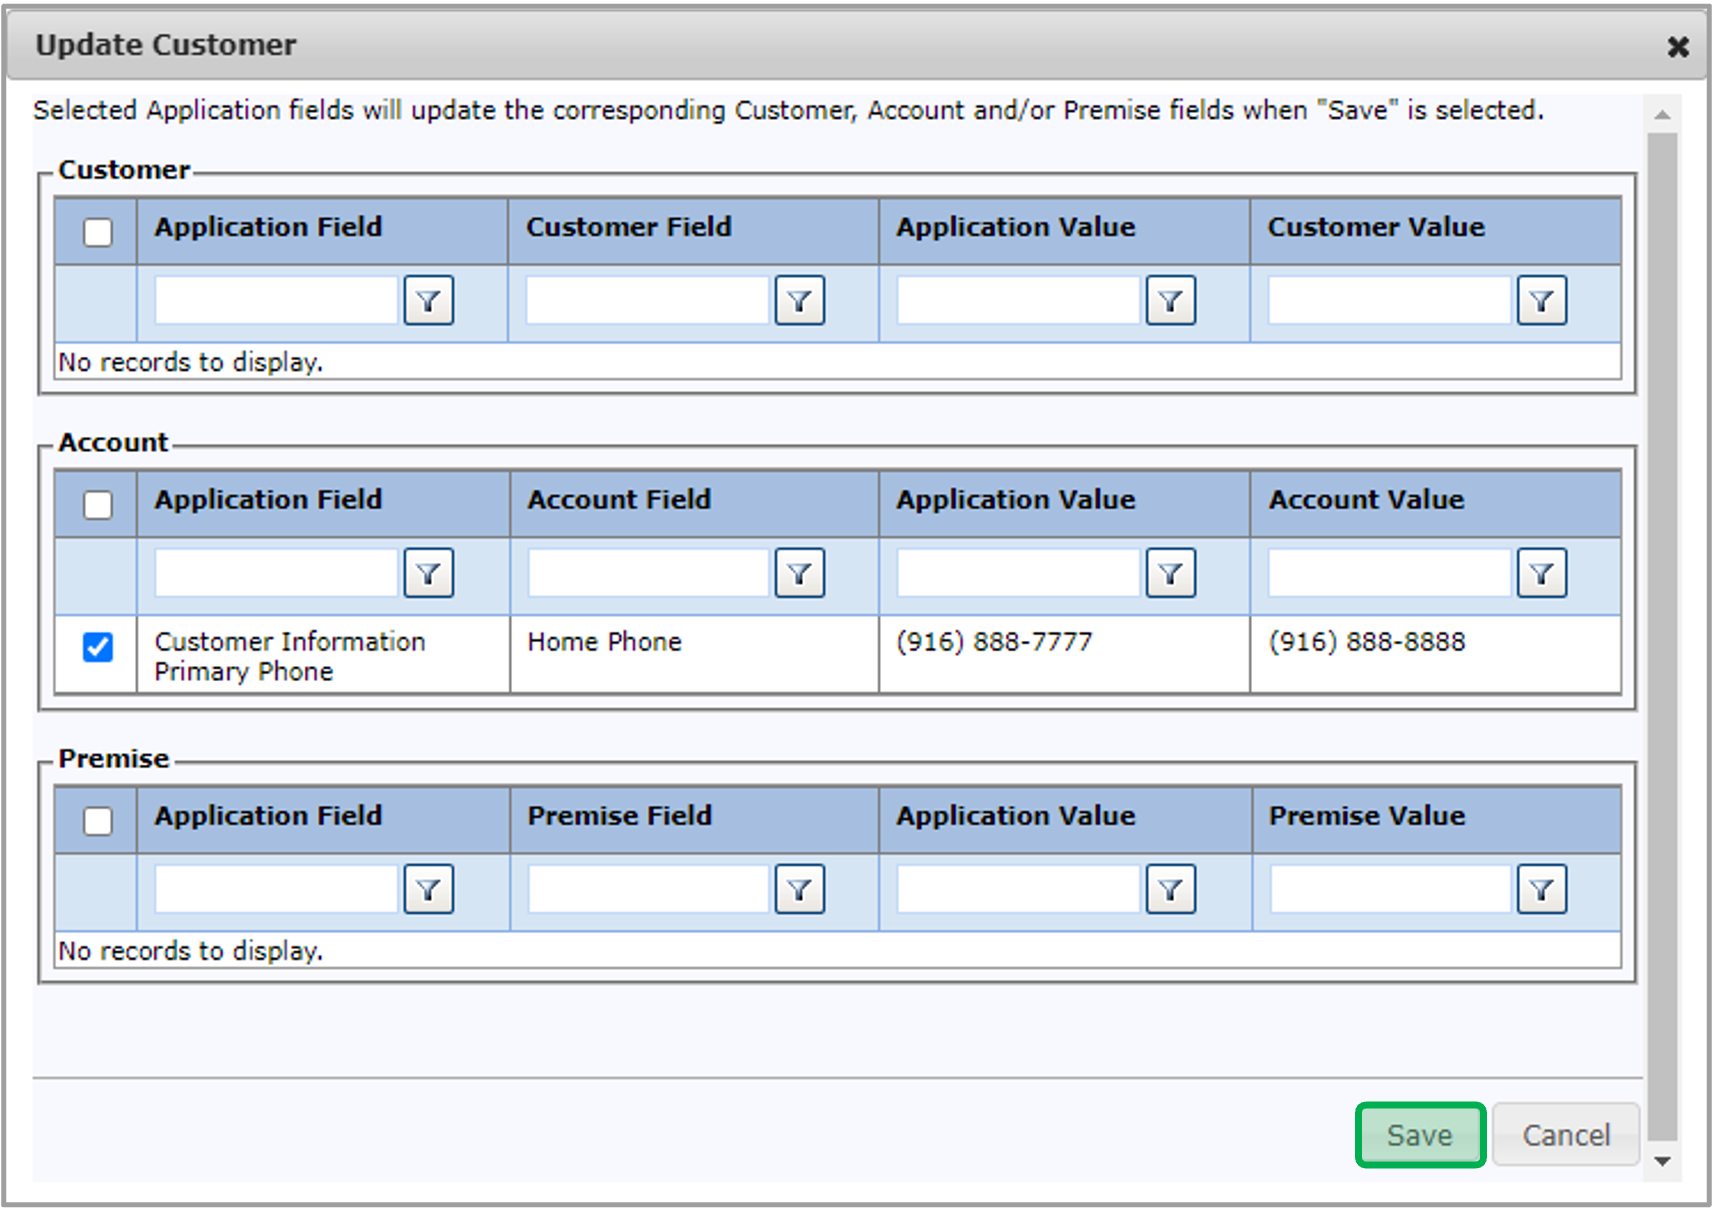
When you click the Update Customer button, the Update Customer dialog will open, displaying every value on the Appliance Request step that is different than the value saved in the corresponding field on the Customer/Account/Premise. All these fields will be checked by default.

Expand
titlescreenshot

Image Added


UI Step

When finished, click Save in the dialog. The system will update the checked Customer/Account/Premise fields for the values to match the Appliance Request step.

Expand
titlescreenshot

Image Added


UI Step

Back on the Applicant Information page, the Primary Trade Ally on the Appliance Request step will default to the Trade Ally and Employee associated with the user that created the enrollment. To change the Trade Ally to a Contractor/Vendor, click the Trade Ally Name Hyperlink.

Expand
titlescreenshot


UI Step

If you click the Trade Ally Name hyperlink, the Add Trade Ally dialog will open. Select the correct Contractor/Vendor and Employee in the Trade Ally and Employee dropdowns, and then click Save.

Expand
titlescreenshot

Image Added


Aura - Tab
titleNotes


Panel
borderColor#002D72
bgColor#F3F4F9
titleColor#ffffff
borderWidth1
titleBGColor#002D72
borderStylenone
titleNotes


Info

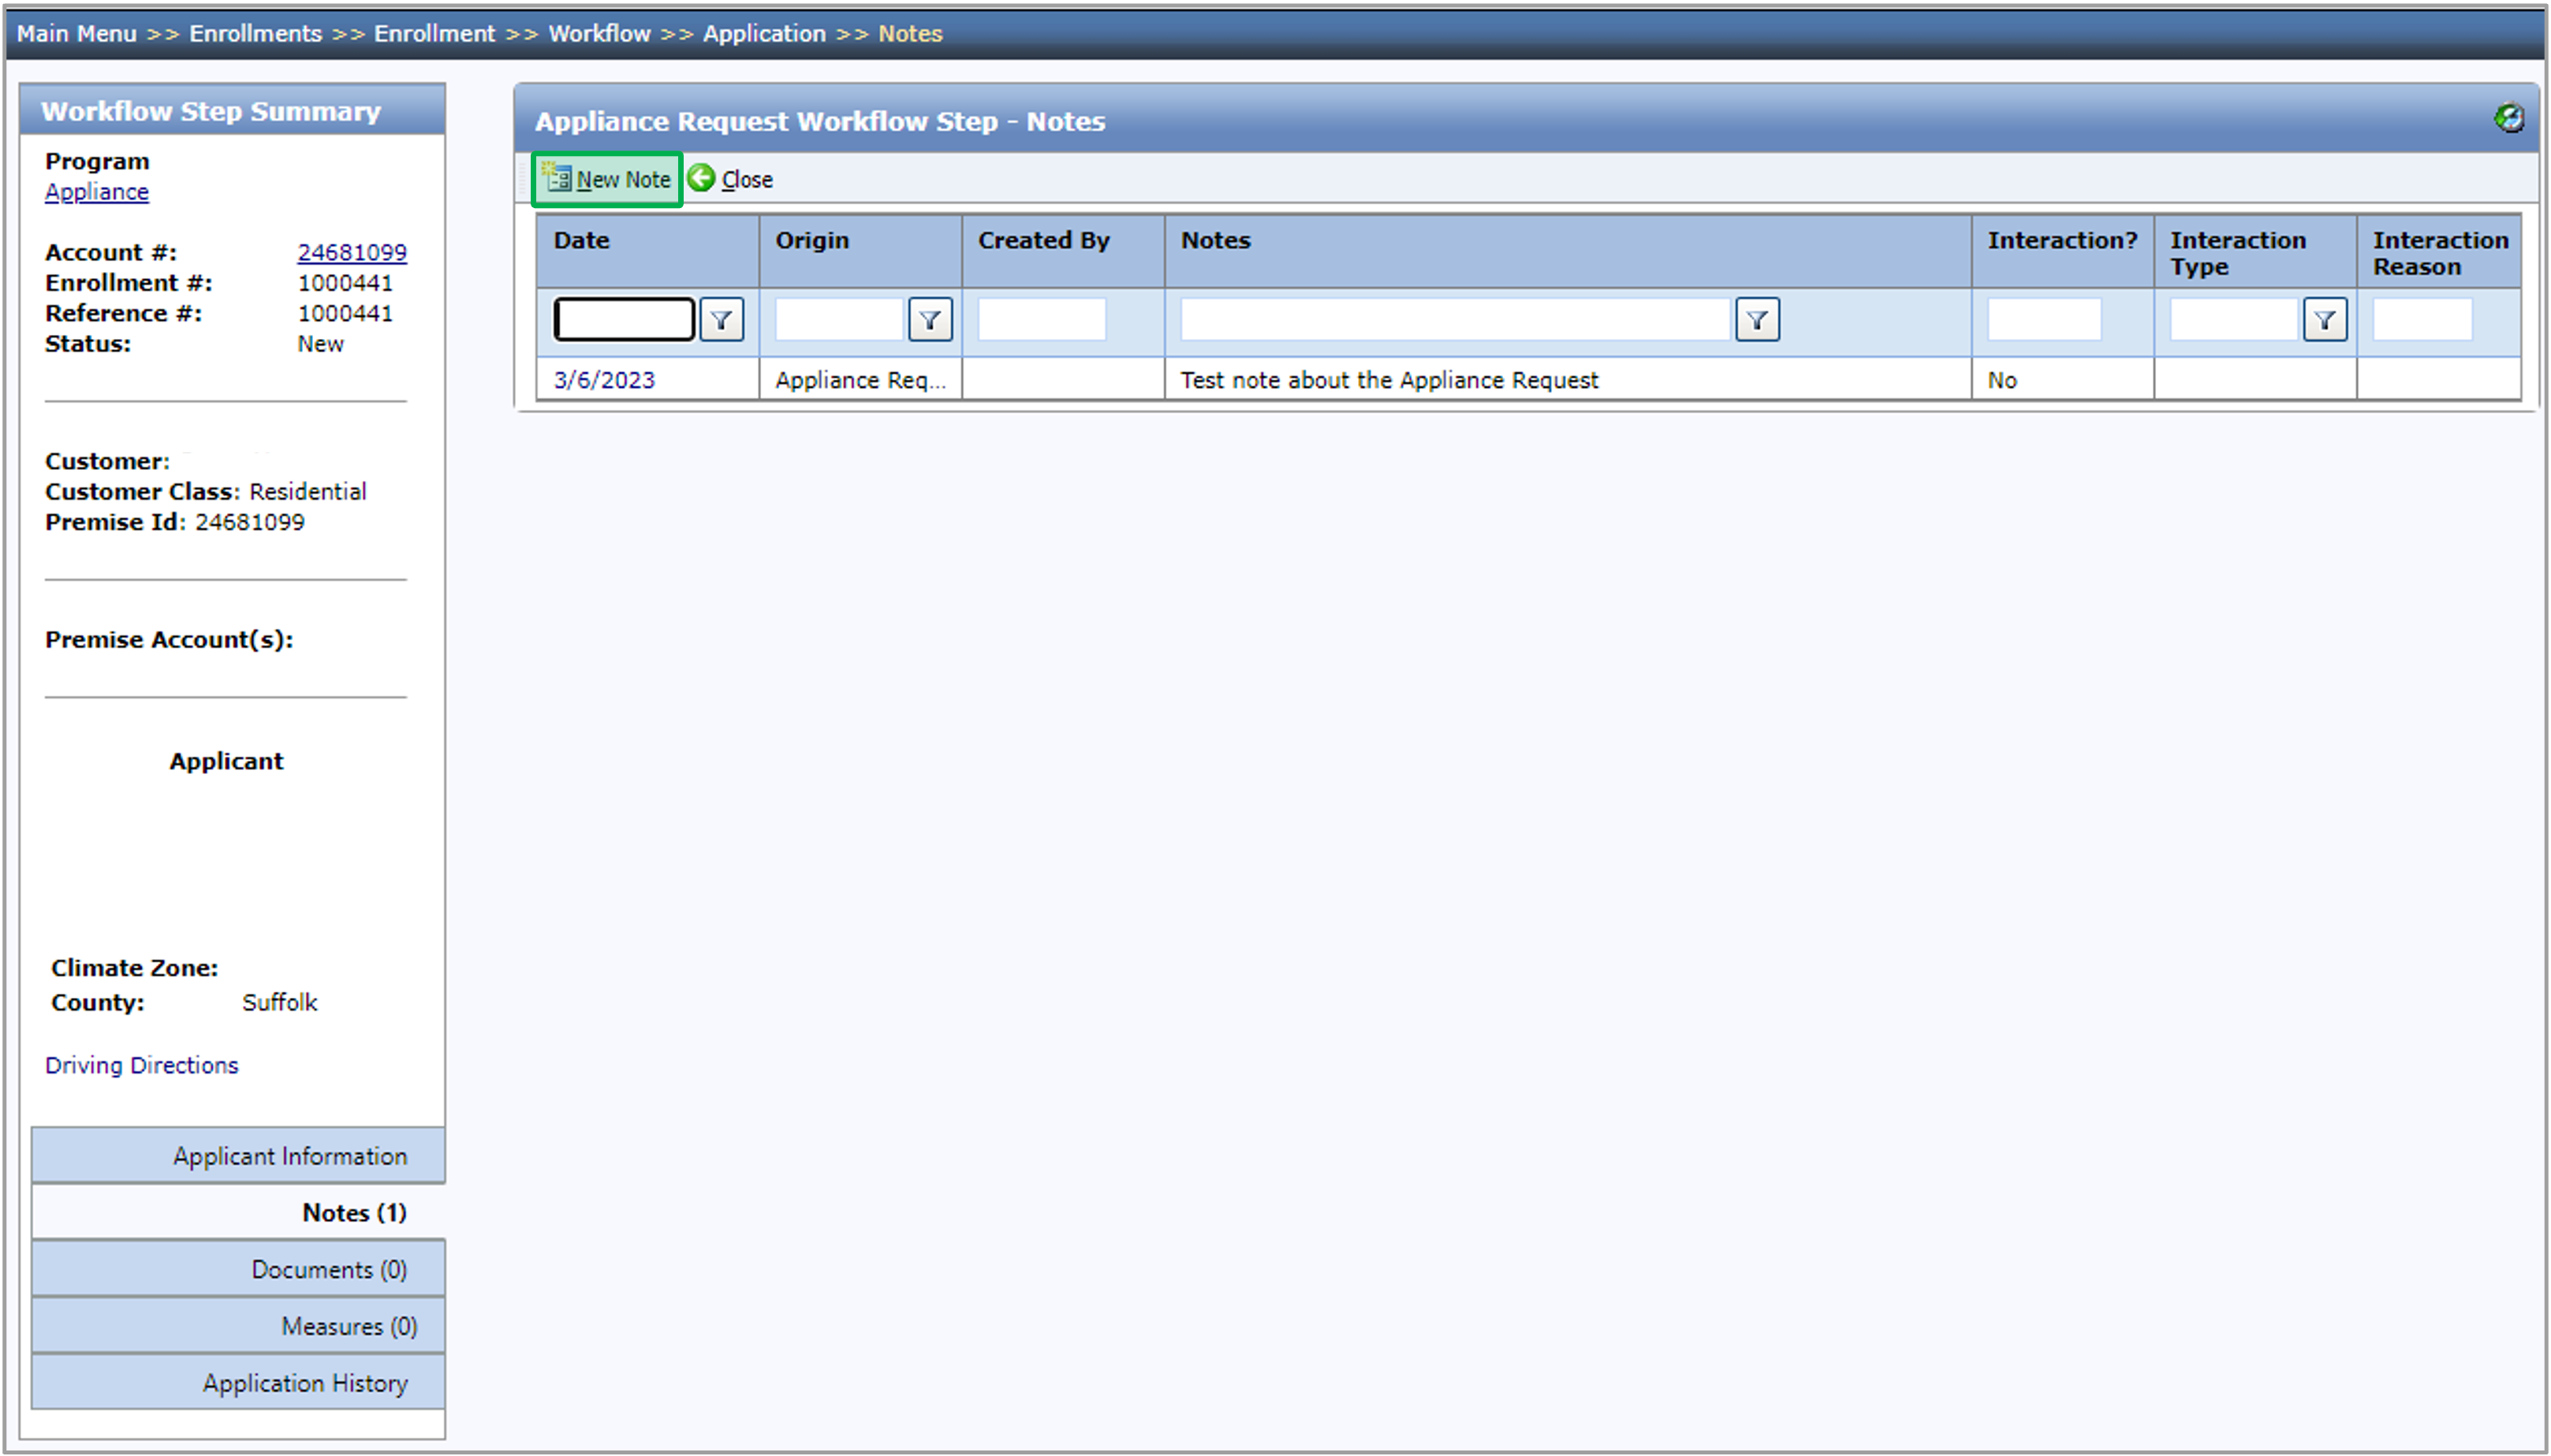
The following Notes will be displayed on the Notes tab:

  • The Notes that were added to this workflow step.
  • The Notes that were added to a different workflow step on the Appliance enrollment that the user has access to.
  • The Notes that were added to a different workflow step on the Appliance enrollment that the user does not have access to as long as the Note’s Who can view this note? field is set to Users with access to this enrollment.


UI Steps
sizesmall


UI Step

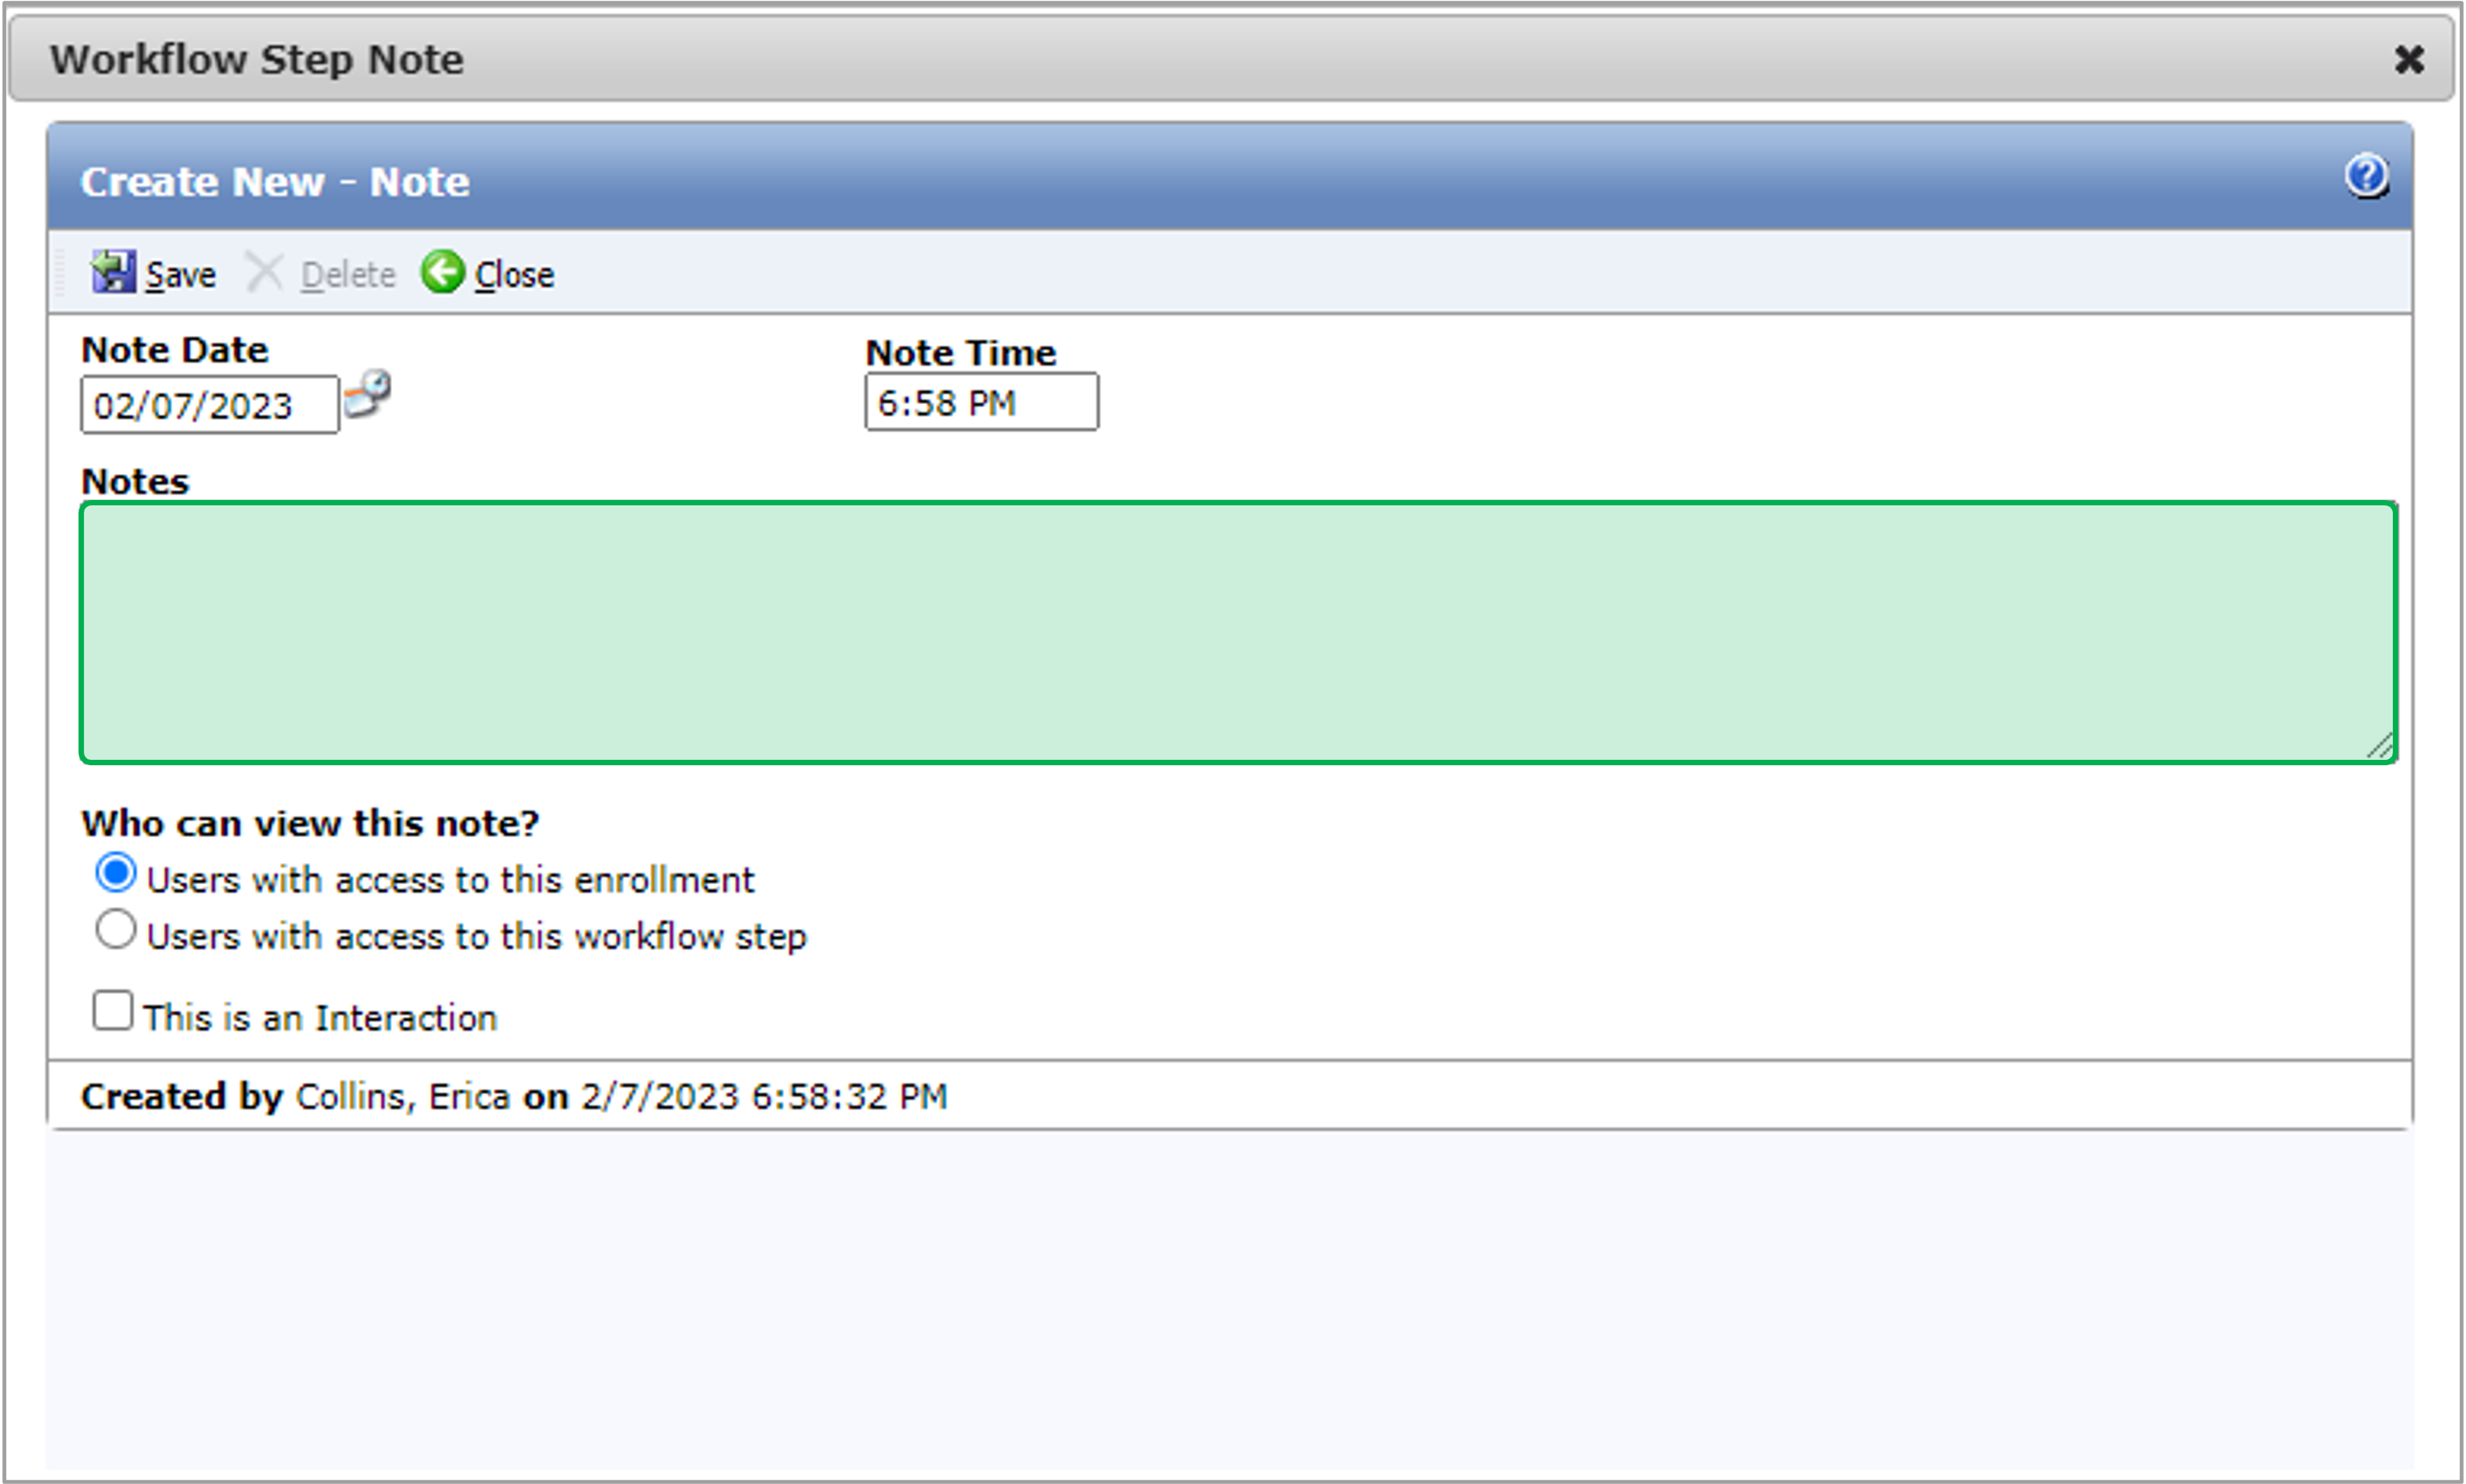
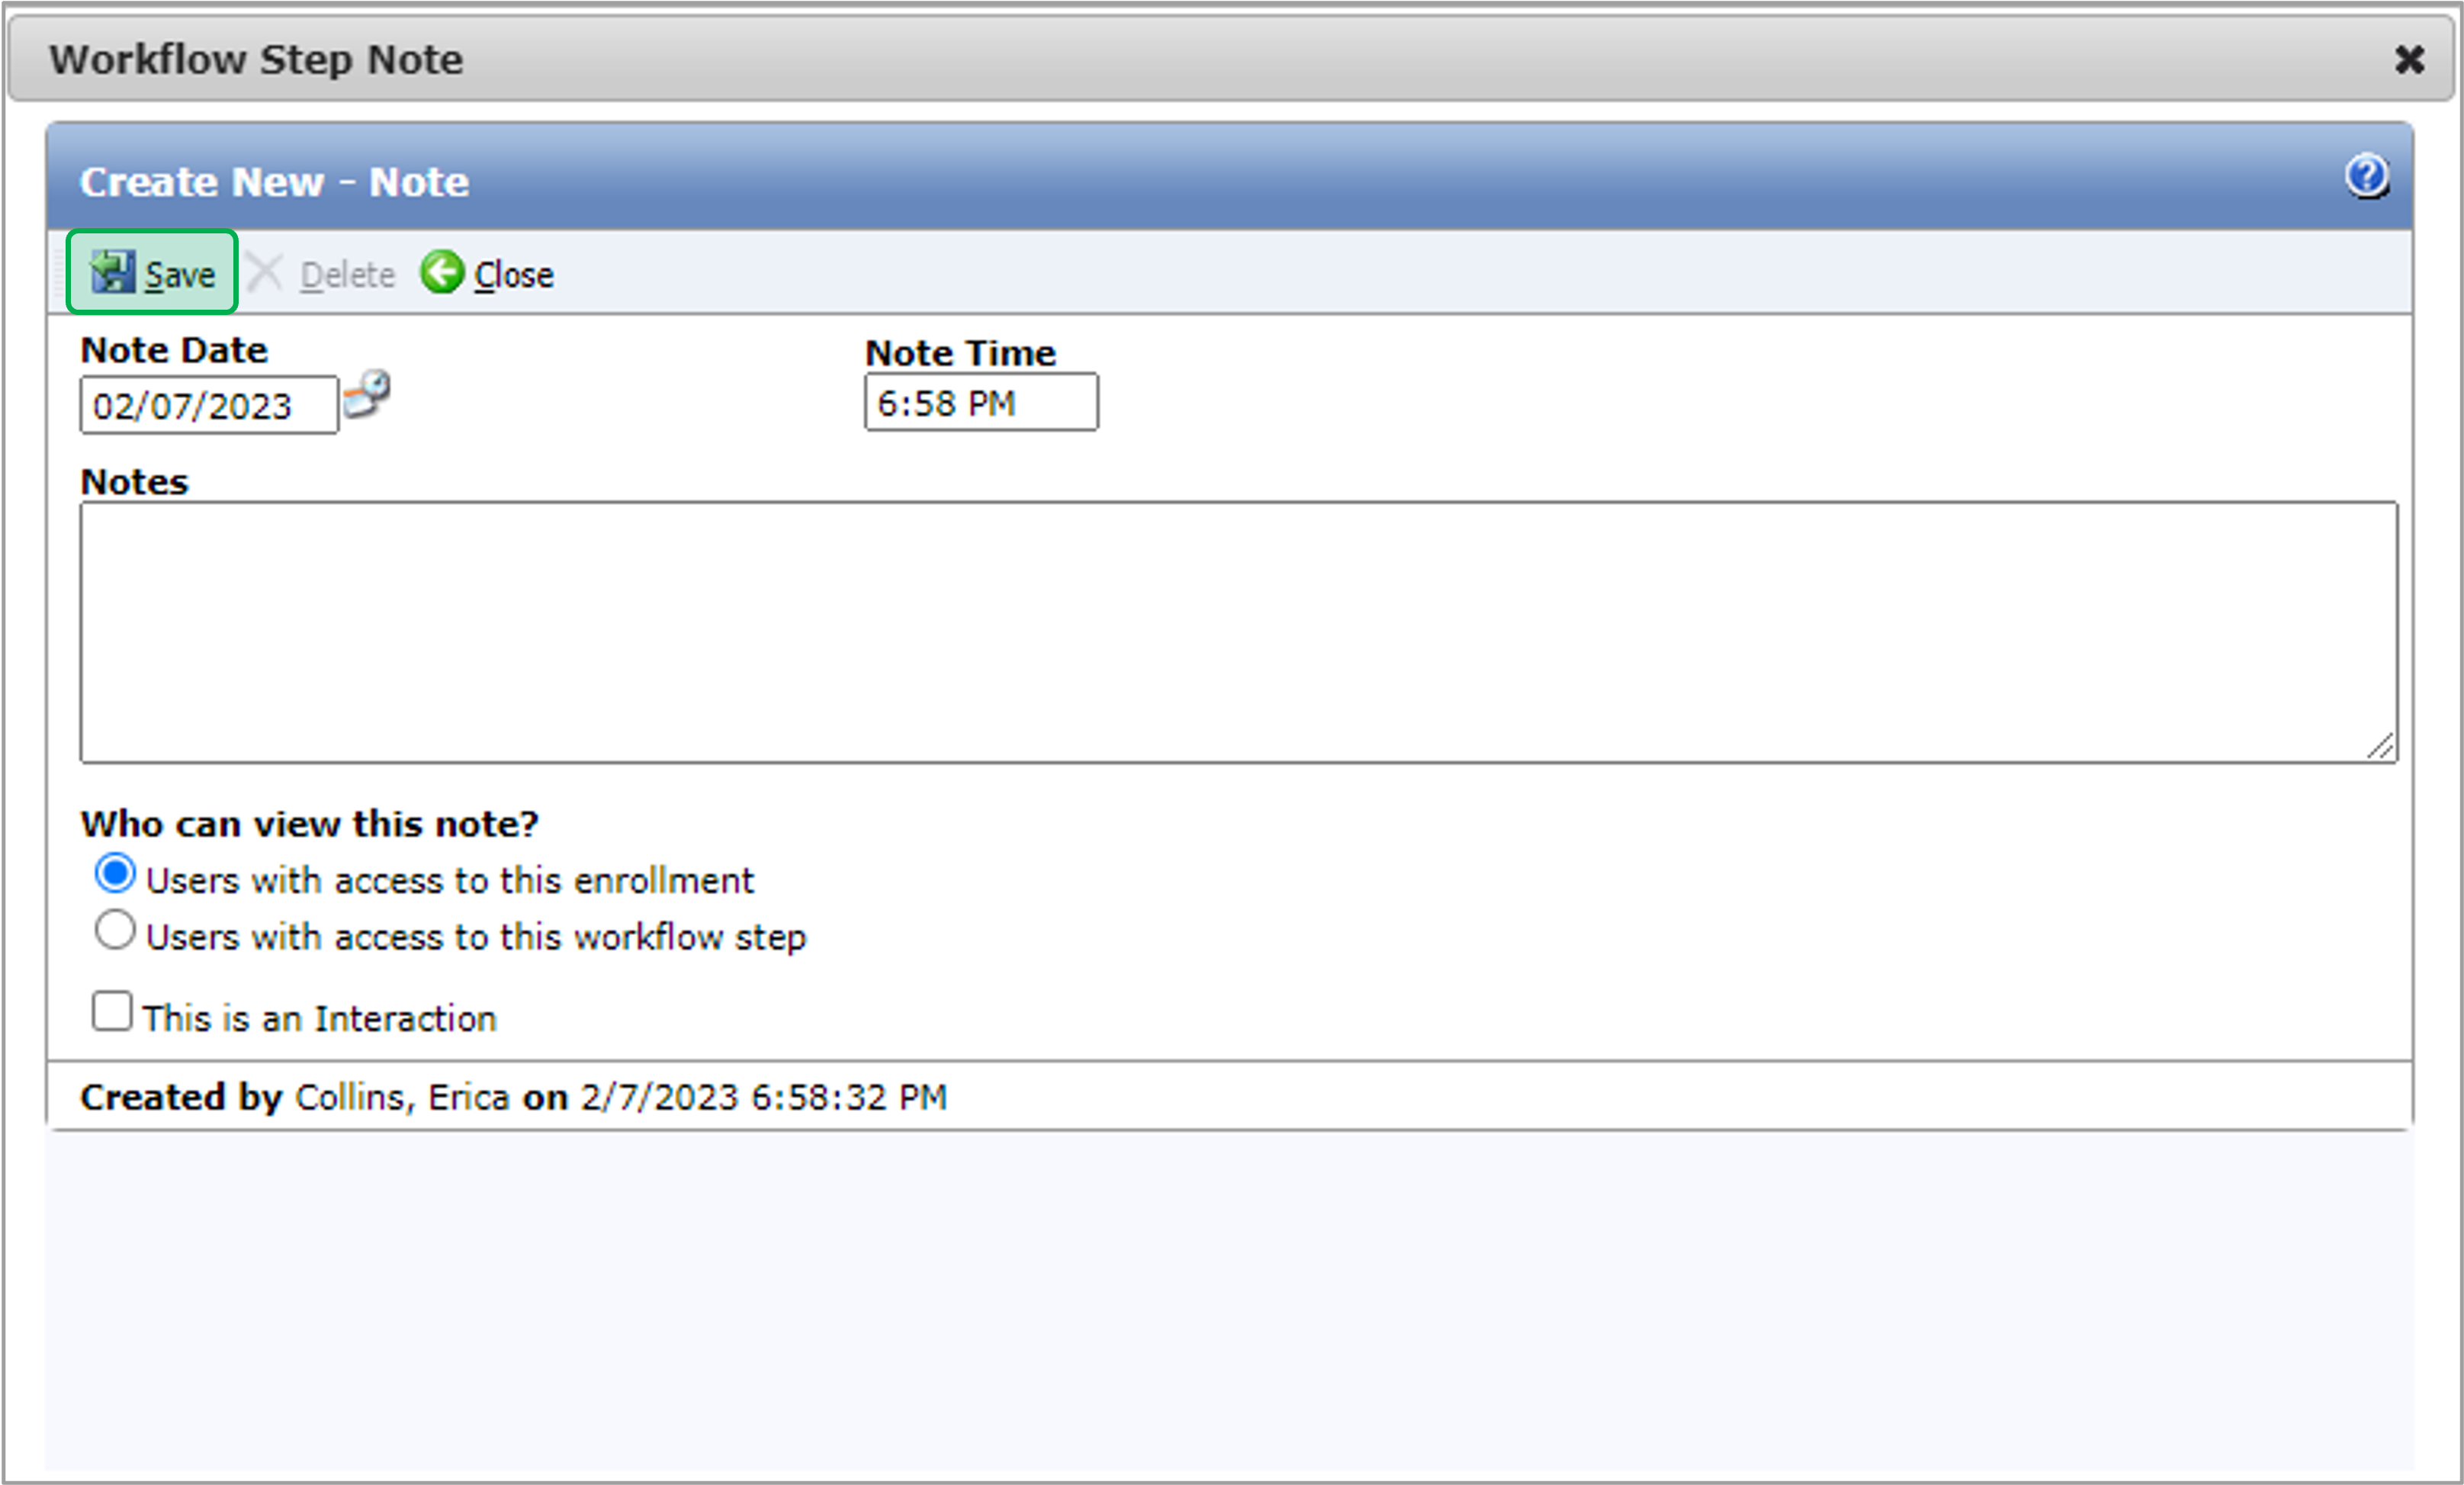
To add a new note, click the New Note button. A new Note dialog will open.

Expand
titlescreenshot

Image Added


UI Step

Fill in the Notes field. 

Tip

The Note Date and Note Time fields will automatically populate with the date and time the user clicked New Note, but the user will have the ability to change the prepopulated values.


Expand
titlescreenshot

Image Added


UI Step

The Who can view this note? field will default to Users with access to this enrollment.

Tip

If a user changes the default value to Users with access to this workflow step, users who do not have access to the step that the Note originated from will not be able to see the Note on the steps that they can access or on the Enrollment Profile - Notes page.


UI Step

Click Save to save the new Note. 

Tip

After you click Save, if your user does not belong to a group with the Workflow Step Notes - Edit role, they will not be able to edit the Note.

If your user does not belong to a group with the Workflow Step Notes - Delete role, they will not be able to delete the Note.


Expand
titlescreenshot

Image Added


Aura - Tab
titleDocuments


Panel
borderColor#002D72
bgColor#F3F4F9
titleColor#ffffff
borderWidth1
titleBGColor#002D72
borderStylenone
titleDocuments


Info

The Documents tab asks you to upload the required Document Types with red exclamation mark under the Required column.


UI Steps
sizesmall


UI Step

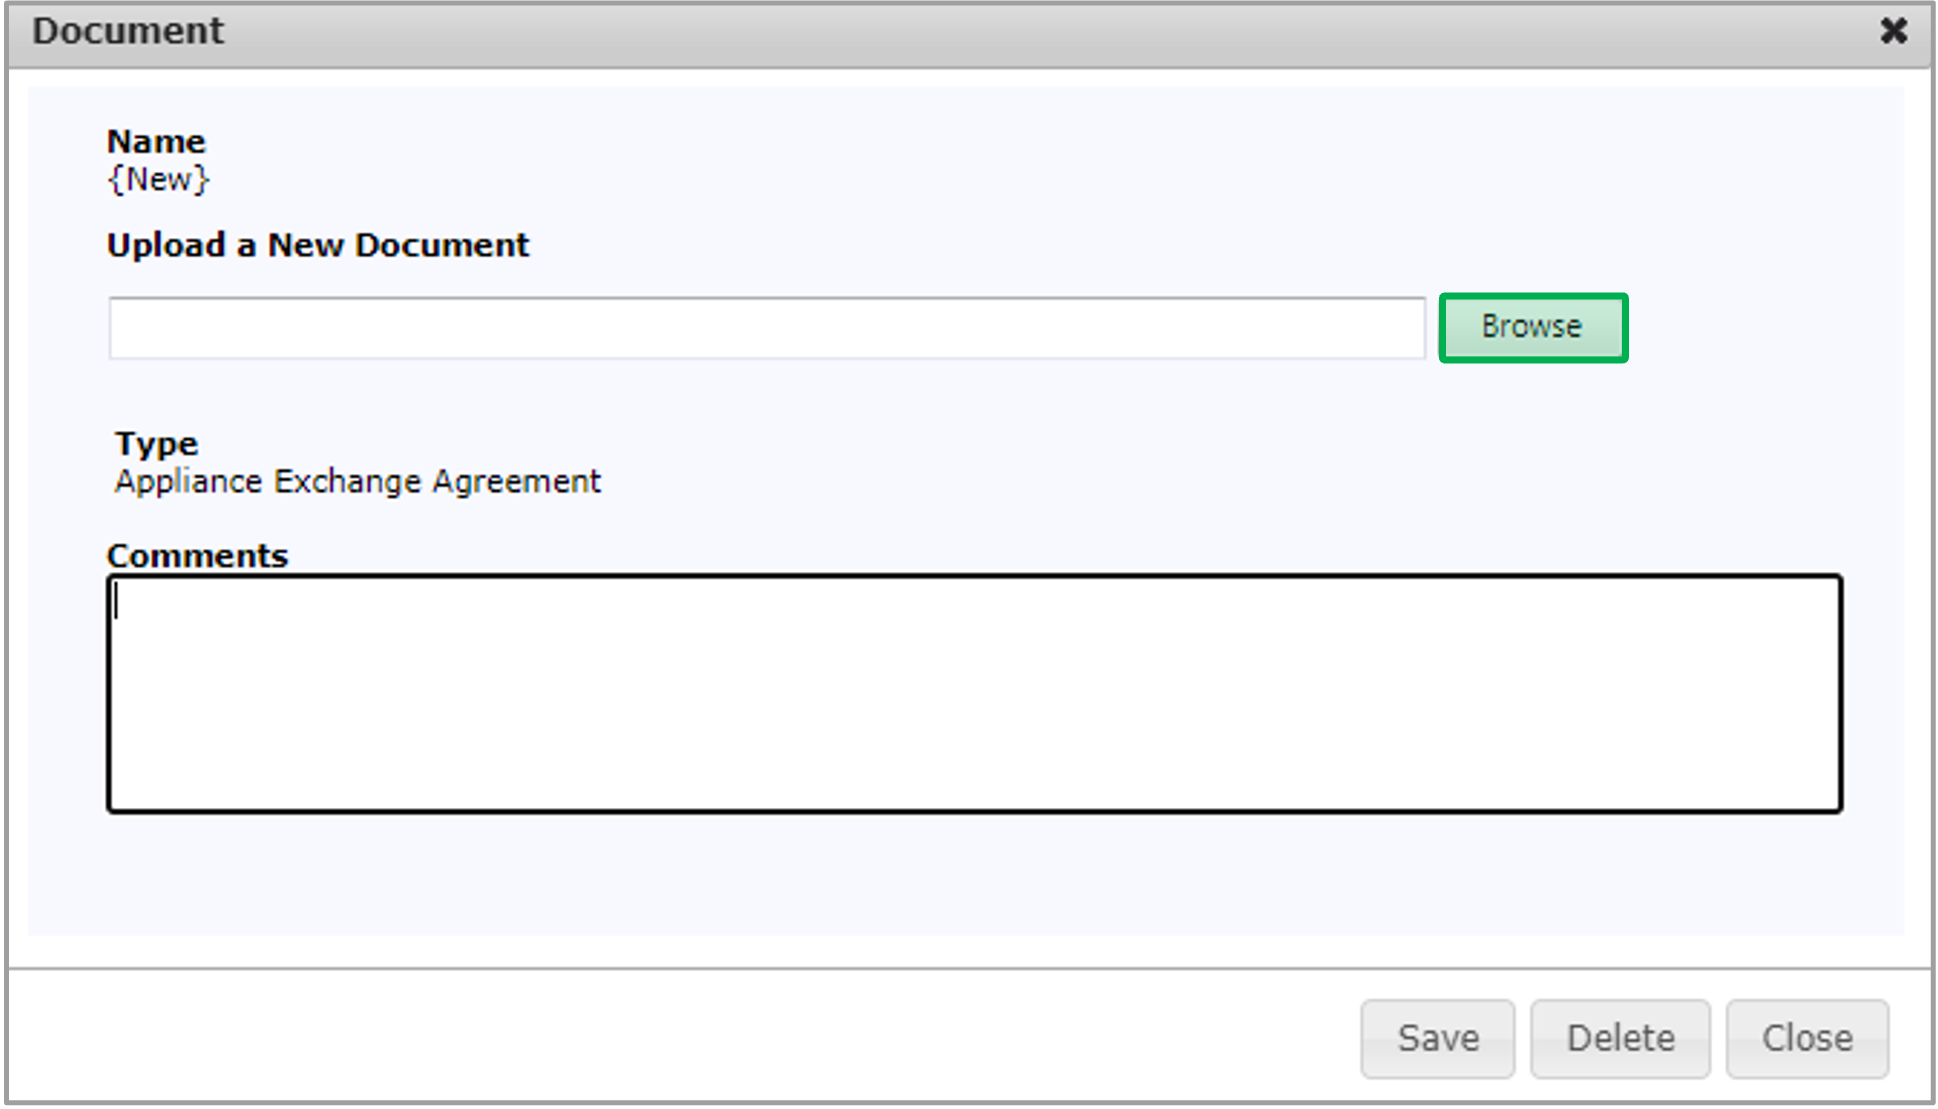
To upload a Document, click the Edit button icon in that Document Type’s row, the Document dialog will open.

Expand
titlescreenshot

Image Added


UI Step

Click Browse to select a file to upload.

Tip

After you’ve selected a file, you can remove it by clicking the x Remove button.


Expand
titlescreenshot

Image Added


UI Step

After the file is uploaded for the Document Type, click Save and then click Close to upload the file and close the dialog.

Expand
titlescreenshot

Image Added


UI Step

To view an uploaded document, click the Document Name Hyperlink.

Expand
titlescreenshot

Image Added


UI Step

If you want to upload more than one Document Type at the same time, click the New button at the top of the Documents tab.

Expand
titlescreenshot

Image Added


ui-step

The Upload Documents dialog will open. You will need to select the Document Type for every file you choose in the Upload Documents dialog. When finished, click Save.

Expand
titlescreenshot

Image Added


Aura - Tab
titleMeasures


Panel
borderColor#002D72
bgColor#F3F4F9
titleColor#ffffff
borderWidth1
titleBGColor#002D72
borderStylenone
titleMeasures


ui-steps
sizesmall


UI Step


UI Step


UI Step


HTML
<style type="text/css">  
#title-text { display: none;}
.panelContent {
display: none;
}
.aura-tab-content {
margin-top: 0px!important;
padding-top: 0px!important;
}
.panel, .alertPanel, .infoPanel {
margin-top: 0px!important;
}
.panelHeader {
font-size: 20px;
padding-top: 5px!important;
padding-bottom: 5px!important;
}
</style>